Getting Information About Your Git Repository With C#

During a hackathon not so long ago, I wanted to incorporate some source control data into my .NET assembly version information for the purposes of troubleshooting installations, making it easier for people to report the code in which they found a bug, and making it easier for people to find the code in which a bug was found1. The plan was to automatically encode the branch, the commit hash, and whether there were local commits or local changes into the `AssemblyConfiguration` attribute of my assemblies during the build.

At the time, I hacked together the `RepositoryInformation` class below that wraps the command line tool to extract the required information. This class supported detecting if the directory is a repository, checking for local commits and changes, getting the branch name and the name of the upstream branch, and enumerating the log. Though it felt a little wrong just wrapping the command line (and seemed pretty fragile too), it worked. Unfortunately, it was dependent on git being installed on the build system; I would prefer the build to get everything it needs using package management like NuGet and npm2.

class RepositoryInformation : IDisposable
{
    public static RepositoryInformation GetRepositoryInformationForPath(string path, string gitPath = null)
    {
        var repositoryInformation = new RepositoryInformation(path, gitPath);
        if (repositoryInformation.IsGitRepository)
        {
            return repositoryInformation;
        }
        return null;
    }
    
    public string CommitHash
    {
        get
        {
            return RunCommand("rev-parse HEAD");
        }
    }
    
    public string BranchName
    {
        get
        {
            return RunCommand("rev-parse --abbrev-ref HEAD");
        }
    }
    
    public string TrackedBranchName
    {
        get
        {
            return RunCommand("rev-parse --abbrev-ref --symbolic-full-name @{u}");
        }
    }
    
    public bool HasUnpushedCommits
    {
        get
        {
            return !String.IsNullOrWhiteSpace(RunCommand("log @{u}..HEAD"));
        }
    }
    
    public bool HasUncommittedChanges
    {
        get
        {
            return !String.IsNullOrWhiteSpace(RunCommand("status --porcelain"));
        }
    }
    
    public IEnumerable<string> Log
    {
        get
        {
            int skip = 0;
            while (true)
            {
                string entry = RunCommand(String.Format("log --skip={0} -n1", skip++));
                if (String.IsNullOrWhiteSpace(entry))
                {
                    yield break;
                }
                
                yield return entry;
            }
        }
    }
    
    public void Dispose()
    {
        if (!_disposed)
        {
            _disposed = true;
            _gitProcess.Dispose();
        }
    }
    
    private RepositoryInformation(string path, string gitPath)
    {
        var processInfo = new ProcessStartInfo
        {
            UseShellExecute = false,
            RedirectStandardOutput = true,
            FileName = Directory.Exists(gitPath) ? gitPath : "git.exe",
            CreateNoWindow = true,
            WorkingDirectory = (path != null && Directory.Exists(path)) ? path : Environment.CurrentDirectory
        };
        
        _gitProcess = new Process();
        _gitProcess.StartInfo = processInfo;
    }
    
    private bool IsGitRepository
    {
        get
        {
            return !String.IsNullOrWhiteSpace(RunCommand("log -1"));
        }
    }
    
    private string RunCommand(string args)
    {
        _gitProcess.StartInfo.Arguments = args;
        _gitProcess.Start();
        string output = _gitProcess.StandardOutput.ReadToEnd().Trim();
        _gitProcess.WaitForExit();
        return output;
    }
    
    private bool _disposed;
    private readonly Process _gitProcess;
}

If I were to approach this again today, I would use the LibGit2Sharp NuGet package or something similar3. Below is an updated version of `RepositoryInformation` that uses LibGit2Sharp instead of git command line. Clearly, you could forego any type of wrapper for LibGit2Sharp and I probably would if I were incorporating this into a bigger task like the one I originally had planned.

class RepositoryInformation : IDisposable
{
    public static RepositoryInformation GetRepositoryInformationForPath(string path)
    {
        if (LibGit2Sharp.Repository.IsValid(path))
        {
            return new RepositoryInformation(path);
        }
        return null;
    }
    
    public string CommitHash
    {
        get
        {
            return _repo.Head.Tip.Sha;
        }
    }
    
    public string BranchName
    {
        get
        {
            return _repo.Head.Name;
        }
    }
    
    public string TrackedBranchName
    {
        get
        {
            return _repo.Head.IsTracking ? _repo.Head.TrackedBranch.Name : String.Empty;
        }
    }
    
    public bool HasUnpushedCommits
    {
        get
        {
            return _repo.Head.TrackingDetails.AheadBy > 0;
        }
    }
    
    public bool HasUncommittedChanges
    {
        get
        {
            return _repo.RetrieveStatus().Any(s => s.State != FileStatus.Ignored);
        }
    }
    
    public IEnumerable<Commit> Log
    {
        get
        {
            return _repo.Head.Commits;
        }
    }
    
    public void Dispose()
    {
        if (!_disposed)
        {
            _disposed = true;
            _repo.Dispose();
        }
    }
    
    private RepositoryInformation(string path)
    {
        _repo = new Repository(path);
    }

    private bool _disposed;
    private readonly Repository _repo;
}

I have yet to use any of this outside of my hackathon work or this blog entry, but now that I have resurrected it from my library of coding exploits past to write about, I might just resurrect the original plans I had too. Whether that happens or not, I hope you found this useful or at least a little interesting; if so, or if you have some suggestions related to this post, please let me know in the comments.

  1. Sometimes, like a squirrel, you want to know which branch you were on []
  2. I had looked at NuGet packages when I was working on the original hackathon project, but had decided not to use one for some reason or another (perhaps the available packages did not do everything I wanted at that time) []
  3. PowerShell could be a viable replacement for my initial approach, but it would suffer from the same issue of needing git on the build system; by using a NuGet package, the build includes everything it needs []

Writing A Simple Slack Bot With Node slack-client

Last week, we held our first CareEvolution hackathon of 2015. The turn out was impressive and a wide variety of projects were undertaken, including 3D printed cups, Azure-based machine learning experiments, and Apple WatchKit prototypes. For my first hackathon project of the year, I decided to tinker with writing a bot for Slack. There are many ways to integrate custom functionality into Slack including an extensive API. I decided on writing a bot and working with the associated API because there was an existing NodeJS1 client wrapper, `slack-client`2. Using this client wrapper meant I could get straight to the functionality of my bot rather than getting intimate with the API and JSON payloads.

I ended up writing two bots. The first implemented the concept of `@here` that we had liked in HipChat and missed when we transitioned to Slack (they have `@channel`, but that includes offline people). The second implemented a way of querying our support server to get some basic details about our deployments without having to leave the current chat, something that I felt might be useful to our devops team. For this blog, I will concentrate on the simpler and less company-specific first bot, which I named `here-bot`.

The requirement for here-bot is simple:

When a message is sent to `@here` in a channel, notify only online members of the channel, excluding bots and the sender

In an ideal situation, this could be implemented like `@channel` and give users the ability to control how they get notified, but I could not identify an easy way to achieve that inside or outside of a bot (I raised a support request to get it added as a Slack feature). Instead, I felt there were two options:

  1. Tag users in a message back to the channel from `here-bot`
  2. Direct message the users from `here-bot` with links back to the channel

I decided on the first option as it was a little simpler.

To begin, I installed the client wrapper using `npm`:

npm install slack-client

The `slack-client` package provides a simple wrapper to the Slack API, making it easy to make a connection and get set up for handling messages. I used their sample code to guide me as I created the basic skeleton of `here-bot`.

var Slack = require('slack-client');

var token = 'MY SUPER SECRET BOT TOKEN';

var slack = new Slack(token, true, true);

slack.on('open', function () {
    var channels = Object.keys(slack.channels)
        .map(function (k) { return slack.channels[k]; })
        .filter(function (c) { return c.is_member; })
        .map(function (c) { return c.name; });

    var groups = Object.keys(slack.groups)
        .map(function (k) { return slack.groups[k]; })
        .filter(function (g) { return g.is_open && !g.is_archived; })
        .map(function (g) { return g.name; });

    console.log('Welcome to Slack. You are ' + slack.self.name + ' of ' + slack.team.name);

    if (channels.length > 0) {
        console.log('You are in: ' + channels.join(', '));
    }
    else {
        console.log('You are not in any channels.');
    }

    if (groups.length > 0) {
       console.log('As well as: ' + groups.join(', '));
    }
});

slack.login();

This code defines a connection to Slack using the token that is assigned to our bot by the bot integration setup on Slack's website. It then sets up a handler for the `open` event, where the groups and channels to which the bot belongs are output to the console. In Slack, I could see the bot reported as being online while the code executed and offline once I stopped execution. As bots go, it was not particularly impressive, but it was amazing how easy it was to get the bot online. The `slack-client` package made it easy to create a connection and iterate the bot's channels and groups, including querying whether the groups were open or archived.

For the next step, I needed to determine when my bot was messaged. It turns out that when a bot is the member of a channel (including direct message), it gets notified on each message entered in that channel. In our client code, we can get these messages using the `message` event.

slack.on('message', function(message) {
    var channel = slack.getChannelGroupOrDMByID(message.channel);
    var user = slack.getUserByID(message.user);

    if (message.type === 'message') {
        console.log(channel.name + ':' + user.name + ':' + message.text);
    }
});

Using the `slack-client`'s useful helper methods, I turned the message channel and user identifiers into channel and user objects. Then, if the message is a message (it turns out there are other types such as edits and deletions), I send the details of the message to the console.

With my bot now listening to messages, I wanted to determine if a message was written at the bot and should therefore alert the channel users. It turns out that when a message references a user, it actually embeds the user identifier in place of the displayed `@here` text. For example, a message that appears in the Slack message window as:

@here: Anyone know how to write a Slack bot?

Is sent to the `message` event as something like3:

<@U099999>: Anyone know how to write a Slack bot?

It turns out that this special code is how a link to a user or channel is embedded into a message. So, armed with this knowledge and knowing that I would want to mention users, I wrote a couple of helper methods: the first to generate a user mention embed code from a user identifier, the second to determine if a message was targeted at a specific user (i.e. that it began with a reference to that user).

var makeMention = function(userId) {
    return '<@' + userId + '>';
};

var isDirect = function(userId, messageText) {
    var userTag = makeMention(userId);
    return messageText &&
           messageText.length >= userTag.length &&
           messageText.substr(0, userTag.length) === userTag;
};

Using these helpers and the useful `slack.self` property, I could then update the `message` handler to only log messages that were sent directly to here-bot.

slack.on('message', function(message) {
    var channel = slack.getChannelGroupOrDMByID(message.channel);
    var user = slack.getUserByID(message.user);

    if (message.type === 'message' && isDirect(slack.self.id, message.text)) {
        console.log(channel.name + ':' + user.name + ':' + message.text);
    }
});

The final stage of the bot was to determine who was present in the channel and craft a message back to that channel mentioning those online users. This turned out to be a little trickier than I had anticipated. The `channel` object in `slack-client` provides an array of user identifiers for its members; `channel.members`. This array contains all users present in that channel, whether online or offline, bot or human. To determine details about each user, I would need the user object. However, the details for each Slack user are provided by the `slack.users` property. I needed to join the channel member identifiers with the Slack user details to get a collection of users for the channel. Through a little investigative debugging4, I learned that `slack.users` was not an array of user objects, but instead an object where each property name is a user identifier. At this point, I wrote a method to get the online human users for a channel.

var getOnlineHumansForChannel = function(channel) {
    if (!channel) return [];

    return (channel.members || [])
        .map(function(id) { return slack.users[id]; }
        .filter(function(u) { return !!u && !u.is_bot && u.presence === 'active'; });
};

Finally, I crafted a message and wrote that message to the channel. In this update of my `message` event handler, I have trimmed the bot's mention from the start of the message before creating an array of user mentions, excluding the user that sent the message. The last step calls `channel.send` to output a message in the channel that mentions all the online users for that channel and repeats the original message text.

slack.on('message', function(message) {
    var channel = slack.getChannelGroupOrDMByID(message.channel);
    var user = slack.getUserByID(message.user);

    if (message.type === 'message' && isDirect(slack.self.id, message.text)) {
        var trimmedMessage = message.text.substr(makeMention(slack.self.id).length).trim();
        
        var onlineUsers = getOnlineHumansForChannel(channel)
            .filter(function(u) { return u.id != user.id; })
            .map(function(u) { return makeMention(u.id); });
        
        channel.send(onlineUsers.join(', ') + '\r\n' + user.real_name + 'said: ' + trimmedMessage);
    }
});

Conclusion

Example

My `@here` bot is shown below in its entirety for those that are interested. It was incredibly easy to write thanks to the `slack-client` package, which left me with hackathon time to spare for a more complex bot. I will definitely be using `slack-client` again.

var Slack = require('slack-client');

var token = 'MY SUPER SECRET BOT TOKEN';

var slack = new Slack(token, true, true);

var makeMention = function(userId) {
    return '<@' + userId + '>';
};

var isDirect = function(userId, messageText) {
    var userTag = makeMention(userId);
    return messageText &&
           messageText.length >= userTag.length &&
           messageText.substr(0, userTag.length) === userTag;
};

var getOnlineHumansForChannel = function(channel) {
    if (!channel) return [];

    return (channel.members || [])
        .map(function(id) { return slack.users[id]; }
        .filter(function(u) { return !!u && !u.is_bot && u.presence === 'active'; });
};

slack.on('open', function () {
    var channels = Object.keys(slack.channels)
        .map(function (k) { return slack.channels[k]; })
        .filter(function (c) { return c.is_member; })
        .map(function (c) { return c.name; });

    var groups = Object.keys(slack.groups)
        .map(function (k) { return slack.groups[k]; })
        .filter(function (g) { return g.is_open && !g.is_archived; })
        .map(function (g) { return g.name; });

    console.log('Welcome to Slack. You are ' + slack.self.name + ' of ' + slack.team.name);

    if (channels.length > 0) {
        console.log('You are in: ' + channels.join(', '));
    }
    else {
        console.log('You are not in any channels.');
    }

    if (groups.length > 0) {
       console.log('As well as: ' + groups.join(', '));
    }
});

slack.on('message', function(message) {
    var channel = slack.getChannelGroupOrDMByID(message.channel);
    var user = slack.getUserByID(message.user);

    if (message.type === 'message' && isDirect(slack.self.id, message.text)) {
        var trimmedMessage = message.text.substr(makeMention(slack.self.id).length).trim();
        
        var onlineUsers = getOnlineHumansForChannel(channel)
            .filter(function(u) { return u.id != user.id; })
            .map(function(u) { return makeMention(u.id); });
        
        channel.send(onlineUsers.join(', ') + '\r\n' + user.real_name + 'said: ' + trimmedMessage);
    }
});

slack.login();


  1. or ioJS, if you would prefer []
  2. I find hackathons to be a bit like making a giant pile of sticks in the middle of a desert; it's an opportunity to get creative and build something where there seems to be nothing…using sticks…or in my case, a Node package and Slack []
  3. I totally made up the user identifier for this example []
  4. I used WebStorm 9 from JetBrains to debug my Node code, a surprisingly easy and pleasant experience []

Controlling a bot using node.js and express

Last week was our work hackathon. During these events we get to spend a day hacking around with something fun, whether it is work related or not. Thanks to my friend and colleague, Brian Genisio, this time around we got to tinker with hardware and build some bots.

Using node.js, johnny-five, an Arduino Uno board and a bunch of additional components, teams created their own sumo bots. At the end of the day, we competed to see who had the best bot. Ours was the only bot that walked instead of using wheels and we were confident our design could have won. Unfortunately,  we faced some technical difficulties and a couple of design issues that prevented us from achieving our full potential. You can see our bot (it's the large gold one that lumbers in from the bottom) take on all the others in this video and slowly start pushing them all out of the way.

http://youtu.be/pW6t5qfsc4g

As I am sure you can tell from the audio, this was a thoroughly enjoyable and highly competitive hackathon. There were a variety of problems to address as we developed our bots. Some of them were unique to the bot being created, others were comment to all. One such problem was how to control the bot. Regardless of how the signal got to the Arduino board (Bluetooth, RF and USB were available), we had to command our bots to move forwards, backwards, left and right (and in some cases, to deploy an extensive range of weaponry and distractions).

After some trial and error, I settled on using a simple web server and web page front-end that made API calls to the server. The server would then map these API calls to bot controls. This provided a way for us to use mouse, keyboard and touch input to control our electronic sumo minion. You can see the very basic user interface1 in this Vine that I took during our build.

https://vine.co/v/Ounjjiu6Br5

Using AngularJS, the buttons in the web page were connected to API calls. By clicking buttons in the web page, using the numpad or AWSD keys, or touching the screen of my laptop, we could control the robot. The API itself was implemented using the Express package in node.

Express

I installed express into our node application, using npm:

npm install express

Then I added express to our bot code and defined a simple API to process web requests:

var express = require("express");

var app = express();

app.post('/move', doMove);
app.post('/rotate', doRotate);
app.post('/stop', doStop);

app.use(express.static(__dirname + '/public'));

app.listen(4242);

This snippet of code has been edited down to show the pertinent details; you can view the real code on GitHub. First, we require the express module, then we use it to create our server app. The three calls to post set up our three API methods and the handlers for those methods. Using the post method defined these as POST endpoints, we could have used put, get or delete, if it were appropriate. The use call sets up a redirect for static page requests so that those requests are satisfied from our public directory. Finally, we tell the app to listen on port 4242.

Each request that matches one of the three calls I have setup will be sent to the appropriate handling methods. These handlers each take a request object and a response object, which they can use to get additional information about the request and craft an appropriate response.

Here is an implementation of the doRotate method:

function doRotate(req, res) {
    var direction = req.param('direction');
    var rate = req.param('rate');
    drive.rotate(direction, rate);
    res.send();
}

In this handler, we get the direction and rate parameters from the request and pass them to the code that does the real work. At the end, we respond to the request. We could provide data in our response or even send an error if we wanted.

This allowed me to host a local website and API for controlling our bot. It was that simple.

Conclusion

Hacking a robot using node.js was a great way to delve into a new facet of JavaScript programming; hacking hardware. Not only that, but it allowed me to discover some of the cooler things that can be done quickly and easily using node.js, such as setting up a web server using express.

Have you hacked a robot with node? How did you implement control? Please leave a comment with your experience or any questions you may have. And if you are interested in hacking a bot of your own, watch this space.

  1. and an early prototype of our robot []

Making a Grow Light Stand

Last night was the quarterly hackathon at work, the day where we get to work on something fun and new until 4am and then demo to the team. Beers were drunk, Thai food was eaten and the sports tournaments were played out (darts and ping pong, or table tennis, if you prefer). It was a great time and although my work wasn't as brilliant as some of my colleagues, I felt accomplished by the time we crawled off for breakfast sometime around 7am.

That was 6 hours ago. I'm still awake. I've been awake since sometime between 7am and 9am yesterday.

I don't know why, really. I ran an errand for the wife this morning and one thing led to another. Before I knew it, I had not only completed the errand (returning some plants and a grow light stand to Growing Hope after Chrissy did some seed starting for them), I had also completed our own grow light stand (a project we purchased the pieces for back when I made the raised bed) and cleaned the cat litter boxes. Luckily for you, I didn't take pictures of the latter task; I'm keeping those precious memories of being watched by a cat while I dug around in his feces (mostly) to myself, but I digress.

Often, when you garden, you have to start some seeds. When the weather is inclement prior to the growing season, as it often is in these parts, you need to start those seeds indoors and, much like this winter in Michigan, there's no Sun indoors (I'm thankful for that, I like my stuff unsinged), so an artificial source of equivalent light is required. That's where the grow light stand comes in.

Unlike the one we had borrowed from Growing Hope, which was a simple wood construction with two A-frames at each end joined by two planks from which the 4' long fluorescent grow lamps were suspended, our grow light stand was to be made out of PVC. As mentioned earlier, we had purchased the pieces for it some time ago, which explains why some of the pieces were wrong. Thankfully, Home Depot awesomely gave me store credit for those incorrect pieces despite a lack of receipt. That's customer service for you.

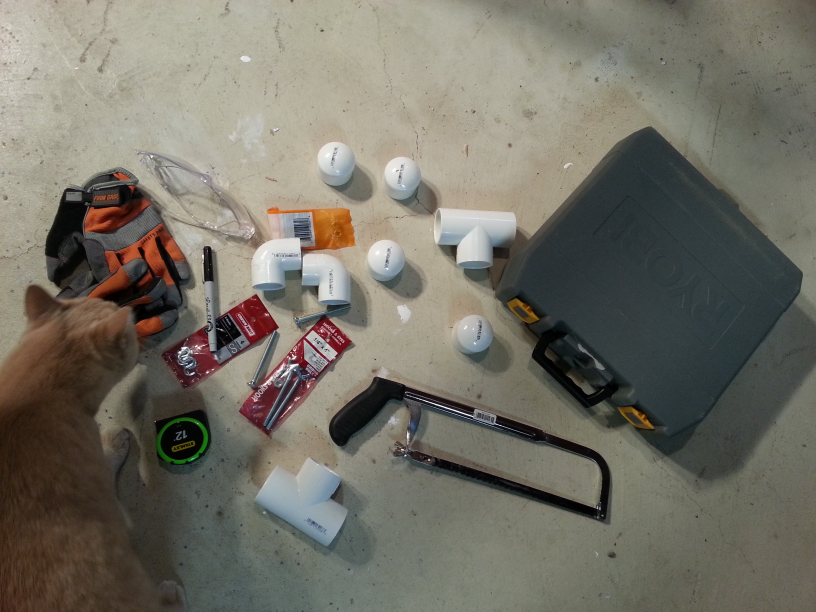
The parts required for this little project were:

  • 120" of 2" PVC pipe
  • 4x end caps
  • 2x three-way connectors
  • 2x elbow connectors
  • 2x ¼" eye bolts with 4 nuts
  • 2x S hooks
  • 1x shop light
  • 2x fluorescent grow lamp tubes
Barry inspecting the parts and tools

In addition, the following tools were used:

  • Safety Gloves and Glasses
  • Drill
  • ¼" drill bit
  • Permanent marker (I used the one Chrissy got from John Mayer's fan club)
  • Hacksaw
  • Pliers
  • Wrench/Spanner (for tightening the nuts)

The assembly was really quite easy and probably would have taken about an hour at most if I hadn't needed to go to Home Depot twice (once for the shop light and again to get the correct size elbows).

First, the PVC pipe was marked (with the John Mayer fan club marker) and cut (with the hacksaw) to the following lengths:

  • 4x 5"
  • 2x 24"
  • 1x 52"

Then, using the connectors and end caps, join them all together to create the stand.

All the pipe fittings and lengths ready for assembly
End caps fitted to 5" pipe (QA manager, Barry checking craftsmanship on the left)
End caps fitted to 5" pipe (QA manager, Barry checking craftsmanship on the left)End caps fitted to 5" pipe
End caps, 5" lengths and three way connector combined
Light stand legs and cross bar assembled
Completely assembled stand without light fixture

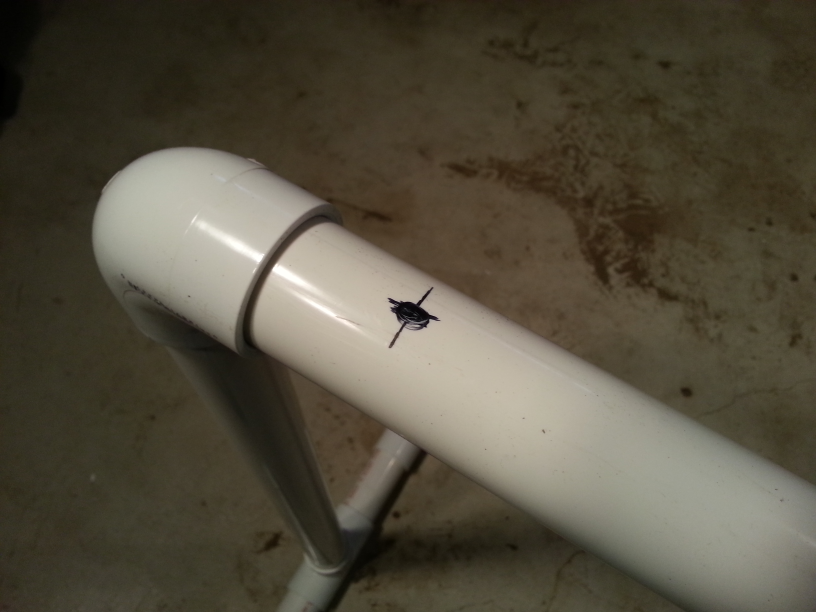
See, that was easy, right? No glue, just push it all together. It's a little disappointing that it did not include power tools, but don't worry, because this is where I whipped out my trusty drill after marking where I wanted the eye bolts to go. The shop light fixture hangs from these, so I measured where the chains would go in the shop light and chose eye bolt locations accordingly.

Chains, S hooks, etc. for attaching the light fixture
Position of eye bolt for one side of light fixture mounting

If you attempt this, be sure to wear your safety gear as I did; PVC pipe can be slippy and drills can make easily eye bolt holes in your hand if you're not careful (I recommend having some sleep too).

Safety gear on and ready to go

Once the holes were drilled in the pipe (though a little skewed), I fitted the eye bolts. In order to get a sturdy fixture, I first screwed a nut onto the eye bolt, then pushed the remainder through the pipe and applied a lock nut to the other side (though a regular nut would have done, I think). I then tightened the nuts on each side of the pipe so that the eye bolt was secure.

Eye bolt installed (note the two nuts on either side of the pipe)
Chains showing S hook before being attached and after

The shop light fixture came with its own chains for suspending it, however, only one end of these chains had a hook, so I carefully crimped S hooks onto the other ends of the chains. I then hooked one end into the corresponding eye bolt and the other into the light fixture and that was job done.

The assembled and working light stand (with QA manager doing final inspection)

The height is even adjustable by threading the hook through the eye and hooking back into the chain.

With the assembly complete, I placed the new stand over Chrissy's seedlings and plugged it into our timer ready for her to be surprised when she gets home or reads this (whichever is first).

Chrissy's seedlings enjoying their new light stand

Now, I've been awake for far too long so I'm off to play video games and eat snacks before a well-earned nap.