🤖 Setting up Dependabot with GitHub actions to approve and merge

Photo by Denys Nevozhai on Unsplash

Hello, everyone! It has been a long time. As the pandemic got into full swing last year, my bandwidth for cognitive tasks took a big hit and some things fell by the wayside, such as this blog. I did not intend to ghost y'all like that; alas, here we are. Perhaps I'll write more on that another time, for now, let's jump into something that I was recently tackling1.

What is Dependabot?

Dependabot is a handy tool now owned and incorporated into GitHub that monitors your repositories dependencies and updates them, a chore that many maintainers can find laborious. It is not the only tool available to perform this task, but it is the one that many will use if they are already on GitHub since it is easy to setup and manage.

When Dependabot identifies a package you use that can be updated (based on your semver rule in package.json, for example), or it knows of a security issue in a package you use or referenced by a package you use, Dependabot can create a PR (pull request) to update that package. It is pretty smart and will only ever have one PR per package, so if multiple releases occur, it will close out any pending PR for that package and make a new one. It is a really handy tool with a variety of configuration options; I'm not going to delve into those here – you can read about them in the official documentation.

When Dependabot was in preview, it would create the PR, wait for all relevant checks to have been performed – such as your CI (continuous integration) processes like linting and testing, and then on success of these checks, auto-merge the change into the branch you configured it to target. However, this is a security issue, especially if you also have CD (continuous deployment) set up as a malicious package could be published, causing Dependabot to trigger a new deployment, which could then propagate that malicious package to all your package users, and their users, etc. Quite rightly, the decision was made to take that feature out of Dependabot and leave it to each individual use-case to decide what to do with the PRs created by Dependabot. However, this then led to a new problem – managing the PRs.

To avoid security issues in your releases, make sure that there is a manual QA (quality assurance) step somewhere between any automated update and an actual release of the updated code.

Dependabot has the ability to limit how many open PRs it creates, which is helpful, but they still require manual intervention. If you have rules like "every PR needs at least X reviewers", then it can quickly become a chore almost as annoying as the one it tries to address.

So what to do? Auto-merge is a potential security issue, not auto-merging is a time sap.

Do not enable auto-merging on a branch used for CD. It really is a bad idea and a big security risk. Packages do get hacked sometimes and tidying up after a malicious publish is not easy. To avoid security issues in your releases, make sure that there is a manual QA (quality assurance) step somewhere between any automated update and an actual release of the updated code. For example, you could do this by having Dependabot operate on a branch that is a copy of the CD branch and then have a process for merging the Dependabot updates across to your main branch before a release.

💡Check out CodeQL, another GitHub feature, if you want to add some automated vulnerability checking to your repository

For the remainder of this entry, we will assume that you are using Dependabot on a main branch that is not continuously deployed. However, just as with licensing, it is ultimately your responsibility to make sure the code you release, including its dependencies do not introduce vulnerabilities, so make sure to consider your specific scenario before enabling things like Dependabot and auto-merging of the changes it makes.

What are GitHub Actions?

GitHub Actions are GitHub's approach to supporting the kinds of tasks that have traditionally been performed by CI and CD platforms like Travis, CircleCI, and Jenkins. Using a combination of YAML configurations and scripts referred to as actions, you can build workflows that perform all kinds of automated processes from running tests to managing your GitHub repository issues. They are incredibly powerful (and therefore, should be used responsibly).

Many first and third-party actions exist to help you build your workflows. I have used actions to run tests across multiple platforms, update code coverage stats in CodeCov, and, most recently, help manage Dependabot PRs. In addition, GitHub Actions have access to the incredibly powerful gh CLI tool.

💡Checkout the documentation on GitHub Actions regarding security hardening to learn how to use GitHub Actions more securely.

GitHub Actions are free for public repositories, see the GitHub Actions documentation for more information, including pricing for private repository usage.

Setting Things Up

1. Your GitHub Repository Settings

Before you setup the merging workflow, you need to make a few changes to your GitHub repository.

Auto-merge

A screenshot showing a zoomed in portion of the GitHub repository Settings tab with the Options section selected
The Settings tab of a repository on GitHub with the Options section selected
A screenshot of the "Allow auto-merge" repository setting. Text reads: "You can allow setting pull requests to merge automatically once all required reviews and status checks have passed." and there is a checkbox checked, labelled "Allow auto-merge" and the text "Waits for merge requirements to be met and then merges automatically." with a link labelled "Learn more".
The Allow auto-merge repository setting

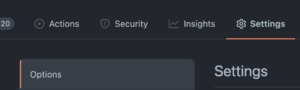
First, go to your repository Settings tab and under the Options section, ensure that Allow auto-merge is checked. This does not make every PR auto-merge, but it does allow for specific PRs to be set to auto-merge – this will be important.

Status Checks

If you don't have status checks enabled for your repository, then it means that a PR can just be merged without any reviews or code quality checks occurring. I highly recommend setting status checks as it ensures at least some level of code quality assurance before your code or anyone else's is merged.

For the purposes of this discussion, it is assumed that you have set your repository to require at least one review per PR before it can be merged, and at least one non-instant code quality check (such as a test run, or lint check).

Status checks are mandated for PRs to specific branches by using Branch Protection Rules. These are configured in your repositories Settings under Branches. In the following screenshot, the main branch – the default branch, has branch protection rules applied. Branch protection rules can be applied to specific branches, or a range of branches by using a selector like feature/*.
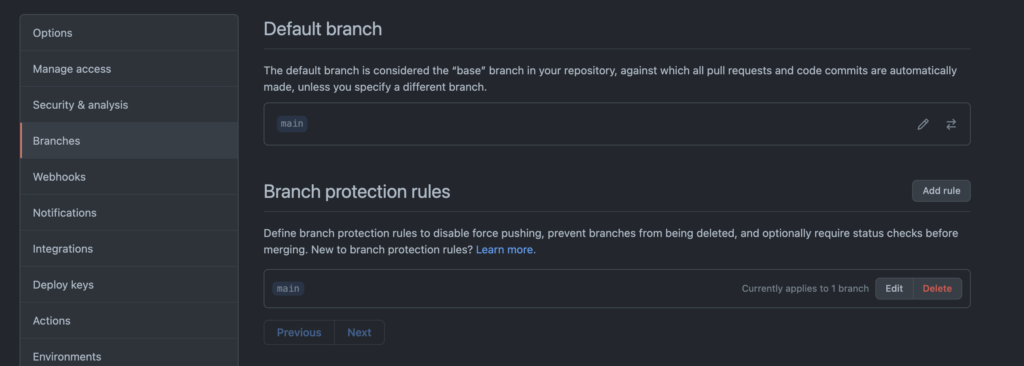
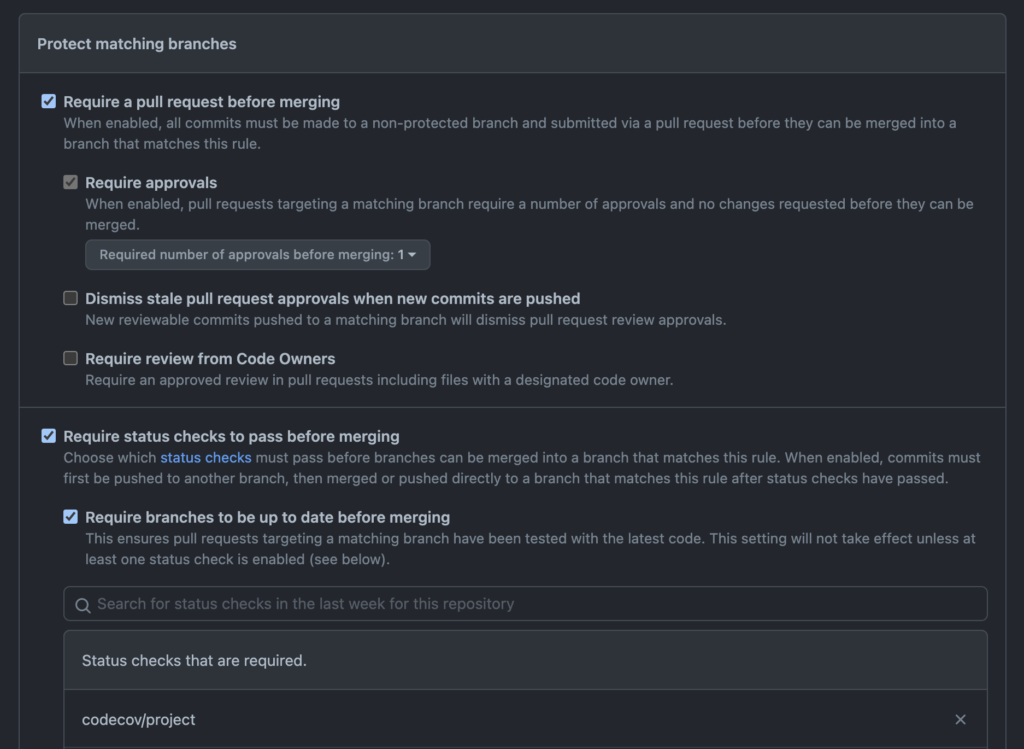
A screenshot of the Branches options section of the GitHub repository Settings tab. It shows the repository's default branch as well as any branches that have protection rules setup, along with options to add, modify, and delete those rules.
The Branches section of a GitHub repository with rules applied to the main default branch

If you add rules for a branch (or set of branches) or edit an existing rule, you can specify all sorts of measures to control when code is suitable for merging in the branches that match that rule. In the following screen, the rule has been configured such that code can only be merged when:

  • It comes from a PR
  • It has at least one approving reviewer
  • It is up-to-date with the target branch
  • The codecov/project status check has passed
A screenshot of a portion of the branch protection rules screen in GitHub. There are some unchecked options and some checked options, along with text describing what those options do.
A subset of the rules one can apply to protect your branches in GitHub

Why at least one non-instant quality check?

The auto-merge setting for GitHub PRs is only useful for PRs that are not already passing all status checks. I do not know if this is still the case, but at one time it was the case that the command we are going to use to tell GitHub to auto-merge the PR would fail if the PR is already in a mergeable state. If you want to auto-merge PRs that are already mergeable when our new workflow runs, you will need to call a different command. This is left as an exercise for the reader.

2. Dependabot

You will need to enable Dependabot on your repository. Follow GitHub instructions to set it up how you want it. This blog assumes defaults, but you should be able to make it work with other configurations.

3. GitHub Actions

With Dependabot in place (and probably creating PRs for you already) and your status checks running, we can now setup our automation.

There are two things we need our automation to do.

  1. We need it to approve the PR as we have mandated that we need at least 1 reviewer in order for code to be allowed to merge.
  2. We need to enable auto-merge for the PR so that it will merge once our status checks are completed.

To add a GitHub Actions workflow, all you need to do is add a YAML file describing the workflow to the .github/workflows folder of your repository. Each YAML file describes a specific workflow, including what triggers the workflow, what permissions it has, and the jobs that it performs. Triggers can be specific events in your repository (such as creating a PR or raising an issue), webhooks, on a specific schedule such as once a week, or even via events fired from another workflow.

Let's take a look at the workflow for our approve and auto-merge workflow, and then we can discuss some of the important pieces. Since this isn't a deep dive into GitHub Actions, I will skim over some of the details to get to the pertinent info.

name: Dependabot Pull Request Approve and Merge

on: pull_request_target

permissions:
  pull-requests: write
  contents: write

jobs:
  dependabot:
    runs-on: ubuntu-latest
    # Checking the actor will prevent your Action run failing on non-Dependabot
    # PRs but also ensures that it only does work for Dependabot PRs.
    if: ${{ github.actor == 'dependabot[bot]' }}
    steps:
      # This first step will fail if there's no metadata and so the approval
      # will not occur.
      - name: Dependabot metadata
        id: dependabot-metadata
        uses: dependabot/fetch-metadata@v1.1.1
        with:
          github-token: "${{ secrets.GITHUB_TOKEN }}"
      # Here the PR gets approved.
      - name: Approve a PR
        run: gh pr review --approve "$PR_URL"
        env:
          PR_URL: ${{ github.event.pull_request.html_url }}
          GITHUB_TOKEN: ${{ secrets.GITHUB_TOKEN }}
      # Finally, this sets the PR to allow auto-merging for patch and minor
      # updates if all checks pass
      - name: Enable auto-merge for Dependabot PRs
        if: ${{ steps.dependabot-metadata.outputs.update-type != 'version-update:semver-major' }}
        run: gh pr merge --auto --squash "$PR_URL"
        env:
          PR_URL: ${{ github.event.pull_request.html_url }}
          GITHUB_TOKEN: ${{ secrets.GITHUB_TOKEN }}

There is a bit to unpack there, so let's go over it.

name: Dependabot Pull Request Approve and Merge

First, we have the name of the workflow, which is "Dependabot Pull Request Approve and Merge". This will be shown in the GitHub user interface when referring to your workflow.

on: pull_request_target

Next, we have the triggers. In this case, we have just one trigger; pull_request_target. This trigger should rarely be used and, when it is used, used with care as it provides a read/write access token. We need this as it allows us to perform tasks to update our PR. There are specific types of each trigger if you need to narrow down exactly when your workflow occurs; pull_request_target defaults to opened, reopened, and synchronize, which means our workflow will trigger when a PR is opened, updated, or reopened. For more information on this trigger and its types, see the GitHub documentation, also check out this blog on security implications of misusing this trigger.

permissions:
  pull-requests: write
  contents: write

After specifying the trigger for the workflow, we specify the scope of permissions we are granting the workflow. Every workflow has a secret available, GITHUB_TOKEN, which is used to authenticate the actions that the workflow wants to perform. Each trigger type has a restricted level of permissions, and while we cannot elevate permissions outside of those restrictions, we can control the scope of permissions allowed within the restrictions.

In our case, we need write access to the pull requests so that we can modify the PR itself, and we need write access to the repository contents because we need to be able to request merging. Even though setting a PR to auto-merge may seem like we are just editing the PR, because it results in the code getting merged, we have to make sure we have permission to do that future merge too.

jobs:
  dependabot:
    runs-on: ubuntu-latest
    # Checking the actor will prevent your Action run failing on non-Dependabot
    # PRs but also ensures that it only does work for Dependabot PRs.
    if: ${{ github.actor == 'dependabot[bot]' }}
    steps:
      # This first step will fail if there's no metadata and so the approval
      # will not occur.
      - name: Dependabot metadata
        id: dependabot-metadata
        uses: dependabot/fetch-metadata@v1.1.1
        with:
          github-token: "${{ secrets.GITHUB_TOKEN }}"
      # Here the PR gets approved.
      - name: Approve a PR
        run: gh pr review --approve "$PR_URL"
        env:
          PR_URL: ${{ github.event.pull_request.html_url }}
          GITHUB_TOKEN: ${{ secrets.GITHUB_TOKEN }}
      # Finally, this sets the PR to allow auto-merging for patch and minor
      # updates if all checks pass
      - name: Enable auto-merge for Dependabot PRs
        if: ${{ steps.dependabot-metadata.outputs.update-type != 'version-update:semver-major' }}
        run: gh pr merge --auto --squash "$PR_URL"
        env:
          PR_URL: ${{ github.event.pull_request.html_url }}
          GITHUB_TOKEN: ${{ secrets.GITHUB_TOKEN }}

At the end of the file, we have the jobs themselves. In this case, we have a single job named dependabot. This job runs on an instance of the latest Ubuntu image, as specified by runs-on: ubuntu-latest. GitHub Actions support a range of operating systems and versions, and you can even configure a job to run on a matrix of these things, but we do not need that fanciness – the Ubuntu images tend to be the cheapest and the fastest, so we that is what we are using.

We control when the job runs with a condition, if: ${{ github.actor == 'dependabot[bot]' }}. This means that if the PR was created by some entity other than dependabot[bot], we won't do anything, preventing us from auto-approving other folks code contributions.

Finally, we describe the steps in the job. In this case there are three steps:

  1. name: Dependabot metadata
    This step uses an action from Dependabot that gets us information about the update.
  2. name: Approve a PR
    This step performs the review approval. We do this using the awesome gh CLI.
  3. name: Enable auto-merge for Dependabot PRs
    This step sets the PR to auto-merge using a squash merge strategy. You could change this strategy to whatever you prefer – possibly omitting it if you want the repository default to be used.

Versions

You may have noticed that the last step in our job has a condition:

if: ${{ steps.dependabot-metadata.outputs.update-type != 'version-update:semver-major' }}

This is why we have the "Dependabot metadata" step. In this condition, we use that metadata to ensure that we only allow auto-merging of minor and patch level updates. After all, a major version change is likely a breaking a change, and we don't want to automatically include those, even if they do pass our status checks. So, this condition ensures that we leave major updates as open PRs for manual verification before merging.

If you decided not to merge these PRs, you can tell Dependabot exactly how to handle this dependency in future, even preventing it suggesting major updates to that package again.

Conclusion

This was a long post, but hopefully a useful one. I want to acknowledge that I did not come up with this all on my own. My strategy here was built from the excellent GitHub documentation that also goes into detail about workflows and Dependabot.

Thanks for reading. If you have feedback or questions, don't forget to leave a comment.

It's nice to be back. 🙂

  1. Don't worry, I haven't forgotten about our series on React server-side rendering – I'll get back into that soon []

🙇🏻‍♂️ Introducing checksync

Photo by Clint Adair on Unsplash

Have you ever written code in more than one place that needs to stay in sync? Perhaps there is a tool in your framework of choice that can generate multiple files from a single source of truth, like T4 templates in the .NET world; perhaps not. Even if there is such a tool, it adds a layer of complexity that is not necessarily easy to grok. If you look at the output files or the template itself, it may not be clear what files are affected or related.

At Khan Academy, we have a linter, written in Python, that is executed whenever we create a new diff for review. It runs across a subset of our files and looks for blocks of text that are marked up with a custom comment format that identifies those blocks as being synchronized with other target blocks. Included in that markup is a checksum of the target block content such that if the target changes, we will get an error from the linter. This is our signal to check if further changes are need and then update the checksums that are invalidated. The only bugbear folks seem to have is that instead of offering an option to auto-fix checksums in need of update, it outputs a perl script that has to be copied and run for that purpose.

Small bugbear aside, this tool is fantastic. It enables us to link code blocks that need to be synchronized and catches when we change them with reasonably low overhead. Though I believe it is hugely useful, it is sadly custom to our codebase. I have long wanted to address that and create an open source version for everyone to use. checksync is that open source version.

🤔 The Requirements

Before writing checksync, I started out with the following requirements:

  • It should work with existing marked up code in the Khan Academy codebase; specifically,
    1. File paths are relative to the project root directory
    2. Checksums are calculated using Adler-32
    3. Both // and # style comments are used to comment the markup tags
    4. Start tag format is:
      sync-start:<ID> <CHECKSUM> <TARGET_FILE_PATH>
    5. End tag format is:
      sync-end:<ID>
    6. Multiple start tags can exist for the same tag ID but with different target files
    7. Sync tags are not included in the checksum'd content
    8. An extra line of blank content is included in the checksum'd content (due to a holdover from an earlier implementation)
    9. .gitignore files should be ignored
    10. Additional files can be ignored
  • It should be comparably performant to the existing linter
    • The linter ran over the entire Khan Academy website codebase in less than 15 seconds
  • It should auto-update invalid checksums if asked to do so
  • It should output file paths such that editors like Visual Studio Code can open them on the correct line
  • It should support more comment styles
  • It should generally support any text file
  • It should run on Node 8 and above
    • Some of our projects are still using Node 8 and I wanted to support those uses

With these requirements in mind, I implemented checksync (and ancesdir, which I ended up needing to ensure project root-relative file paths). By making it compatible with the existing Khan Academy linter, I could leverage the existing Khan Academy codebase to help measure performance and verify that things worked correctly. After a few changes to address various bugs and performance issues, it is still mildly slower than the Python equivalent, but the added features it provides more than make up for that (especially the fact that it is available to folks outside of our organization).

🎉 Check It Out

checksync includes a --help option to get information on usage. I have included the output below to give an overview of usage and the options available to customize how checksync runs.

checksync --help
checksync ✅ 🔗

Checksync uses tags in your files to identify blocks that need to remain
synchronised. It works on any text file as long as it can find the tags.

Tag Format

Each tagged block is identified by one or more sync-start tags and a single
sync-end tag.

The sync-start tags take the form:

    <comment> sync-start:<marker_id> <?checksum> <target_file>

The sync-end tags take the form:

    <comment> sync-end:<marker_id>

Each marker_idcan have multiple sync-start tags, each with a different
target file, but there must be only one corresponding sync-endtag.

Where:

    <comment>       is one of the comment tokens provided by the --comment
                    argument

    <marker_id>     is the unique identifier for this marker

    <checksum>      is the expected checksum of the corresponding block in
                    the target file

    <target_file>   is the path from your package root to the target file
                    with a corresponding sync block with the same marker_id

Usage

checksync <arguments> <include_globs>

Where:

    <arguments>       are the arguments you provide (see below)

    <include_globs>   are glob patterns for identifying files to check

Arguments

    --comments,-c      A string containing comma-separated tokens that
                       indicate the start of lines where tags appear.
                       Defaults to "//,#".

    --dry-run,-n       Ignored unless supplied with --update-tags.

    --help,-h          Outputs this help text.

    --ignore,-i        A string containing comma-separated globs that identify
                       files that should not be checked.

    --ignore-files     A comma-separated list of .gitignore-like files that
                       provide path patterns to be ignored. These will be
                       combined with the --ignore globs.
                       Ignored if --no-ignore-file is present.
                       Defaults to .gitignore.

    --no-ignore-file   When true, does not use any ignore file. This is
                       useful when the default value for --ignore-file is not
                       wanted.

    --root-marker,-m   By default, the root directory (used to generate
                       interpret and generate target paths for sync-start
                       tags) for your project is determined by the nearest
                       ancestor directory to the processed files that
                       contains a package.json file. If you want to
                       use a different file or directory to identify your
                       root directory, specify that using this argument.
                       For example, --root-marker .gitignore would mean
                       the first ancestor directory containing a
                       .gitignore file.

    --update-tags,-u   Updates tags with incorrect target checksums. This
                       modifies files in place; run with --dry-run to see what
                       files will change without modifying them.

    --verbose          More details will be added to the output when this
                       option is provided. This is useful when determining if
                       provided glob patterns are applying as expected, for
                       example.

And here is a simple example (taken from the checksync code repository) of running checksync against a directory with two files, using the defaults. The two files are given below to show how they are marked up for use with checksync. In this example, the checksums do not match the tagged content (though you are not expected to know that just by looking at the files – that's what checksync is for).

// This is a a javascript (or similar language) file

// sync-start:update_me 45678 __examples__/checksums_need_updating/b.py
const someCode = "does a thing";
console.log(someCode);
// sync-end:update_me
# Test file in Python style

# sync-start:update_me 4567 __examples__/checksums_need_updating/a.js
code = 1
# sync-end:update_me
Example output showing mismatched checksums

Additional examples that demonstrate various synchronization conditions and error cases can be found in the checksync code repository. To give checksync a try for yourself:

I hope you find this tool useful, and if you do or you have any questions, please do comment on this blog.

🙇🏻‍♂️ Introducing ancesdir

Photo by Maksym Kaharlytskyi on Unsplash

After many years of software development, I finally published my own NPM package. In fact, I published two. I was working on my checksync tool when I realised that I needed the package that this blog introduces. More on checksync in the next entry.

https://www.npmjs.com/package/ancesdir

🤔 What is root? Where is root?

Quite often, when working on some projects at Khan Academy, we need to know the root directory of the project. This enables us to write tools, linters, and tests that use root-relative paths, which in turn can make it much easier to refactor code. However, determining the root path of a project is not necessarily simple.

First, there is working out what identifies the root of a project. Is it the node_modules directory? The package.json file? The existence of .git folder? It may seem obvious to use one of these, but all these things have something in common; they don't necessarily exist. We can configure our package manager to have package.json and node_modules in non-standard places and we might change our source control, or not even run our code from within a clone of our repository. Determining the root folder by relying on any of these things as a marker is potentially not going to work.

Second, the code to walk the directory structure to find the given "marker" file or directory is not trivial. Sharing a common implementation within your project means everything that needs it, needs to locate it; in JavaScript, that means a relative path, at which point, you may as well just use a relative path to the known root directory and skip the shared approach all together. Yet, if you don't share a common implementation from a single location, then the code has to be duplicated everywhere you need it. I don't know about you, but that feels wrong.

💁🏻‍♂️ Solution: ancesdir

The issue of sharing a common implementation is easiest to solve. If that common implementation is installed as an NPM package, we don't need to include it via a relative path; we can just import it by its package name. There are packages out there that do this, but the ones I found all assumed some level of default setup, failing to acknowledge that this may change. In turn, they did not support a monorepo setup where there could be multiple sub-projects. How could one find the root folder of the monorepo from within a sub-project if all we used to identify the root folder were package.json? What if we wanted to sometimes get the root of the sub-project and sometimes the root of the monorepo?

I needed a way to identify a specific ancestor directory based on a known marker file or directory that would work even with non-standard setups. At Khan Academy, we have a marker file at the root of the project that is there solely to identify its parent directory as the project root. This file is agnostic of tech stack; it's just an empty file. It is solely there to say "this directory is the root directory". No tooling changes are going to render this mechanism broken unexpectedly unless they happen to use the same filename, which is unlikely. This way, we can find the repository root easily by locating that file. I wanted a package that could work just as easily with this custom marker file as it could with package.json.

I created ancesdir to fulfill these requirements1.

yarn add ancesdir

The API is simple. In the default case, all you need to do is:

import ancesdir from "ancesdir";

console.log(`ancesdir's root directory is ${ancesdir()}`);

If you have a standard setup, with a package.json file, you will get the ancestor directory of the ancesdir package that contains that package.json file.

However, if you want the ancestor directory of the current file or a different path, you might use ancesdir like this:

import ancesdir from "ancesdir";

console.log(`This file's root directory is ${ancesdir(__dirname)}`);

In this example, we have given ancesdir a path from which to being its search. Of course, that still only works if there is an ancestor directory that contains a package.json file. What if that's not what you want?

For the more complex scenarios, like monorepos, for example, you can use ancesdir with a marker name, like this:

import ancesdir from "ancesdir";

console.log(`The monorepo root directory is ${ancesdir(__dirname, ".my_unique_root_marker_file")}`);

ancesdir will then give you the directory you seek (or null if it cannot be found). Not only that, but repeated requests will work faster as the results are cached as the directory tree is traversed.

Conclusion

If you find yourself needing a utility like this, checkout ancesdir. I hope y'all find it useful and I would love to hear if you do. You can checkout the source on GitHub.

  1. The name is a play on the word "ancestor", while also attempting indicate that it has something to do with directories. I know, clever, right? []

Merging multiple accounts on UserEcho

UserEcho is a service employed by the likes of OzCode and SublimeText for collecting and managing customer issues and suggestions; often regarding software features and bugs. It enables users and developers to discuss bugs and ideas, and respond to frequently asked questions.

OzCode UserEcho landing page

Recently, I signed into the OzCode UserEcho site using my Google credentials. UserEcho supports the OpenID identity system, providing a wide range of ways to authenticate. Upon logging in, I was immediately confused; where was the issue I had raised a week or two earlier? I was certain it should be there but it was not. After a little thought, I realised I may have logged in with the wrong credentials, inadvertently creating a new account. I logged out and then, using my GitHub account to authenticate instead of Google, tried logging back in. Voila! My issue appeared.

For some, this would probably be the end of it, but it bugged me that I now had two accounts. You may think this is no big deal and you are right, but it was bothering me1.

Settings dropdown on UserEcho

Using the dropdown captioned with my name at the top-right of the UserEcho site, I chose User Profile. At the bottom of the subsequent page, I found a table of OpenID logins that the account used but no way to edit it. How could I merge my accounts or add new OpenID identities?

OpenID table on UserEcho user profile screen

After searching around the UserEcho site a bit and trying a few Google searches2, I was almost ready to contact UserEcho for some help (or just give up), but then I had an idea. If UserEcho was like most sites these days, it probably keyed accounts using a primary email address for the user. So, I checked the two UserEcho accounts I knew I had and confirmed they had different email addresses.

User details section of a UserEcho profile

I edited the email address for one of the two accounts to match the other, triggering UserEcho to send a verification email3, so I followed the instructions and verified the email address change.

UserEcho table of accounts with the same email

Then I returned to the User Profile screen in OzCode's UserEcho. At the bottom, below the OpenID table, I was now presented with a message saying that there were other accounts with the same email address, including a Merge button. I clicked that button and immediately, the table showed both the Google and GitHub logins.

OpenID table in UserEcho showing GitHub and Google IDs

So, there you go. If you have multiple accounts for a UserEcho product site, make sure the email addresses match and that you have verified the email address on each account, then view one and click Merge. Job done.

  1. In writing this blog and generating the screenshots, I discovered I actually had three accounts! []
  2. and maybe one Bing []
  3. just making sure you're still you []

Prerelease packages with branches, Appveyor, and MyGet

We use a workflow where Appveyor is setup for CI and then it automatically pushes newly built nuget packages to a MyGet feed for consumption. Perhaps in a future post, I will go over how to set all this up, but for now, let's assume you already have this working; you push changes to a branch in your GitHub repo, which then gets built and tested on Appveyor, before being pushed to MyGet. Everything is nice and smooth.

Unfortunately, the magic ended there. Since there is no differentiation between pushing prerelease changes and release changes, I found that I would either have to limit what branches built in on Appveyor or spend a lot of time curating MyGet to remove intermediate builds I did not want used. I knew that MyGet supported prerelease packages but no matter what I tried, I could not get Appveyor to build them. Unsurprisingly, I found this frustrating. Then I stumbled on this particular answer on StackOverflow:

However, there were some issues I had with this.

  1. It seemed wrong that I had to use an after_build or on_success step to explicitly build my nuget package
  2. I didn't want every build to be prerelease
  3. It didn't work

The first point smelled enough that I wanted to see if I could not have to do that, and that second point seemed really important.

So, I delved a little deeper and discovered that the nuspec file, which has a handy $version$ substitution for the version takes that information from the value of the AssemblyInformationalVersion attribute, which I did not have declared in my AssemblyInfo.cs. Since it was not in there, the Appveyor step declared to patch it did not do anything. This was easy to fix, so I edited my AssemblyInfo.cs to include the attribute and tried again. This time the version updated as I wanted, even without the after_build or on_success shenanigans.

However, it still was not quite right since now, every build being performed was marked as prerelease. While this is a potential workflow, where the appveyor.yml is updated when finally reaching release, what I wanted was for releases to occur when I tagged a branch. For that, I looked at tweaking how the Appveyor build version updated and what environment variables Appveyor defined that I could leverage.

It turns out that Appveyor defines APPVEYOR_REPO_TAG, which is set to true if the build was started by a tag being pushed. It also defines APPVEYOR_REPO_BRANCH containing the name of the branch being built. Armed with these two variables, I updated my appveyor.yml to have two init scripts.

init:
- ps: $env:customnugetversion = if ($env:APPVEYOR_REPO_TAG -eq $True) { "$env:APPVEYOR_BUILD_VERSION" } else { "$env:APPVEYOR_BUILD_VERSION-$env:APPVEYOR_REPO_BRANCH" }
- ps: Update-AppveyorBuild -Version $env:customnugetversion

The first script creates a new environment variable. If the APPVEYOR_REPO_TAG is set to true, the new variable gets set to the value of APPVEYOR_BUILD_VERSION; if not, it is set to APPVEYOR_BUILD_VERSION-APPVEYOR_REPO_BRANCH. So, for example, if the build was going to be version 2.4.0, it was not a tag, and the branch was master, then the new variable would be set to 2.4.0-master; however, if it was a tag, it would just be 2.4.0.

The second script calls the Update-AppveyorBuild cmdlet provided by Appveyor, passing the value of the new environment variable as the -Version parameter value.

These two init scripts, plus the AssemblyInformationalVersion attribute in the AssemblyInfo.cs (and corresponding assembly_information_version field under the assembly_info section of the appveyor.yml) were all I needed. Now, whenever I push to a branch, I get a new prerelease nuget package that I can use in my development coding, and whenever I create a new tag, I get a release package instead. Not only does this reduce my need to manually manage my nuget packages on MyGet, but it also means I can take advantage of the different retention policy settings between prerelease and release packages.

All in all, I find this workflow much nicer than what I had before. Hopefully some of you do too. Examples of the appveyor.yml file and associated AssemblyInfo.cs change can be seen in the following Gist.