Debugging IIS Express website from a HyperV Virtual Machine

Recently, I had to investigate a performance bug on a website when using Internet Explorer 8. Although we are fortunate to have access to BrowserStack for testing, I have not found it particularly efficient for performance investigations, so instead I used an HyperV virtual machine (VM) from modern.IE.

I had started the site under test from Visual Studio 2013 using IIS Express. Unfortunately, HyperV VMs are not able to see such a site out-of-the-box. Three things must be reconfigured first: the VM network adapter, the Windows Firewall of the host machine, and IIS Express.

HyperV VM Network Adapter

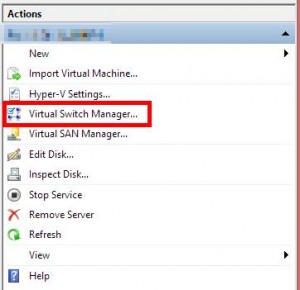
HyperV Virtual Switch Manager

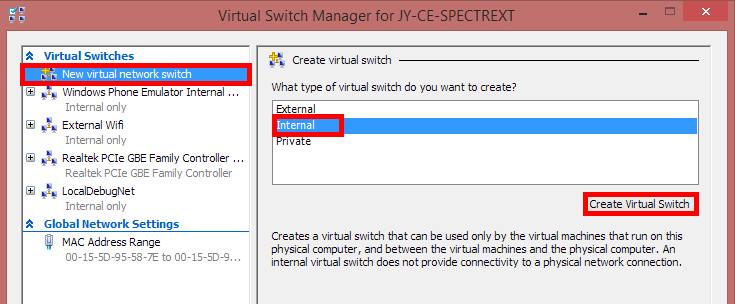
In HyperV, select Virtual Switch Manager… from the Actions list on the right-hand side. In the dialog that appears, select New virtual network switch on the left, then Internal on the right, then click Create Virtual Switch. This creates a virtual network switch that allows your VM to see your local machine and vice versa. You can then name the switch anything you want; I called mine LocalDebugNet.

New virtual network switch

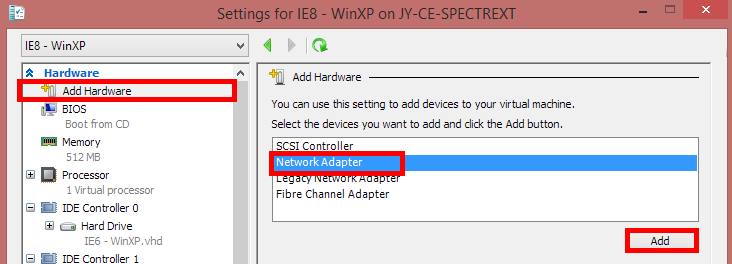
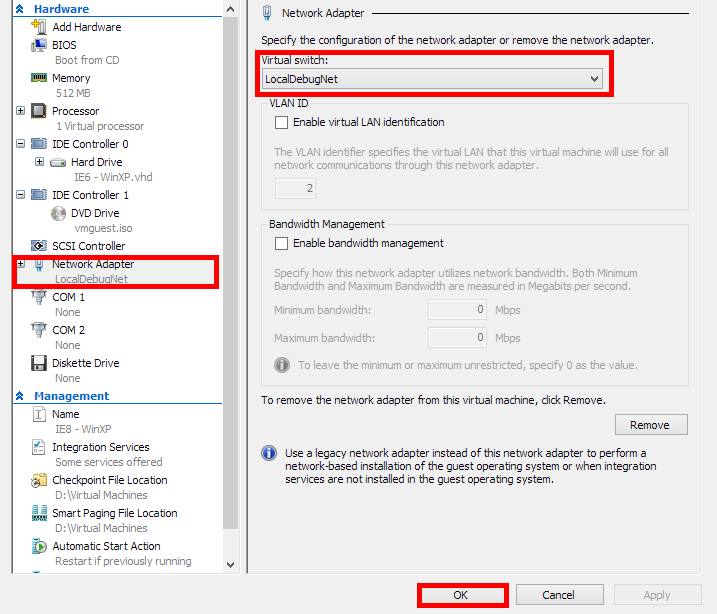
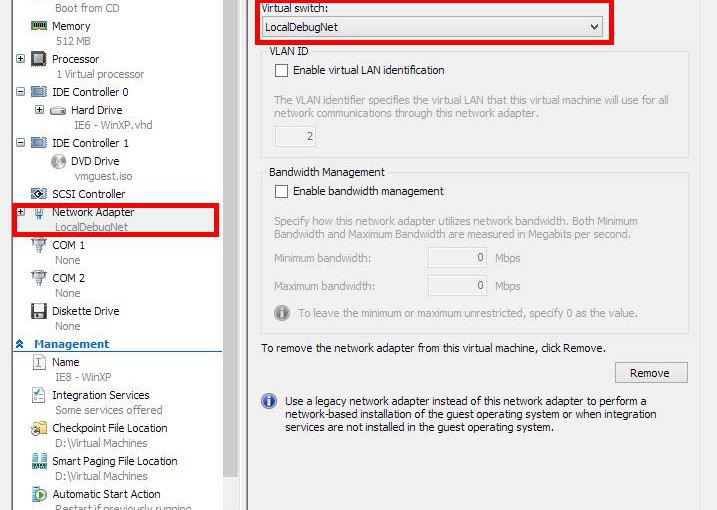
To ensure the VM uses the newly created virtual switch, select the VM and choose Settings… (either from the context menu or the lower-right pane). Choose Add Hardware in the left-hand pane and add a new Network Adapter, then drop down the virtual switch list on the right, choose the switch you created earlier, and click OK to accept the changes and close the dialog.

Add network adapter
Add network adapter
Set virtual switch on network adapter

Now the VM is setup and should be able to see its host machine on its network. Unfortunately, it still cannot see the website under test. Next, we have to configure IIS Express.

IIS Express

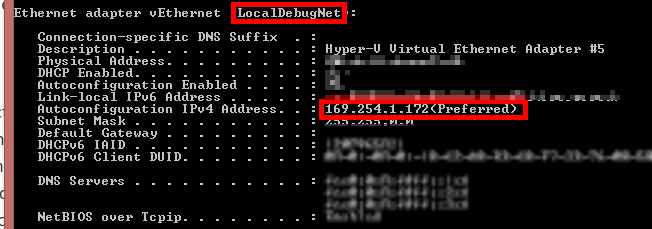
Open up a command prompt on your machine (the host machine, not the VM) and run ipconfig /all . Look in the output for the virtual switch that you created earlier and write down the corresponding IP address1.

Command prompt showing ipconfig

Open the IIS Express applicationhost.config file in your favourite text editor. This file is usually found under your user profile.

notepad %USERPROFILE%\documents\iisexpress\config\applicationhost.config

Find the website that you are testing and add a binding for the IP address you wrote down earlier and the port that the site is running on. You can usually just copy the localhost binding and change localhost to the IP address or your machine name.

You will also need to run this command as an administrator to add an http access rule, where <ipaddress>  should be replaced with the IP you wrote down or your machine name, and <port>  should be replaced with the port on which IIS Express hosts your website.

netsh http add urlacl url=http://<ipaddress>:<port>/ user=everyone

At this point, you might be in luck. Try restarting IIS Express and navigating to your site from inside the HyperV VM. If it works, you are all set; if not, you will need to add a rule to the Windows Firewall (or whatever firewall software you have running).

Windows Firewall

The VM can see your machine and IIS Express is binding to the appropriate IP address and port, but the firewall is preventing traffic on that port. To fix this, we can add an inbound firewall rule. To do this, open up Windows Firewall from Control Panel and click Advanced Settings or search Windows for Windows Firewall with Advanced Security and launch that.

Inbound rules in Windows Firewall

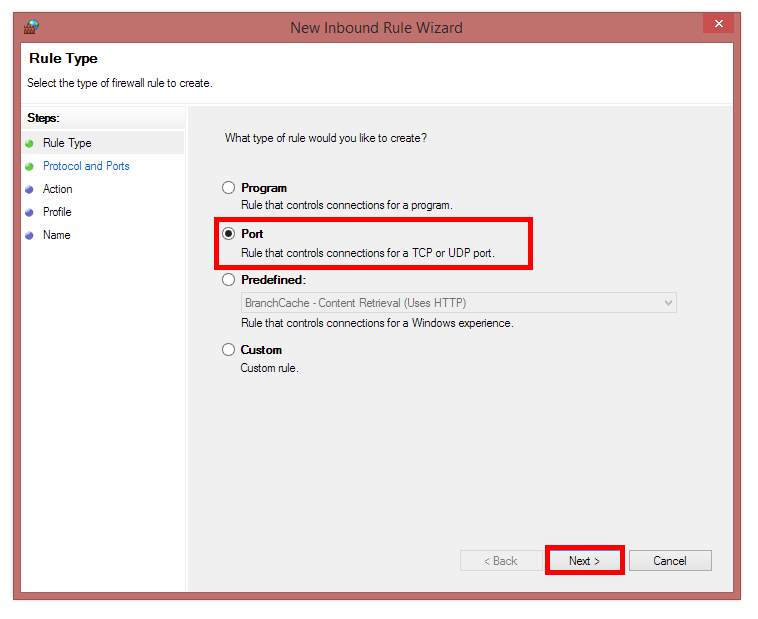
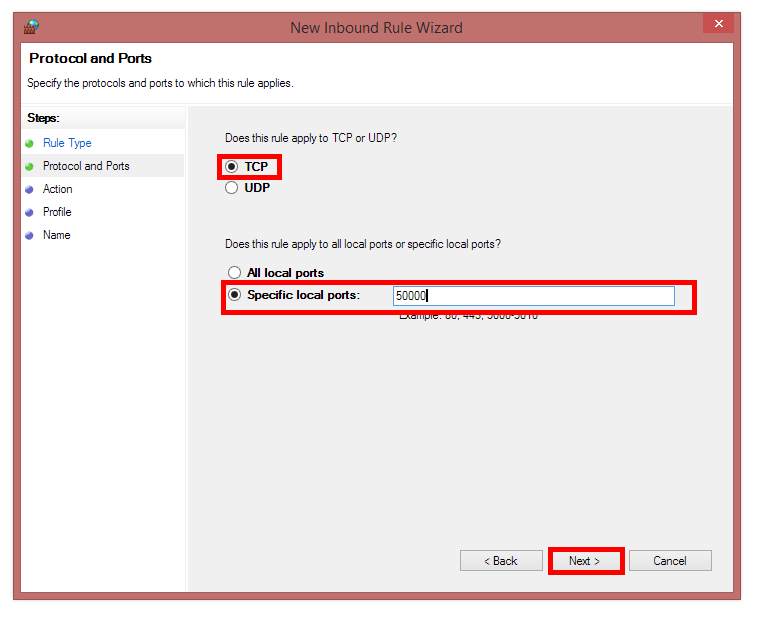
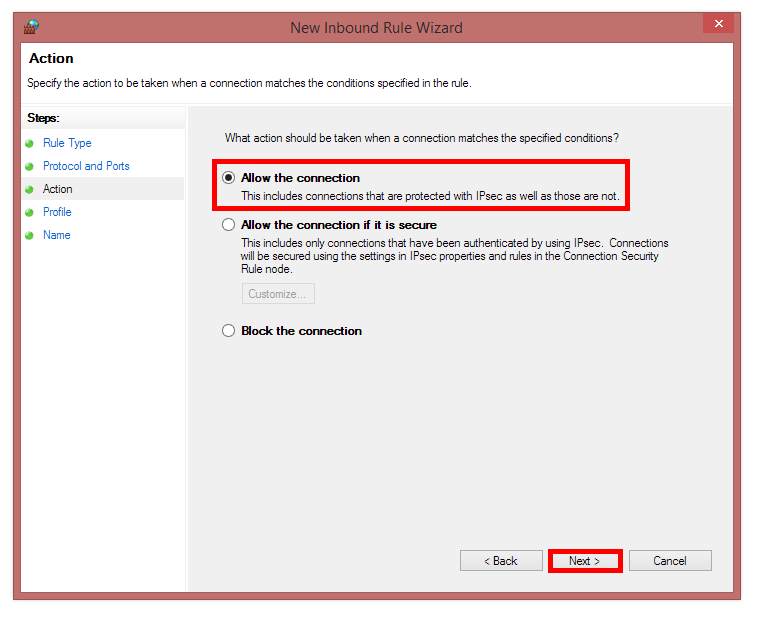
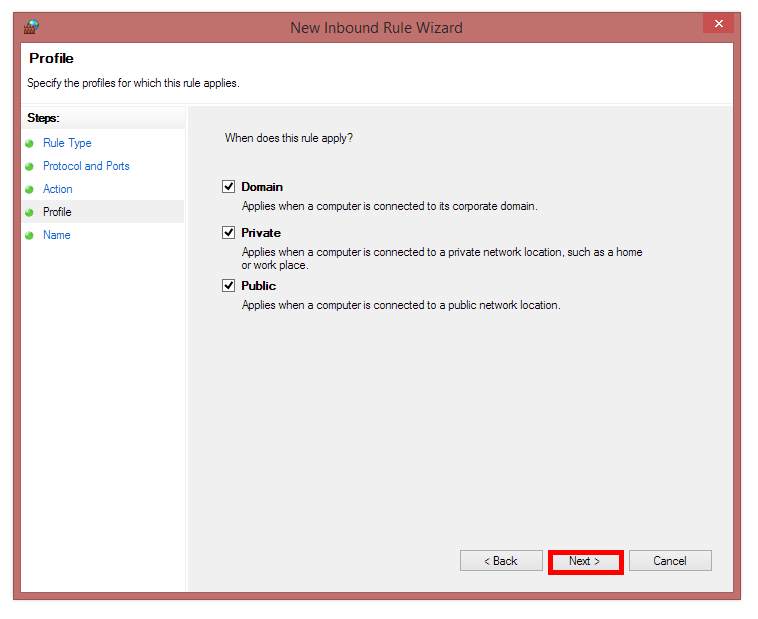
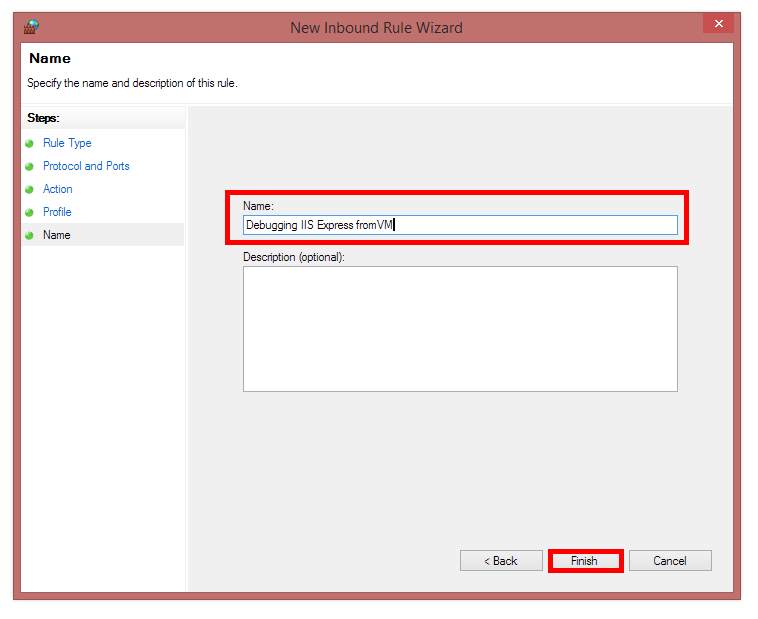
Select Inbound Rules on the left, then New Rule… on the right and set up a new rule to allow connections the port where your site is hosted by IIS Express. I have shown an example here in the following screen grabs, but use your own discretion and make sure not to give too much access to your machine.

New inbound port rule
Specifying rule port
Setting rule to allow the connection
Inbound rule application
Naming the rule
Naming the rule

Once you have set up a rule to allow access via the appropriate port, you should be able to see your IIS Express hosted site from inside your VM of choice.

As always, if you have any feedback, please leave a comment.

  1. You can also try using the name of your machine for the following steps instead of the IP []

Caching with LINQPad.Extensions.Cache

One of the tools that I absolutely adore during my day-to-day development is LINQPad . If you are not familiar with this tool and you are a .NET developer, you should go to www.linqpad.net right now and install it. The basic version is free and feature-packed, though I recommend upgrading to the professional version. Not only is it inexpensive, but it also adds some great features like Intellisense1 and Nuget package support.

I generally use LINQPad as a simple coding environment for poking around my data sources, crafting quick coding experiments, and debugging. Because LINQPad does not have the overhead of a solution or project, like a development-oriented tool such as Visual Studio, it is easy to get stuck into a task. I no longer write throwaway console or WinForms apps; instead I just throw together a quick LinqPad query. I could continue on the virtues of this tool2, but I would like to touch on one of its utility features.

As part of LINQPad , you get some useful methods and types for extending LINQPad , dumping information to LINQPad's output window, and more. Two of these methods are LINQPad.Extensions.Cache and Utils.Cache. Using either Cache method, you can execute some code and cache the result locally, then use the cached value for all subsequent runs of that query. This is incredibly useful for caching the results of an expensive database query or computationally-intensive calculation. To cache an IEnumerable<T>  or IObservable<T>  you can do something like this:

var thingThatTakesALongTime = from x in myDB.Thingymabobs
                              where x.Whatsit == "thingy"
                              select x;
var myThing = LINQPad.Extensions.Cache(thingThatTakesALongTime);

Or, since it's an extension method,

var myThing = thingThatTakesALongTime.Cache();

For other types, Util.Cache  will cache the result of an expression.

var x = Util.Cache(()=> { /* Something expensive */ });

The first time I run my LINQPad code, my lazily evaluated query or the expression is executed by the Cache method and the result is cached. From then on, each subsequent run of the code uses the cached value. Both Cache methods also take an optional name for the cached item, in case you want to differentiate items that might otherwise be indistinguishable (such as caching a loop computation).

This is, as I alluded earlier, one of many utilities provided within LINQPad that make it a joy to use. What tools do you find invaluable? Do you already use LINQPad ? What makes it a must have tool for you? I would love to hear your responses in the comments.

Updated to correct casing of LINQPad, draw attention to Cache being an extension method for some uses, and adding note of Util.Cache3.

  1. including for imported data types from your data sources []
  2. such as its support for F#, C#, SQL, etc. or its built-in IL disassembly []
  3. because, apparently, I am not observant to this stuff the first time around. SMH []

Testing AngularJS: inject, spies and $provide

Testing is an important part of software development. To a software developer, automating that testing is an important part of software development, that is because to a software developer (at least one like me) testing is boring…unless we can make it seem like software development.

In my last few posts on AngularJS we looked at a way to monitor HTTP activity and guard against page navigation when requests were pending. However, we didn't validate that the code actually worked. Fortunately, the great ways to encapsulate client-side business logic and isolate it from the user experience that AngularJS provides, coupled with excellent support from angular-mocks, make testing AngularJS easy. In this post, we will take a glimpse at how.

Jasmine, CoffeeScript and Chutzpah

There are a few approaches to JavaScript testing, but they usually involve the same general components; a test framework, a test runner, and a test language. Thankfully (for me and you), this post is not an exhaustive discussion of testing options or their pros and cons. Instead, I will be stating what I use and assuming that they are the best choice1. A great place to start is the JavaScript Testing Tactics presentation from Justin Searls, which can be found here along with other talks he has given.

Based on Justin's testing tactics, which I saw at SEMjs, I write all my tests using Jasmine, CoffeeScript and jasmine-given.  The outcome is a terse testing DSL2 that is low on ceremony and high on readability3.

Chutzpah

While it is common on greenfield projects to use a test runner such as Karma launched by Gulp or Grunt, I started my work on a legacy project where the build process was maintained using Visual Studio and MSBuild. Chutzpah is a suite of tools that fits this development process nicely, including a test runner as a NuGet package and some simple Visual Studio integration via extensions.

In addition, Chutzpah supports multiple testing frameworks4, multiple languages5 and code coverage metrics using Blanket.js. Basically, Chutzpah is awesome; fact.

Testing an Angular Factory

With our test framework, test runner and test language selected, we can look at our first test.  We are going to test saHttpActivityInterceptor and the very first thing we should test is that saHttpActivityInterceptor  actually exists. The following test does exactly that.

###
## <reference path="../angular-sa.js"/>
###

describe 'saHttpActivityInterceptor', ->
  Given -> module 'somewhatabstract'
  describe 'exists', ->
    When => inject (saHttpActivityInterceptor) =>
      @saHttpActivityInterceptor = saHttpActivityInterceptor
    Then => expect(@saHttpActivityInterceptor).toBeDefined()

Just as with AngularJS implementations, AngularJS tests start with some setup: a reference path to the file under test (other files such as the Jasmine framework, AngularJS and angular-mocks are included via the Chutzpah configuration file), a  describe call under which to group all tests for  saHttpActivityInterceptor, and a Given call that ensures the somewhatabstract module is loaded at the start of each child test (the module method is provided by Angular Mocks).

The actual unit test is declared starting at line 7 with describe 'exists', ->. This test is very simple; it states that when we try to inject our factory, we should get something other than undefined. The => syntax in CoffeeScript (also known as "fat arrow" syntax6) ensures that the When and Then calls share the same this context so that the @saHttpActivityInterceptor variable is shared between them (the @ symbol preceeding a variable in CoffeeScript indicates a context-level variable). The value stored in the @saHttpActivityInterceptor variable is obtained by asking AngularJS to inject it using the inject function, a helpful utility from angular-mocks.

This test works, you can verify it easily by commenting out the interceptor declaration in the JavaScript file we referenced7, but it is not a great test. If saNavigationGuard  does not exist, this test will fail, yet our interceptor still exists. What we have done is create a simple integration test instead of a unit test; we need to isolate the thing under test, saHttpActivityInterceptor, from its dependency, saNavigationGuard.

inject and $provide

To isolate our item under test, we need to provide our own version of saNavigationGuard . We can do this using a fake; an object that pretends to be the real thing. We will use a Jasmine spy as a fake to represent saNavigationGuard and then provide it to AngularJS using the $provide  service8. Because AngularJS uses the most recent definition when injecting dependencies and because our newly created spy is the most recent definition of saNavigationGuard, it is that spy which ultimately gets injected into saHttpActivityInterceptor when the test runs.

###
## <reference path="../angular-sa.js"/>
###

describe 'saHttpActivityInterceptor', ->
  Given -> module 'somewhatabstract'
  Given -> module ($provide) ->
    fakeNavigationGuard = jasmine.createSpyObj 'saNavigationGuard', ['registerGuardian']
    $provide.value 'saNavigationGuard', fakeNavigationGuard;return
      
  describe 'exists', ->
    When => inject (saHttpActivityInterceptor) =>
      @saHttpActivityInterceptor = saHttpActivityInterceptor
    Then => expect(@saHttpActivityInterceptor).toBeDefined()

Not only are we now isolating saHttpActivityInterceptor , but because our fake is being used in place of the real saNavigationGuard, we can check that any guardian registered with our fake works properly9.

###
## <reference path="../angular-sa.js"/>
###

describe 'saHttpActivityInterceptor', ->
  Given -> module 'somewhatabstract'
  Given -> module ($provide) ->
    fakeNavigationGuard = jasmine.createSpyObj 'saNavigationGuard', ['registerGuardian']
    $provide.value 'saNavigationGuard', fakeNavigationGuard;return
      
  describe 'exists', ->
    When => inject (saHttpActivityInterceptor) =>
      @saHttpActivityInterceptor = saHttpActivityInterceptor
    Then => expect(@saHttpActivityInterceptor).toBeDefined()
      
  describe '#guardian', ->
    describe 'is registered', ->
      Given => inject (saNavigationGuard) =>
        @saNavigationGuard = saNavigationGuard
      When => inject (saHttpActivityInterceptor) =>
      Then => expect(@saNavigationGuard.registerGuardian).toHaveBeenCalledWith jasmine.any(Function)
      
    describe 'returns undefined when there are no pending requests', ->
      Given => inject (saNavigationGuard) =>
        saNavigationGuard.registerGuardian.and.callFake (guardian) => @guardian = guardian
        inject (saHttpActivityInterceptor) =>
      When => @actual = @guardian()
      Then => expect(@actual).toBeUndefined()
    
    describe 'returns message when there are pending requests', ->
      Given => inject (saNavigationGuard) =>
        saNavigationGuard.registerGuardian.and.callFake (guardian) => @guardian = guardian
        inject (saHttpActivityInterceptor) => saHttpActivityInterceptor.request { method: "POST" }
      When => @actual = @guardian()
      Then => expect(@actual).toBeDefined()

And there we have it, a little test suite that validates the saHttpActivityInterceptor, almost. You may note that to test the guardian, we had to actually use one of the factory functions, request, but how do we know that the request function works if we haven't tested it? We should add some tests, but since we can only check the functionality of requestresponse, and responseError via the guardian call and we can only check the guardian call via the functionality of those other methods, we don't have a good way to gain high confidence in the functionality of any of these methods. Therefore, if we really wanted to test this effectively, we need to refactor the count functionality into its own factory. That way we can inject and validate the count state independently of the thing under test. For now, that's an exercise for another time.

Finally…

In this post, I have shown how we can test a simple AngularJS factory using Jasmine, Jasmine-Given and the built-in testing support of the AngularJS framework via Angular Mocks; specifically, module,  inject and $provide.

While not exhaustive, I hope this look at testing Angular-based code encourages you to begin testing your own applications. Code discussed in this and earlier related posts can be found in a repository on GitHub.  The repository includes a Visual Studio solution and project to run the tests, including NuGet and Bower restore to get the appropriate packages for running the tests. I intend to expand the code in GitHub as I write more blogs on AngularJS and AngularJS testing.

In the next post, we will take a look at how I structure directives to simplify testing and what that testing looks like. We might even see some of the cooler testing tricks for AngularJS that enable us to synchronously test asynchronous operations and validate web requests. Until then, feel free to ask questions in the comments and carry on coding.
  1. I recommend that you investigate for yourself before choosing what works best for you and your development processes []
  2. Domain-specific Language []
  3. IMHO YMMV []
  4. Jasmine, QUnit and Mocha []
  5. CoffeeScript, TypeScript or plain old JavaScript []
  6. Be careful when using this "fat arrow" syntax – sharing context across unit tests can cause side-effects including false pass and fail results []
  7. Go on, try it. The code is on GitHub []
  8. Make sure to use $provide before any calls to inject []
  9. Though we could also have done this by spying on the real saNavigationGuard.registerGuardian function using Jasmine's spyOn function, such an approach assumes the remainder of saNavigationGuard has no unwanted side-effects, which is not necessarily true []

Versioning with T4 templates

In the last month or two I've started using T4 templates, a feature originally made available in Visual Studio 2005 though rarely used outside of code generation tools for database models and the like. Though I have known about T4 templates for quite some time, like many developers, I have struggled to conceive of a practical application in my every day software development activities. That is until recently, when two uses came along at once.

1 day, 7000 lines

The first use came when I started to implement a strongly typed unit conversion framework. I needed to generate types for different quantities (Area, Distance, Volume, etc.), units and operations that convert between them. As I was coding my framework, I noticed that much of the code was identical. Rather than cut and paste a lot (I had over 20 different quantities and hundreds of units) and deal with a horribly tedious task when bug fixing, I realised that a T4 template and an XML file would reduce my effort a lot. I embarked on learning all about T4 and within a day I was auto-generating over 7000 lines of useful code from far less than that.

I am still working on some nitty gritty details in that framework so I'd rather not blog about it in detail just yet. However, having become more familiar with T4 templates, it was much easier to spot other places they could add value. The next opportunity arose when working on another project. One of the first things I tend to do when setting up a development project is set up the versioning. I split common attributes shared by every assembly in my solution into a different file and then link to it in each project.

[assembly: System.Reflection.AssemblyCompany("SomewhatAbstract.com")]
[assembly: System.Reflection.AssemblyProduct("DoobreyFlap")]
[assembly: System.Reflection.AssemblyCopyright("Copyright © 2012 SomewhatAbstract.com")]

[assembly: System.Reflection.AssemblyConfiguration("alpha")]

// Version information for an assembly consists of the following four values:
//
// Major Version
// Minor Version
// Patch
// Revision
//
[assembly: System.Reflection.AssemblyVersion("1.0.0.101")]
[assembly: System.Reflection.AssemblyFileVersion("1.0.0.101")]

This single file is then updated by a script (MSBuild step or pre-build BAT or PS file) based on information from my source control provider of choice. You may wonder where T4 fits in here. Well, it doesn't, yet.

The next step in a development project is to consider deployment. I use Windows Installer XML (aka WIX) for my installers, an open source installation framework that uses XML files to describe the installer. Just as with my source code, I split the version information into its own file as this simplifies update of that information and allows me to share it across different installations. I also update some of this information using a script.

<?xml version="1.0" encoding="utf-8"?>

<!-- These values should be updated when a new release is made. This ensures that the new version can
 upgrade the old. -->

<!-- This is the product version.
 Note: only the first 3 tokens are used (i.e. 1.0.0.0 will be ignored). -->
<?define ProductVersion=1.0.0?>

<?define ProductVersionText="1.0.0.101"?>
<?define ProductState="alpha"?>

<Include />

So, now I have two version files. My scripts update these to include revision information from my source control provider (if you are familiar with semantic versioning, this goes in the build version, though I admit, in my examples I am not using SemVer). However, when doing a new major, minor or patch update, I have to manually edit each of these files to change the major, minor or patch version. On more than one occasion, I've updated one file and not the other. This only gets more complicated if there are additional files that need versioning (maybe there's also VB projects or some markdown for a release notice). This is where T4 templates comes in handy.

1 file, many files

Now, some of you may think that this is where my plan falls down. Can't T4 templates only output one file? How can one file be suitable for C#, VB and XML all at the same time? The answer is, it can't. At least not without a little help.

As you can execute any code in a T4 template, you could just write out a file using a FileStream or something similar. However, while researching T4 templates for my unit conversion framework and realising that 7000 lines of code and tens of different types in a single file might be a tad unmanageable in some circumstances, I discovered a rather handy T4 mix-in that permits me to output multiple files from a single template using a simple syntax.

Using Damien Guard's Manager.ttinclude file, I created a T4 template and outputted my C# and WIX files. Now, updating the version just means updating the template. This could easily be extended so that the information is read from some other file (such as an XML or JSON file) rather than hard-coded in the template. In addition, the revision information that I extract from source control via script could be extracted via the template itself, if I so choose.

<#@ template debug="true" hostSpecific="true"
#><#@ output extension=".cs"
#><#@ include file="Manager.ttinclude"
#><# // Create the file manager so we can output multiple files.
#><# var manager = Manager.Create(this.Host, this.GenerationEnvironment);
#><#
#><# // Setup the version information.
#><# var version = new Version(1, 0, 0, 101);
#><# var configuration = "alpha";
#><# var company = "SomwhatAbstract.com";
#><# var product = "DoobreyFlap";
#><# var copyright = "Copyright © 2012 SomewhatAbstract.com";
#><#
#><# // Output the C# versioning
#><# //
#><# // VersionInfo.g.cs
#><# //
#>
[assembly: System.Reflection.AssemblyCompany(<#= company #>)]
[assembly: System.Reflection.AssemblyProduct(<#= product #>)]
[assembly: System.Reflection.AssemblyCopyright(<#= copyright #>)]

[assembly: System.Reflection.AssemblyConfiguration(<#= configuration #>)]

// Version information for an assembly consists of the following four values:
//
// Major Version
// Minor Version
// Patch
// Revision
//
[assembly: System.Reflection.AssemblyVersion(<#= version.ToString() #>)]
[assembly: System.Reflection.AssemblyFileVersion(<#= version.ToString() #>)]
<#
#><#
#><#
#><# // Output the WIX versioning
#><# //
#><# // VersionInfo.g.wxi
#><# //
#><# manager.StartNewFile("VersionInfo.g.wxi");
#>
<?xml version="1.0" encoding="utf-8"?>

<!-- These values should be updated when a new release is made. This ensures that the new version can
 upgrade the old. -->

<!-- This is the product version.
 Note: only the first 3 tokens are used (i.e. 1.0.0.0 will be ignored). -->
<?define ProductVersion=<#= version.ToString(3) #>?>

<?define ProductVersionText="<#= version.ToString() #>"?>
<?define ProductState="<#= configuration #>"?>

<Include />
<# manager.EndBlock();
#><# manager.Process(true);
#><#+
#>

This template will output two files: VersionInfo.g.cs and VersionInfo.g.wxi. Note that the C# file is named after the template whereas the WIX file is named on line 41. I recommend adding the g suffix to make it easier to see that these are auto-generated files. I have this template in a special PreSolutionBuild project that sits at the start of the dependency chain for my solution. This keeps things nice and tidy in my solution.

Conclusion

As you can see, this is a very simple use for T4 templates, yet it solves a reasonably common issue. In the past I may have addressed this issue of making sure the version files are up-to-date by adding to the release processes or creating a bespoke tool. Personally, I prefer the elegance of the T4-based approach and I hope that others find it just as useful as I do.

For more information on T4 templates, I found the following resources exceedingly useful: