
Photo by Rolands Zilvinskis on Unsplash
This is part 2 of my series on server-side rendering (SSR):
- 🤷🏻♂️ What is server-side rendering (SSR)?
- [You are here] ✨ Creating A React App
- 🎨 Architecting a privacy-aware render server
- 🏗 Creating An Express Server
- 🖥 Our first server-side render
- 🖍 Combining React Client and Render Server for SSR
- ⚡️ Static Router, Static Assets, Serving A Server-side Rendered Site
- 💧 Hydration and Server-side Rendering
- 🦟 Debugging and fixing hydration issues
- 🛑 React Hydration Error Indicator
- 🧑🏾🎨 Render Gateway: A Multi-use Render Server
Last week, I gave my own brief history of web sites and how their frontend implementation has drifted from entirely server-based, to entirely client-based, and is now settling (perhaps) with hybrid that we call server-side rendering (SSR). The goal of this journey is to poke around the gnarly bones of SSR and learn what we learn. We may make mistakes, break idioms, and portray ourselves as fools, but we will definitely learn. For that reason, we are not going to bother with things like Next.js, which have already fleshed over and hidden away the gnarly bones for us1.
Now, before we dip even further in the specific world of SSR, we are going to need an app. To be specific, we are going to need a React app.
Hello, React World!
Before creating a React app, we need a package manager; either npm or yarn will suffice. Though we could put together our own app from scratch, there is no need to as the handy create-react-app package exists. There are numerous ways to use this, but the easiest is to use yarn create or npx, which will do the work of obtaining the package and executing it all in one go.
For yarn, drop create from the front of create-react-app:
yarn create react-app <app-name-here>
For npx:
npx create-react-app <app-name-here>
I want to also put this in a git repository so I can track my changes. I would normally make a directory, run git init and then get started. In this case, we do not need to as create-react-app takes care of that for us.
So, let's begin. Open a terminal and invoke create-react-app.
yarn create react-app hello-react-world
After executing this, you will have a working React app that uses react-scripts to manage the basics. This is perfect for our initial journey. If we navigate to that directory and run the project, we can see our app in action.
cd hello-react-world
yarn start
Fantastic. We have an app. Before we do any more, let's get some remote source control underway. I am paranoid of my machine dying and losing all my work, so having an off machine place to store things is really useful. First, add a new repository on your source control site of choice (I prefer GitHub). Second, connect the local repository to the remote one:
git remote add origin <repo-url>
git fetch
git branch --set-upstream-to origin/master master
Since we want our local code to be the first commit and we're pushing to a brand new repository, we can force push what we have.
git push -f
Routing
Okay, we have an app and it is in source control. This is usually a good spot to spend some time setting up code quality tools like eslint and prettier. I am going to be naughty and skip right over that right now and save it for a different post, perhaps. Instead, let us add some routing to our fledgling application.
There are a few options for implementing routing in a React application (some frameworks, like Next.js, even provide it out of the box). We are going to use React Router. There are two variants of React Router; one for React on websites, and one for React Native on mobile. We want the website variant, which is provided by the react-router-dom package.
yarn add react-router-dom
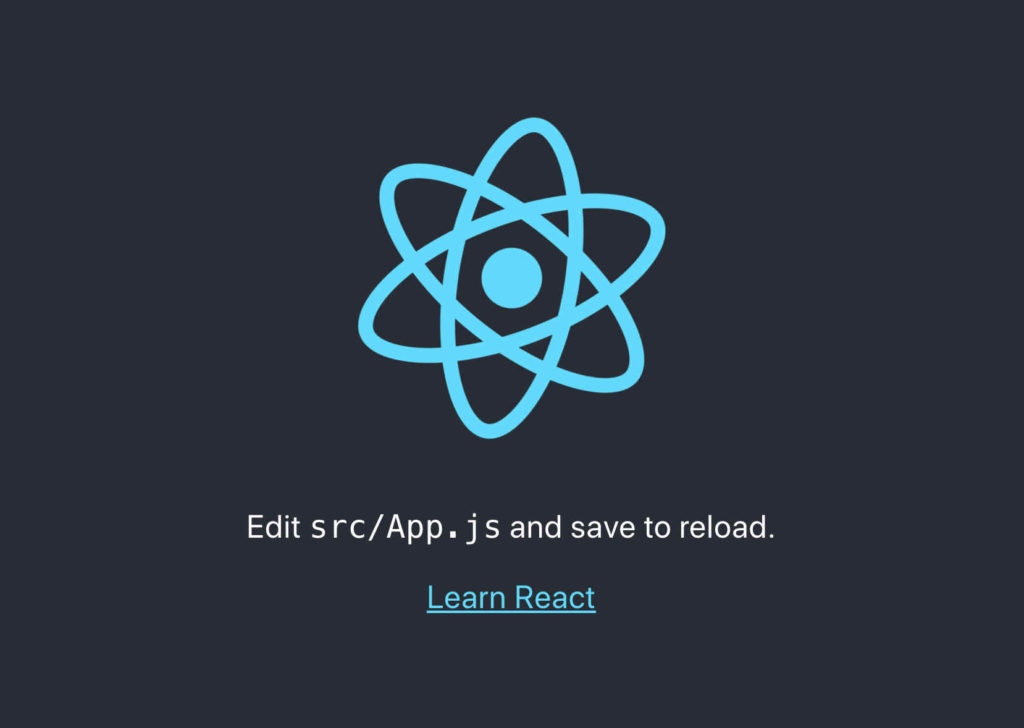
Now we will edit our app to have a couple of routes. The main app is defined in the src/App.js file. It should look something like this. I have highlighted the lines we're going to replace; we are also going to add some too.
import React from 'react';
import logo from './logo.svg';
import './App.css';

function App() {
  return (
    <div className="App">
      <header className="App-header">
        <img src={logo} className="App-logo" alt="logo" />
        <p>
          Edit <code>src/App.js</code> and save to reload.
        </p>
        <a
          className="App-link"
          href="https://reactjs.org"
          target="_blank"
          rel="noopener noreferrer"
        >
          Learn React
        </a>
      </header>
    </div>
  );
}

export default App;
There are two things we want to add.
- The routes to render our pages.
- The links to navigate to our routes.
First we import four things from react-router-dom:
BrowserRouter
This is the root of our React Router-based navigation. Basically, the router is responsible for the routing (I'm sure you guessed that).Link
This replaces the anchor tag (<a>) for our navigation.Route
This is used to render a matched route.Switch
This allows us to specify a table of possible routes that can be used to work out what should handle the URL currently being viewed.
With these things, we can then add some routes. I am adding Home, About, and Contact. Here is my app code after the edit. I have highlighted the new lines.
import React from 'react';
import {BrowserRouter, Link, Route, Switch} from "react-router-dom";
import logo from './logo.svg';
import './App.css';

function App() {
  return (
    <BrowserRouter>
      <div className="App">
        <header className="App-header">
          <img src={logo} className="App-logo" alt="logo" />
          <div className="App-links">
            <Link className="App-link" to="/">Home</Link>
            <Link className="App-link" to="/about">About</Link>
            <Link className="App-link" to="/contact">Contact</Link>
          </div>
        </header>
        <section className="App-content">
          <Switch>
            <Route path="/about">
              This is the about page!
            </Route>
            <Route path="/contact">
              This is the contact page!
            </Route>
            <Route path="/">
              This is the home page!
            </Route>
          </Switch>
        </section>
      </div>
    </BrowserRouter>
  );
}

export default App;
I also edited the CSS a little, but only to make things easier to see. The important bits are the router, wrapping our app, the Link components to perform navigation, and the Route components that render each route. With this, we now have a single page React app that has three pages for home, about, and contact.
This is going to be the application we will eventually render on the server. The important take away at this point is that we are not going to change the functionality of this app in order to achieve our aim. There are some changes we must make to support SSR, but we will not have two versions of the code. The code that runs in the browser will run on the server.
Next time, we are going to setup a server that will perform our SSR and consider what changes we need to make to our application infrastructure in order to support it. We might even get our first server-side rendered page. Until then, thanks for joining me on this continued exploration of server-side rendering using React.
- of course, if starting a new project knowing you need SSR, you should explore solutions like Next.js [↩]