Octokit and the Authenticated Access

Last week, I introduced Octokit and my plans to write a tool that will mine our GitHub repositories for information that can be used to craft release notes. This week, we will look at the first step; authentication. I am using Octokit.NET for my hackery; if you choose to use another variant of Octokit, some of the types and methods available may be different, but you should be able to follow along. In addition, I have no intention of documenting every aspect of Octokit and the GitHub API, so if you are intrigued by anything that I do not discuss, I encourage you to explore the relevant documentation.

The main `GitHubClient` class, used to access the GitHub APIs, has several constructors, some that take credentials (sort of) and some that do not. All but one of the constructors take a `ProductHeaderValue` instance, which provides some basic information about the application that is accessing the API. According to the documentation, this information is used by GitHub for analytics purposes and can be whatever you want.

Now, if you only want to read information about publicly accessible repositories, you do not need to provide any authentication at all. You can create a client instance and just get stuck in, like this:

var githubClient = new GitHubClient(new ProductHeaderValue("Tinkering"));
var repo = await githubClient.Repository.Get("octokit", "octokit.net" );
Console.WriteLine(repo.Name);

However, you can only perform some read-only tasks on public repositories and, unless you are performing the most trivial of tasks, you will hit rate limits for unauthenticated access.

NOTE: All of the Octokit.NET calls are awaitable

Authentication can be achieved in a several ways; via an implementation of `ICredentialStore` passed to a constructor of `GitHubClient`, by providing credentials to the `GitHubClient.Connection.Credentials` property, or by using the `GitHubClient.Oauth`. The `OAuth` API allows an application to authenticate without ever having access to a user's credentials; it is understandably a little more complex than approaches that just take credentials. Since, at this point, our focus is to craft some methods for extending the API functionality, we will worry about the `OAuth` workflow another time. The other two approaches are quite similar, although the constructor-based approach requires a little extra effort. The following two examples will both give you authenticated access, though I think the constructor-based access feels a little less hacky:

// Without the constructor
var githubClient = new GitHubClient(new ProductHeaderValue("tinkering"));
githubClient.Connection.Credentials = new Credentials("username", "password");
// With the constructor
public class CredentialsStore : ICredentialsStore
{
    public Task<Credentials> GetCredentials()
    {
        return Task.Run(() => new Credentials("username","password"));
    }
}

var githubClient = new GitHubClient(new ProductHeaderValue("tinkering"), new CredentialsStore());

Two-factor Authentication

Of course, using your username and password is futile because you have two-factor authentication enabled1. Luckily there is a constructor on the `Credentials` class that takes a token, which you can generate on GitHub.

First, log into your GitHub account and choose Settings from the drop-down at the upper-right. On the fight, select Personal Access Tokens.

The right-hand side will change to the list of personal access tokens you have already created for your account (you may have created these yourself or an application may have created them via OAuth). Click the Generate New Token button and give it a useful name. You can now use this token as your credentials when using Octokit. I keep my token in the LINQPad password manager2 so that I can reference it in my code using the name I gave it, like this:

Util.GetPassword("the.name.I.gave.my.oauth.token")

In conclusion…

And that is it for this week. In the next entry of this series on Octokit, we will start getting to grips with releases and some of the basic pieces for my release note utility library.

  1. If you do not, you should rectify that []
  2. The LINQPad password manager is available via the File menu in LINQPad []

Monitoring My Blog Using Uptime Robot and IF

A week or two ago I discovered that my blog was not loading and I had no idea why it was throwing the 500 error code nor for how long it had been doing so. Having experienced this once or twice before, I went into my administration dashboard, stopped the website and application pool, then started them again. This fixed the immediate issue and my blog was back online, but I was not satisfied. I no longer wanted to discover this issue by chance so I went looking for ways to monitor my site.

I found several methods that could help, including one that uses my site's RSS feed as an IF trigger on IFTTT1, but I did not like this approach, so I looked around a little more. Eventually, after reading over a few options, I settled on using Uptime Robot. Uptime Robot allows up to 30 monitors on their free tier, which can be monitored at various frequencies down to every five minutes (if you want more monitors that are checked more frequently, you can look at their various paid options). Using this service, I not only will find out if my site goes down, but I also get stats over time on the reliability of my site.

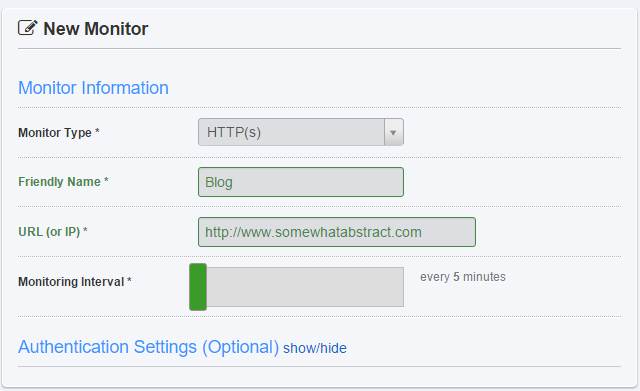
Setting up a monitor on an HTTP(s) URL

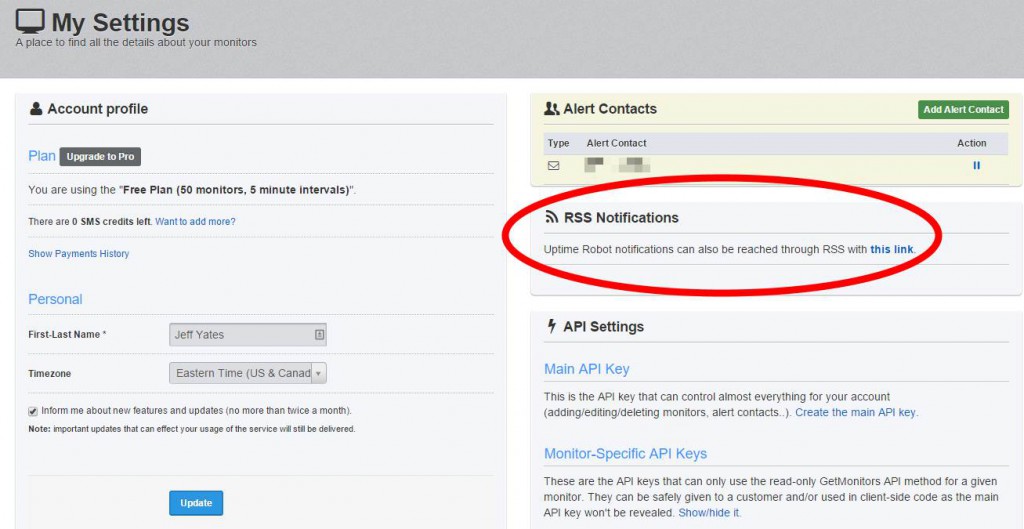
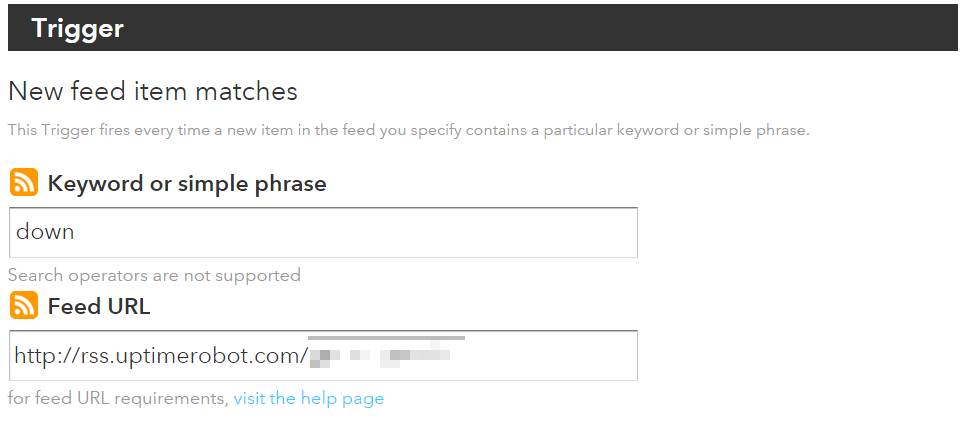
Setting up a monitor was really easy and a quick test resulted in an email telling me the site was down, followed by another telling me it was back up once the site was restored. This was great although I felt an email was not enough. While Uptime Robot provides SMS support for sending alerts, they also provide you with an RSS feed on your account that syndicates your uptime alerts. Using an IF rule and the IF app on my phone, I was able to set up phone notifications for when my blog transitioned state between being up and down.

My Settings provides link to RSS feed for monitors
Trigger settings for IF rule to send notification to phone

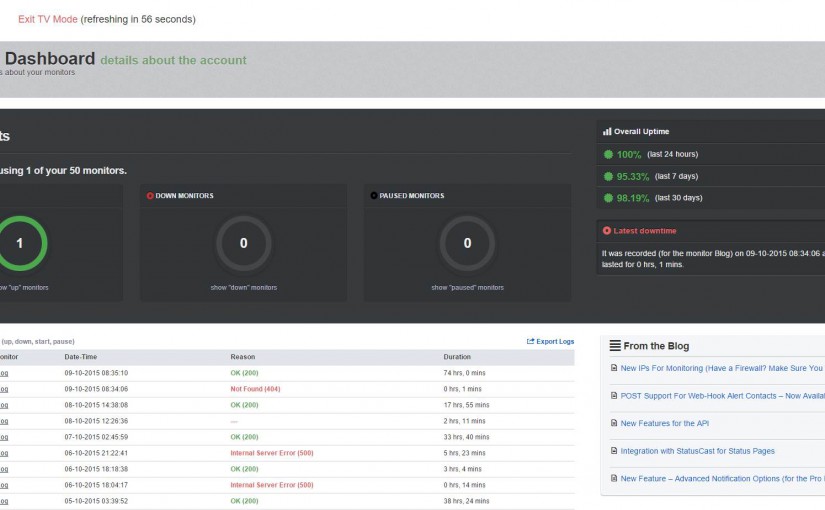
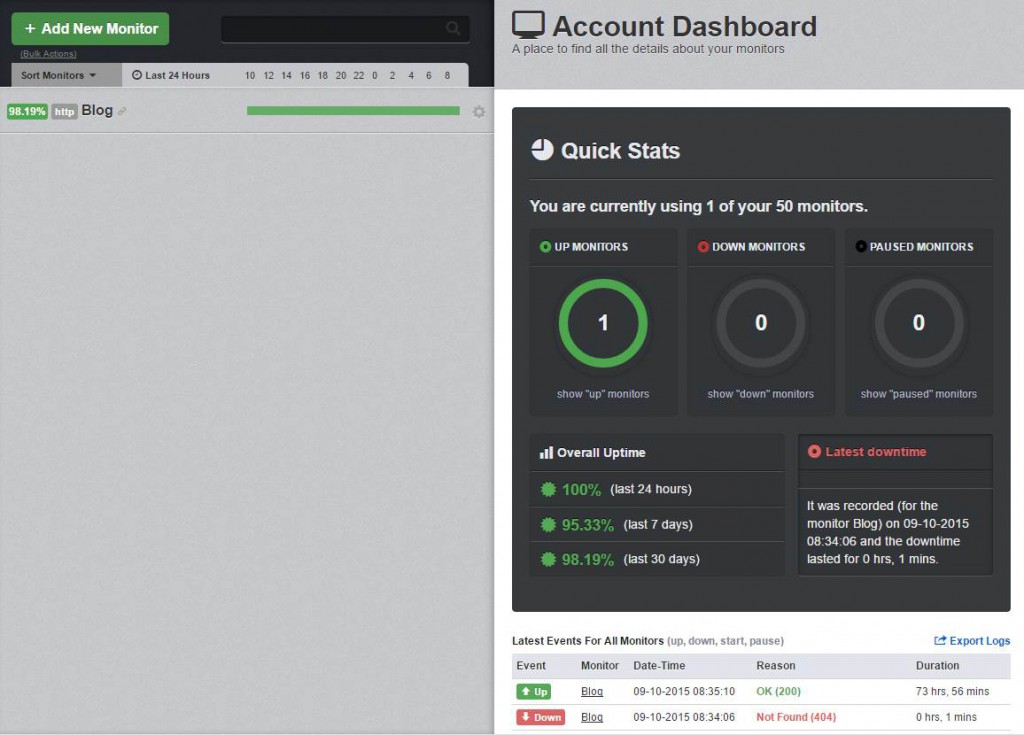
I retested the monitor (this meant taking the site down and waiting until the next monitor cycle) and convinced myself that the IF trigger and action were working satisfactorily. Now, whenever my blog experiences a glitch, I will know within about five minutes or so. Not only that, but if it fixes itself before I get chance to do so, I will have some stats that I can use to determine if there is a fundamental issue with my site's up-time. Uptime Robot provides a dashboard for managing monitors and viewing stats.

Uptime Robot dashboard view

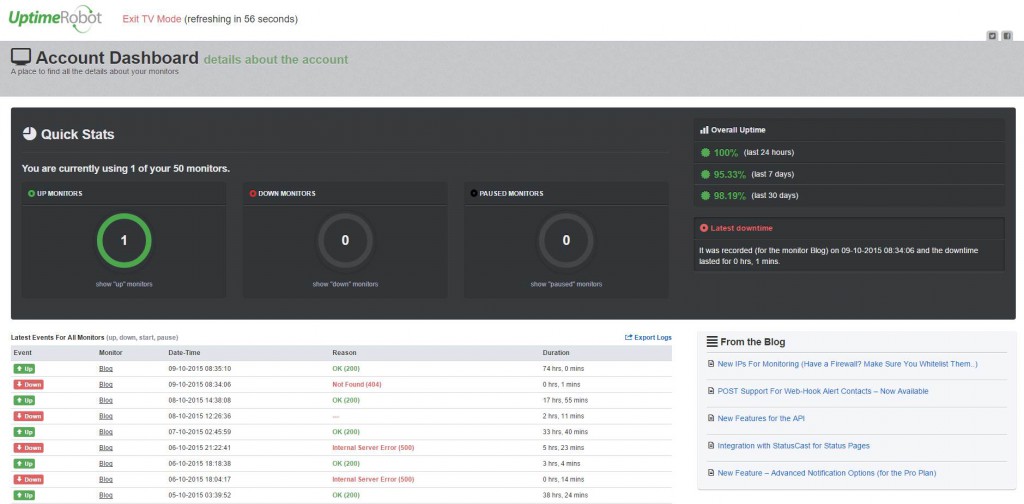
There is also a "TV Mode" for showing live stats, should you want a more permanent display in your office, for example. All of these views have a responsive layout, making it easy to check statuses from a mobile device.

Uptime Robot TV Mode

Since setting the monitor up, my site has been down a lot. I do not know for sure if this is more or less than usual because I was not monitoring it this closely before, but I learned that my hosting provider has been updating servers recently. These hardware changes have caused all sorts of havoc with the reliability of site up-time for a lot of people, it seems2. Thankfully, due to both Uptime Robot and the responsiveness of my hosting providers support team, most issues were discovered and resolved in a reasonable time.

During these availability issues, I learned that just finding out when my site is down was not sufficient, so I added an additional "site back up" rule to IFTTT. This turns out to be really useful when your site is down while one is sleeping as it removes the need to go check if it the site is back up upon waking.

In Conclusion

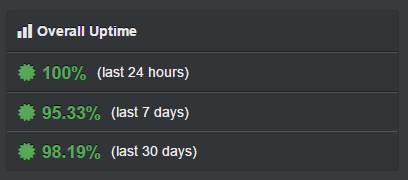
While I am disappointed that my site was down, I was really happy to see that my Uptime Robot monitoring was doing exactly what I wanted. Not only that, but I have screen grab showing less than perfect stats, which makes for a great addition to this blog.

Overview from dashboard

Uptime Robot is a nice discovery and a welcome addition to my suite of tools. The inclusion of a RSS feed to check monitor status as well as an API, which I am yet to explore, make it easy to integrate the information from Uptime Robot monitors into other tools.

  1. If This Then That: ifttt.com []
  2. I will refrain from going into detail on what I think about a company failing at their core purpose when doing something relating to that core business (feels a little like not serving food in a restaurant because they were buying new food) []

Writing A Simple Slack Bot With Node slack-client

Last week, we held our first CareEvolution hackathon of 2015. The turn out was impressive and a wide variety of projects were undertaken, including 3D printed cups, Azure-based machine learning experiments, and Apple WatchKit prototypes. For my first hackathon project of the year, I decided to tinker with writing a bot for Slack. There are many ways to integrate custom functionality into Slack including an extensive API. I decided on writing a bot and working with the associated API because there was an existing NodeJS1 client wrapper, `slack-client`2. Using this client wrapper meant I could get straight to the functionality of my bot rather than getting intimate with the API and JSON payloads.

I ended up writing two bots. The first implemented the concept of `@here` that we had liked in HipChat and missed when we transitioned to Slack (they have `@channel`, but that includes offline people). The second implemented a way of querying our support server to get some basic details about our deployments without having to leave the current chat, something that I felt might be useful to our devops team. For this blog, I will concentrate on the simpler and less company-specific first bot, which I named `here-bot`.

The requirement for here-bot is simple:

When a message is sent to `@here` in a channel, notify only online members of the channel, excluding bots and the sender

In an ideal situation, this could be implemented like `@channel` and give users the ability to control how they get notified, but I could not identify an easy way to achieve that inside or outside of a bot (I raised a support request to get it added as a Slack feature). Instead, I felt there were two options:

  1. Tag users in a message back to the channel from `here-bot`
  2. Direct message the users from `here-bot` with links back to the channel

I decided on the first option as it was a little simpler.

To begin, I installed the client wrapper using `npm`:

npm install slack-client

The `slack-client` package provides a simple wrapper to the Slack API, making it easy to make a connection and get set up for handling messages. I used their sample code to guide me as I created the basic skeleton of `here-bot`.

var Slack = require('slack-client');

var token = 'MY SUPER SECRET BOT TOKEN';

var slack = new Slack(token, true, true);

slack.on('open', function () {
    var channels = Object.keys(slack.channels)
        .map(function (k) { return slack.channels[k]; })
        .filter(function (c) { return c.is_member; })
        .map(function (c) { return c.name; });

    var groups = Object.keys(slack.groups)
        .map(function (k) { return slack.groups[k]; })
        .filter(function (g) { return g.is_open && !g.is_archived; })
        .map(function (g) { return g.name; });

    console.log('Welcome to Slack. You are ' + slack.self.name + ' of ' + slack.team.name);

    if (channels.length > 0) {
        console.log('You are in: ' + channels.join(', '));
    }
    else {
        console.log('You are not in any channels.');
    }

    if (groups.length > 0) {
       console.log('As well as: ' + groups.join(', '));
    }
});

slack.login();

This code defines a connection to Slack using the token that is assigned to our bot by the bot integration setup on Slack's website. It then sets up a handler for the `open` event, where the groups and channels to which the bot belongs are output to the console. In Slack, I could see the bot reported as being online while the code executed and offline once I stopped execution. As bots go, it was not particularly impressive, but it was amazing how easy it was to get the bot online. The `slack-client` package made it easy to create a connection and iterate the bot's channels and groups, including querying whether the groups were open or archived.

For the next step, I needed to determine when my bot was messaged. It turns out that when a bot is the member of a channel (including direct message), it gets notified on each message entered in that channel. In our client code, we can get these messages using the `message` event.

slack.on('message', function(message) {
    var channel = slack.getChannelGroupOrDMByID(message.channel);
    var user = slack.getUserByID(message.user);

    if (message.type === 'message') {
        console.log(channel.name + ':' + user.name + ':' + message.text);
    }
});

Using the `slack-client`'s useful helper methods, I turned the message channel and user identifiers into channel and user objects. Then, if the message is a message (it turns out there are other types such as edits and deletions), I send the details of the message to the console.

With my bot now listening to messages, I wanted to determine if a message was written at the bot and should therefore alert the channel users. It turns out that when a message references a user, it actually embeds the user identifier in place of the displayed `@here` text. For example, a message that appears in the Slack message window as:

@here: Anyone know how to write a Slack bot?

Is sent to the `message` event as something like3:

<@U099999>: Anyone know how to write a Slack bot?

It turns out that this special code is how a link to a user or channel is embedded into a message. So, armed with this knowledge and knowing that I would want to mention users, I wrote a couple of helper methods: the first to generate a user mention embed code from a user identifier, the second to determine if a message was targeted at a specific user (i.e. that it began with a reference to that user).

var makeMention = function(userId) {
    return '<@' + userId + '>';
};

var isDirect = function(userId, messageText) {
    var userTag = makeMention(userId);
    return messageText &&
           messageText.length >= userTag.length &&
           messageText.substr(0, userTag.length) === userTag;
};

Using these helpers and the useful `slack.self` property, I could then update the `message` handler to only log messages that were sent directly to here-bot.

slack.on('message', function(message) {
    var channel = slack.getChannelGroupOrDMByID(message.channel);
    var user = slack.getUserByID(message.user);

    if (message.type === 'message' && isDirect(slack.self.id, message.text)) {
        console.log(channel.name + ':' + user.name + ':' + message.text);
    }
});

The final stage of the bot was to determine who was present in the channel and craft a message back to that channel mentioning those online users. This turned out to be a little trickier than I had anticipated. The `channel` object in `slack-client` provides an array of user identifiers for its members; `channel.members`. This array contains all users present in that channel, whether online or offline, bot or human. To determine details about each user, I would need the user object. However, the details for each Slack user are provided by the `slack.users` property. I needed to join the channel member identifiers with the Slack user details to get a collection of users for the channel. Through a little investigative debugging4, I learned that `slack.users` was not an array of user objects, but instead an object where each property name is a user identifier. At this point, I wrote a method to get the online human users for a channel.

var getOnlineHumansForChannel = function(channel) {
    if (!channel) return [];

    return (channel.members || [])
        .map(function(id) { return slack.users[id]; }
        .filter(function(u) { return !!u && !u.is_bot && u.presence === 'active'; });
};

Finally, I crafted a message and wrote that message to the channel. In this update of my `message` event handler, I have trimmed the bot's mention from the start of the message before creating an array of user mentions, excluding the user that sent the message. The last step calls `channel.send` to output a message in the channel that mentions all the online users for that channel and repeats the original message text.

slack.on('message', function(message) {
    var channel = slack.getChannelGroupOrDMByID(message.channel);
    var user = slack.getUserByID(message.user);

    if (message.type === 'message' && isDirect(slack.self.id, message.text)) {
        var trimmedMessage = message.text.substr(makeMention(slack.self.id).length).trim();
        
        var onlineUsers = getOnlineHumansForChannel(channel)
            .filter(function(u) { return u.id != user.id; })
            .map(function(u) { return makeMention(u.id); });
        
        channel.send(onlineUsers.join(', ') + '\r\n' + user.real_name + 'said: ' + trimmedMessage);
    }
});

Conclusion

Example

My `@here` bot is shown below in its entirety for those that are interested. It was incredibly easy to write thanks to the `slack-client` package, which left me with hackathon time to spare for a more complex bot. I will definitely be using `slack-client` again.

var Slack = require('slack-client');

var token = 'MY SUPER SECRET BOT TOKEN';

var slack = new Slack(token, true, true);

var makeMention = function(userId) {
    return '<@' + userId + '>';
};

var isDirect = function(userId, messageText) {
    var userTag = makeMention(userId);
    return messageText &&
           messageText.length >= userTag.length &&
           messageText.substr(0, userTag.length) === userTag;
};

var getOnlineHumansForChannel = function(channel) {
    if (!channel) return [];

    return (channel.members || [])
        .map(function(id) { return slack.users[id]; }
        .filter(function(u) { return !!u && !u.is_bot && u.presence === 'active'; });
};

slack.on('open', function () {
    var channels = Object.keys(slack.channels)
        .map(function (k) { return slack.channels[k]; })
        .filter(function (c) { return c.is_member; })
        .map(function (c) { return c.name; });

    var groups = Object.keys(slack.groups)
        .map(function (k) { return slack.groups[k]; })
        .filter(function (g) { return g.is_open && !g.is_archived; })
        .map(function (g) { return g.name; });

    console.log('Welcome to Slack. You are ' + slack.self.name + ' of ' + slack.team.name);

    if (channels.length > 0) {
        console.log('You are in: ' + channels.join(', '));
    }
    else {
        console.log('You are not in any channels.');
    }

    if (groups.length > 0) {
       console.log('As well as: ' + groups.join(', '));
    }
});

slack.on('message', function(message) {
    var channel = slack.getChannelGroupOrDMByID(message.channel);
    var user = slack.getUserByID(message.user);

    if (message.type === 'message' && isDirect(slack.self.id, message.text)) {
        var trimmedMessage = message.text.substr(makeMention(slack.self.id).length).trim();
        
        var onlineUsers = getOnlineHumansForChannel(channel)
            .filter(function(u) { return u.id != user.id; })
            .map(function(u) { return makeMention(u.id); });
        
        channel.send(onlineUsers.join(', ') + '\r\n' + user.real_name + 'said: ' + trimmedMessage);
    }
});

slack.login();


  1. or ioJS, if you would prefer []
  2. I find hackathons to be a bit like making a giant pile of sticks in the middle of a desert; it's an opportunity to get creative and build something where there seems to be nothing…using sticks…or in my case, a Node package and Slack []
  3. I totally made up the user identifier for this example []
  4. I used WebStorm 9 from JetBrains to debug my Node code, a surprisingly easy and pleasant experience []

Controlling a bot using node.js and express

Last week was our work hackathon. During these events we get to spend a day hacking around with something fun, whether it is work related or not. Thanks to my friend and colleague, Brian Genisio, this time around we got to tinker with hardware and build some bots.

Using node.js, johnny-five, an Arduino Uno board and a bunch of additional components, teams created their own sumo bots. At the end of the day, we competed to see who had the best bot. Ours was the only bot that walked instead of using wheels and we were confident our design could have won. Unfortunately,  we faced some technical difficulties and a couple of design issues that prevented us from achieving our full potential. You can see our bot (it's the large gold one that lumbers in from the bottom) take on all the others in this video and slowly start pushing them all out of the way.

http://youtu.be/pW6t5qfsc4g

As I am sure you can tell from the audio, this was a thoroughly enjoyable and highly competitive hackathon. There were a variety of problems to address as we developed our bots. Some of them were unique to the bot being created, others were comment to all. One such problem was how to control the bot. Regardless of how the signal got to the Arduino board (Bluetooth, RF and USB were available), we had to command our bots to move forwards, backwards, left and right (and in some cases, to deploy an extensive range of weaponry and distractions).

After some trial and error, I settled on using a simple web server and web page front-end that made API calls to the server. The server would then map these API calls to bot controls. This provided a way for us to use mouse, keyboard and touch input to control our electronic sumo minion. You can see the very basic user interface1 in this Vine that I took during our build.

https://vine.co/v/Ounjjiu6Br5

Using AngularJS, the buttons in the web page were connected to API calls. By clicking buttons in the web page, using the numpad or AWSD keys, or touching the screen of my laptop, we could control the robot. The API itself was implemented using the Express package in node.

Express

I installed express into our node application, using npm:

npm install express

Then I added express to our bot code and defined a simple API to process web requests:

var express = require("express");

var app = express();

app.post('/move', doMove);
app.post('/rotate', doRotate);
app.post('/stop', doStop);

app.use(express.static(__dirname + '/public'));

app.listen(4242);

This snippet of code has been edited down to show the pertinent details; you can view the real code on GitHub. First, we require the express module, then we use it to create our server app. The three calls to post set up our three API methods and the handlers for those methods. Using the post method defined these as POST endpoints, we could have used put, get or delete, if it were appropriate. The use call sets up a redirect for static page requests so that those requests are satisfied from our public directory. Finally, we tell the app to listen on port 4242.

Each request that matches one of the three calls I have setup will be sent to the appropriate handling methods. These handlers each take a request object and a response object, which they can use to get additional information about the request and craft an appropriate response.

Here is an implementation of the doRotate method:

function doRotate(req, res) {
    var direction = req.param('direction');
    var rate = req.param('rate');
    drive.rotate(direction, rate);
    res.send();
}

In this handler, we get the direction and rate parameters from the request and pass them to the code that does the real work. At the end, we respond to the request. We could provide data in our response or even send an error if we wanted.

This allowed me to host a local website and API for controlling our bot. It was that simple.

Conclusion

Hacking a robot using node.js was a great way to delve into a new facet of JavaScript programming; hacking hardware. Not only that, but it allowed me to discover some of the cooler things that can be done quickly and easily using node.js, such as setting up a web server using express.

Have you hacked a robot with node? How did you implement control? Please leave a comment with your experience or any questions you may have. And if you are interested in hacking a bot of your own, watch this space.

  1. and an early prototype of our robot []

Testing AngularJS: $resource

This is the fourth post taking a look at testing various aspects of AngularJS. Previously, I covered:

In this installment we'll take a look at what I do to isolate components from their use of the $resource service and why.

$resource

The $resource service provides a simple way to define RESTful API endpoints in AngularJS and get updated data without lots of promise handling unnecessarily obfuscating your code. If you have created a resource for a specific route, you can get the returned data into your scope as easily as this:

$scope.data = myResource.get();

The $resource magic ensures that once the request returns, the data is updated. It's clever stuff and incredibly useful.

However, when testing components that use resources, I want to isolate the components from those resources. While I could use $httpBackend or a cache to manipulate what results the resource returns, these can be cumbersome to setup and adds unnecessary complexity and churn to unit tests1. To avoid this complexity, I use a fake that can be substituted for $resource.

spyResource

My fake $resource is called spyResource. It is not quite a 1-1 replacement, but it does support the more common situations one might want (and it could be extended to support more). Here it is.

spyResource = function (name) {
	var resourceSpy = jasmine.createSpy(name + ' resource constructor').and.callFake(function () { angular.copy({}, this); });

	resourceSpy['get'] = resourceSpy.prototype['get'] = jasmine.createSpy('get');
	resourceSpy['$save'] = resourceSpy.prototype['$save'] = jasmine.createSpy('$save');
	resourceSpy['$delete'] = resourceSpy.prototype['$delete'] = jasmine.createSpy('$delete');

	return resourceSpy;
};

First of all, it is just a function. Since it is part of my testing framework, there is no need to wrap it in some fancy AngularJS factory, though we certainly could if we wanted.

Second, it mimics the $resource service by returning a function that ultimately copies itself. This is useful because you do not necessarily have access to the instances of a resource that are created in your code before posting an object update to your RESTful API. By copying itself, you can see if the $save() call is made directly from the main spyResource definition, even if it was actually called on an instance returned by it because they share the same spies.

To use this in testing, the $provide service can be used to replace a specific use of $resource with a spyResource. For example, if you defined a resource called someResource, you might have:

describe 'testing something that uses a resource', ->
  Given => module ($provide) =>
    $provide.value 'someResource', spyResource('someResource');return
  ...

Now, the fake resource will be injected instead of the real one, allowing us to not only spy on it, but to also ensure there are no side-effects that we have not explicitly set up.

Finally…

I have covered a very simple technique I use for isolating components from and spying on their usage of AngularJS resources. The simple fake resource I provided for this purpose can be easily tailored to cater to more complex scenarios. For example, if the code under test needs data from the get() method or the $promise property is expected in get() return result, the spy can be updated to return that data.

Using this fake resource instead of $httpBackend or a cache to manipulate the behavior of a real AngularJS resource not only simplifies the testing in general, but also reduces code churn by isolating the tests from the API routes that can often change during development.

As always, please leave a comment if you find this useful or have other feedback.


  1. API routes can often change during development, which would lead to updating `$httpBackend` test code so that it matches []