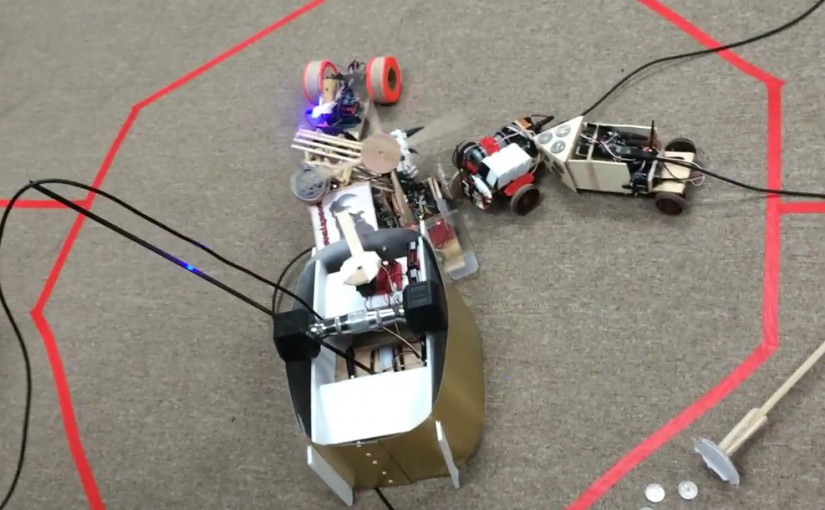
Last week was our work hackathon. During these events we get to spend a day hacking around with something fun, whether it is work related or not. Thanks to my friend and colleague, Brian Genisio, this time around we got to tinker with hardware and build some bots.
Using node.js, johnny-five, an Arduino Uno board and a bunch of additional components, teams created their own sumo bots. At the end of the day, we competed to see who had the best bot. Ours was the only bot that walked instead of using wheels and we were confident our design could have won. Unfortunately, we faced some technical difficulties and a couple of design issues that prevented us from achieving our full potential. You can see our bot (it's the large gold one that lumbers in from the bottom) take on all the others in this video and slowly start pushing them all out of the way.
http://youtu.be/pW6t5qfsc4g
As I am sure you can tell from the audio, this was a thoroughly enjoyable and highly competitive hackathon. There were a variety of problems to address as we developed our bots. Some of them were unique to the bot being created, others were comment to all. One such problem was how to control the bot. Regardless of how the signal got to the Arduino board (Bluetooth, RF and USB were available), we had to command our bots to move forwards, backwards, left and right (and in some cases, to deploy an extensive range of weaponry and distractions).
After some trial and error, I settled on using a simple web server and web page front-end that made API calls to the server. The server would then map these API calls to bot controls. This provided a way for us to use mouse, keyboard and touch input to control our electronic sumo minion. You can see the very basic user interface1 in this Vine that I took during our build.
https://vine.co/v/Ounjjiu6Br5
Using AngularJS, the buttons in the web page were connected to API calls. By clicking buttons in the web page, using the numpad or AWSD keys, or touching the screen of my laptop, we could control the robot. The API itself was implemented using the Express package in node.
Express
I installed express into our node application, using npm:
npm install express
Then I added express to our bot code and defined a simple API to process web requests:
var express = require("express");

var app = express();

app.post('/move', doMove);
app.post('/rotate', doRotate);
app.post('/stop', doStop);

app.use(express.static(__dirname + '/public'));

app.listen(4242);
This snippet of code has been edited down to show the pertinent details; you can view the real code on GitHub. First, we require the express module, then we use it to create our server app. The three calls to post set up our three API methods and the handlers for those methods. Using the post method defined these as POST endpoints, we could have used put, get or delete, if it were appropriate. The use call sets up a redirect for static page requests so that those requests are satisfied from our public directory. Finally, we tell the app to listen on port 4242.
Each request that matches one of the three calls I have setup will be sent to the appropriate handling methods. These handlers each take a request object and a response object, which they can use to get additional information about the request and craft an appropriate response.
Here is an implementation of the doRotate method:
function doRotate(req, res) {
    var direction = req.param('direction');
    var rate = req.param('rate');
    drive.rotate(direction, rate);
    res.send();
}
In this handler, we get the direction and rate parameters from the request and pass them to the code that does the real work. At the end, we respond to the request. We could provide data in our response or even send an error if we wanted.
This allowed me to host a local website and API for controlling our bot. It was that simple.
Conclusion
Hacking a robot using node.js was a great way to delve into a new facet of JavaScript programming; hacking hardware. Not only that, but it allowed me to discover some of the cooler things that can be done quickly and easily using node.js, such as setting up a web server using express.
Have you hacked a robot with node? How did you implement control? Please leave a comment with your experience or any questions you may have. And if you are interested in hacking a bot of your own, watch this space.
- and an early prototype of our robot [↩]


Very cool post. I'm also trying to put together a nodebot line follower. Been having issues with five telling me pin already in use and so I've not been able to calibrate as you defined. By the way, I'm using a zumo bot.
Do you know of anyone controlling a nodebot to perform precise distance movements and turns. I'm thinking about a way to use a nodebot to run a simple maze.
I recommend checking out Brian Genisio's blog at http://briangenisio.com/ and reaching out to him on twitter (@BrianGenisio)
He organised 99% of the CodeMash NodeBots event, is a contributor to Johnny-Five, and has much more experience than I do. I know he experimented with maze bots and I think he also has experience with Zumo (though I might be wrong).