Reputation Is No Substitute For Knowledge

Last week, I regrettably ventured back to answering questions on StackOverflow. The question that lured me back was this one:

Due to the general confusion over this operator, my answer, though correct, was down-voted and derided as entirely wrong. Worst of all, one of the main detractors had over 300k in reputation and, rather than try what I had suggested, spent their time telling me I was wrong as their own incorrect answer received all the up-votes. In the spirit of StackOverflow as I once knew it, I edited my answer and answered the comments, trying to clear up the confusion and get the question answered adequately. As my answer got down-voted, more incorrect answers got up-voted. However, eventually, I was able to convince my main detractor that my answer was correct. So they promptly deleted all evidence that they ever thought otherwise and, without attribution, edited their once incorrect, top-voted answer to be correct.

Though it stings a little1, I do not mind that my answer did not get accepted nor that it did not get the most votes; the question was answered correctly and that's the point of the site. What I find most disagreeable is the unsporting behavior that undermined the sense of community that once pervaded StackOverflow. I left the whole experience feeling like an outsider. In the past, those with wrong answers would delete theirs in favor of the right one, or they would edit theirs, but give credit to the right one. People would (in the most part) treat each other with respect and see reputation as a sign of being a good citizen, not necessarily a knowledgeable one. Not anymore.

I wish I could show the comments I received when answering this question, but they were deleted2. However, the general pattern of this and other experiences appears to be that someone with a high reputation score down-votes and derides other answers, then once the correct answer is clear, takes everything from the correct answers posted to edit into their own, which then earns all the reputation. It is an embittering experience that I know others have shared.

In the beginning, earning reputation and badges encouraged people to get things right and to help each other out. Now the site has matured, the easy questions are answered, and the gap between the newcomers and those with the highest reputation is huge. Newcomers languish in poverty with little opportunity, if any, to reach the top, while those at the top benefit from a bias toward answers and opinions that come from those with large reputation scores. What once incentivised good behavior and engagement, seems to have led to bullying and dishonesty. I am not saying that all people with high reputation engage in unscrupulous practices on StackOverflow —there are many generous and humble members of the community —unfortunately, bad experiences outweigh good experiences 5-1 (or as high as 12-1), so the actions of a few can poison the well.

The root of the problem as I see it3 is that reputation has become (or perhaps always was) over-valued, and in its pursuit, some have lost sight of what StackOverflow was trying to achieve; community. The community that made it special, that made me feel like I belonged, is gone, and reputation is no substitute for knowledge. What was once an all-for-one, one-for-all environment has, in the competition for reputation, turned toxic4.

I have no doubt that many reading this will think I am misrepresenting the situation, overreacting, or just plain wrong, and that is OK; I hope that those people are right, that this is not a trend, and that the overall community remains friendly and constructive. Personally, I will think twice before involving myself in answering (or even asking) a question on StackOverflow again.

Ultimately, StackOverflow works as long as the right answers get provided; but if those with the knowledge to answer get disillusioned and leave, from where will those right answers come?

Today's featured image is "Façade of the Celsus library, in Ephesus, near Selçuk, west Turkey" by Benh LIEU SONG. It is licensed under CC BY-SA 3.0. Other than being resized, the image has not been modified.

  1. we all like recognition for being right []
  2. I also deleted mine, since they were without context []
  3. if it is agreed that there is one []
  4. The fact that I even felt wronged may well be an indicator of that toxicity and my own part in its creation []

Tracepoints, Conditional Breakpoints, and Function Breakpoints

We've all been there: we step through our code with breakpoints and it works just fine, but run it without ever hitting a breakpoint and our code explodes in a fiery ball of enigmatic failure. Perhaps the failure only happens after the 1000th call of a method, when a variable is set to a specific value, or the value of a variable changes. These bugs can be hard to investigate without actually modifying the software that has the bug, which then means you are no longer debugging the same software that had the bug and might mean the bug disappears1.

Thankfully, Visual Studio has our backs on tracking down some of these more obscure bugs. Visual Studio allows us to modify our breakpoints to only break on certain conditions (like the 5th loop iteration, or when a file is open), to output text to the debug window, or to just output text and not actually break into our code. We can even create breakpoints that break on any function that matches a name we provide, just in case you don't even know which code it's actually calling.

Though I discuss the 2015 experience, the features themselves have been around for quite some time. I would not be surprised if this were the first time you had heard about these breakpoint settings, they have always been somewhat hidden away from the primary workflow. Even now, with the updated user experience, they are not obvious unless you go exploring.  If you want to see how to use them in your variant of Visual Studio, or get more information on breakpoints in 2015, MSDN has you covered (2003|2005|2008|2010|2012|2013|2015).

Conditions and Actions

Floating breakpoint toolbar

Let's begin by taking a look at adding conditions and tracepoints. When you add a breakpoint to a line of code, either by using the F9 keyboard shortcut or left-clicking in the code margin, a little toolbar appears to the upper right of the cursor2 . The toolbar has two icons: the first is called Settings…, where all the cool stuff lives; the second is called Disable Breakpoint, which is very useful if you have customized the breakpoint3. If you click the Settings… button, you will see an inline dialog with two checkboxes; Conditions and Actions4.

If you check the first box, Conditions, you will be presented with various fields for specifying a condition under which the breakpoint fires. There are three types of condition;

  1. Conditional Expression
  2. Hit Count
  3. Filter
Adding a condition to a breakpoint

Conditional Expression conditions allow you to specify a condition based on variables within your code. You can break on when a specific condition is met, or when a condition changes (this allows you to break when a variable changes value, for example).

Hit Count conditions allow you to break once after the breakpoint has been hit a specific number of times (such as on the fifth index of an array in a loop), every time after the breakpoint has been hit a specific number of times, or every time the hit count is a multiple of a specific number (like every other hit, or once every five hits).

Filter conditions allow you to specify filters based on process, thread, and machine names, and process and thread identifiers.

Conditional breakpointYou can add multiple conditions to a breakpoint, which all have to match for the breakpoint to fire. When a condition is applied to a breakpoint, the red circle will have a white plus symbol inside it.

Adding output text to a breakpoint

If you check the Actions box, you can specify text to be outputted when the breakpoint fires. By default, a checkbox named Continue Execution will be checked because, usually, if specifying output text, you want a tracepoint rather than a breakpoint. However, if you want to break and output text, you can uncheck this additional checkbox.

Non-breaking breakpoint (aka tracepoint)When a breakpoint is set to continue execution, the red circle changes into a red diamond. If a condition is also applied, the diamond has a white cross Conditional non-breaking breakpoint (aka tracepoint)in it.

If you use the Oz-code extension for Visual Studio, tracepoints are given some additional support with a quick action to add a tracepoint and a tracepoint viewer that shows you just tracepoints.

Function Breakpoints

Adding a function breakpoint

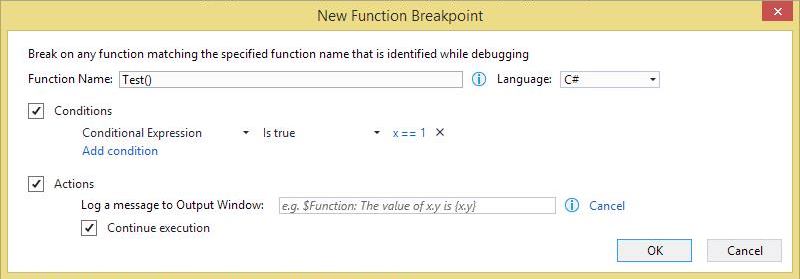
So far, we've looked at traditional breakpoints that are set on specific lines of code. Function breakpoints are set against function names. To add a function point, use the Visual Studio menu to go to Debug→New Breakpoint→Function Breakpoint…5. Selecting this will show a dialog where you can specify the function name (qualifying it as you require), and the language to which the breakpoint applies. You can also specify conditions and actions as with any other breakpoint.

In Conclusion…

Visual Studio is a complex development environment, which unfortunately leads to some of its cooler features being harder to find. I hope you find this introduction to breakpoint superpowers useful, if you do or if you have more Visual Studio debugging tips, I'd love to hear from you in the comments.

Today's featured image is "Debugging the Computer" by Jitze Couperus. The image is licensed under CC BY 2.0. Other than being resized, the image has not been modified.

  1. yay, fixed it… []
  2. This also appears if you hover over an existing breakpoint in the margin []
  3. Deleting the breakpoint would also delete any customization, but disabling does not []
  4. This dialog can also be reached by right-clicking the breakpoint and choosing either Conditions… or Actions… or by hitting Alt+F9, C; the only difference here is that one of the two checkboxes will get checked automatically []
  5. You can also add one via the keyboard with Alt+F9, B or the New… dropdown in the Breakpoints tool window []

International Nodebots Day 2015

For the last few weeks, SEMjs, Girl Develop It Ann Arbor, and some volunteers from the local developer community have been working toward putting on an event for International Nodebots Day, a day of events held around the world for building and hacking bots using JavaScript, node, and Johnny-Five. Most of the Ann Arbor team got to enjoy the fruits of our labor on Saturday.

International Nodebots Day event locations

While most of the day was set aside for building the bots and getting them moving, the last couple of hours were set aside for the exciting finale; seeing the bots battle each other in the Octagon. The aim of each battle is simple; push the other bot out of the arena. It is always fun to see the vastly different bots come to blows as an audience of competitors and impartial spectators bey for bot blood. Sadly, due to concerns over the bot being badly damaged (a somewhat rare occurrence), technical problems, or a desire not to compete, not every bot enters the battle tournament. There were two bots independently created on Saturday that I really wish had battled each other, shown below; Tank Kitty and The Mouse1.

Tank Kitty and The Mouse

We had 17 competitors in our BattleBot tournament, with no two bots alike (always surprising to me since the base kit for each bot is identical). The winning bot for this event was Brick. Like the name implies, Brick was a brick, and a nimble brick at that. With wheels strapped to the bottom, an Arduino board strapped on top, and a hefty weight advantage, Brick maneuvered, dodged, and pushed its way to a victory that seemed inevitable from the first round. After watching Brick dominate the brilliantly (though perhaps, optimistically) named Gunther, The Destroyer of Dreams, there seemed little doubt that Brick was likely to demolish every opponent it faced. No flipper was powerful enough to lift Brick, and no wheel nor anchor had the grip to stop a brick in its tracks. It turns out that motorizing a ten pound brick is a solid strategy, though I still question the mind of a person who has the forethought to bring a brick to such an event. You can check out Brick's performance below in the highlight reel filmed and edited by John Chapman of SEMjs.

https://www.youtube.com/watch?v=IGX13wuxdy0

In organising this event, we drew on the experiences of our own in-house nodebot hackathon at CareEvolution, which Brian Genisio had organised, and the two day CodeMash events, also organised by Brian with the assistance of a small volunteer team. Whether it is experiences like "propellers should be banned" to assets like the lab of components and tools, or the fantastic CAD files for laser-cutting bot chassis and wheels (thanks to Ken Fox), we always learn something new from each event, and Saturday was no different. Thanks to Brick, we now know that a weight limit needs to be added to the battle rules2.

Not everyone who participated was working toward a showdown in the Octagon. There were quite a few people there doing their own thing, like the creator of FlipflopBot, who decided to work on a novel line following creation.

https://www.youtube.com/watch?v=mZwWAo2CRVM

It was a long, but immensely satisfying day thanks to the creative kids and adults that participated, the hard work of the volunteer team (Ronda Bergman, Dennis Burton, Julie Cameron, John Chapman, Ken Fox, Brian Genisio, Jeanette Head, Chrissy Yates, and me), the support of their families, and the generosity of the sponsors; Menlo Innovations, which provided the space to host the event; CareEvolution which sponsored the nodebots lab that participants used to build and customize their bots; and Quantum Signal, which generously sponsored awesome t-shirts for each of our attendees and volunteers.

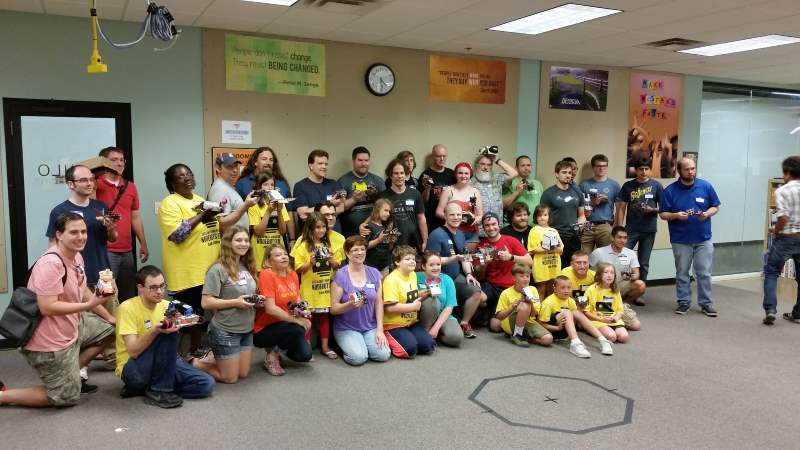
International Nodebots Day Ann Arbor Participants

With that, another successful nodebots event is behind us. It was barely over before the team started discussing what we might do next time. What might we do next time? I guess you'll have to wait and see.


If you're interested in more information on our event or nodebots in general, a good starting point would be nodebots.semjs.org or the nodebotsday github repository.

  1. A name I have invented since I failed to get the bot name from its creators []
  2. and perhaps, a new "BrickBot" event needs to be added for those that happen to bring their brick to battle []

Use Inbox, Use Bundles, Change Your Life

I love Google Inbox. At work, it has enabled me to banish pseudo-spam1, prioritize work, and be more productive. At home, it has enabled me to quickly find details about upcoming trips including up-to-date flight information, remind myself of tasks that I need to do around the house, and generally be more organized. While Inbox doesn't replace Gmail for all situations, it does replace it as a day-to-day email client. Gmail is awesome; Inbox is awesomer.

The main feature of Inbox that has enabled me to build a healthier relationship with my email (and achieve virtual Inbox Zero without having to make email management my day job) is Bundling. Bundles in Inbox are a lot like filters that label emails in Gmail; they allow you to group emails based on rules. Not only can you define filters to determine what emails go in the bundle, but you can also decide if the bundled messages go to your inbox (and how often you see the bundle) or if they are just archived away.

Inbox Sidebar
Inbox Sidebar

Inbox comes with some standard bundles: Purchases, Finance, Social, Updates, Forums, Promos, Low Priority, and Trips. Trips is a magic bundle that you cannot configure; it gathers information about things like hotel stays, flight reservations, and car rentals, and combines them into trips like "Weekend in St. Louis" or "Trip to United Kingdom". The other bundles, equivalent to the tabs that Gmail added a year or two ago, automatically define the filters (and as such, those filters are uneditable), but do allow you to control the behavior of the bundle.

When bundled emails appear in your Inbox, they appear as a single item that can be expanded to view the emails inside. You can also mark the entire bundle as done2, if you desire. These features mean you can bundle emails in multiple bundles and have those bundles appear in your Inbox as messages arrive, once a day (at a time of your choice), once a week (at a time and day of your choice), or never3 (bundling some of the pseudo-spam and only having it appear once a day or once a week has drastically improved the signal-to-noise ratio of my email).

Trips
Trips
Trip to NYC
Trip to NYC

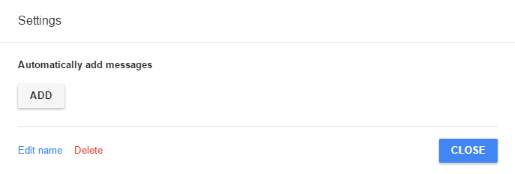
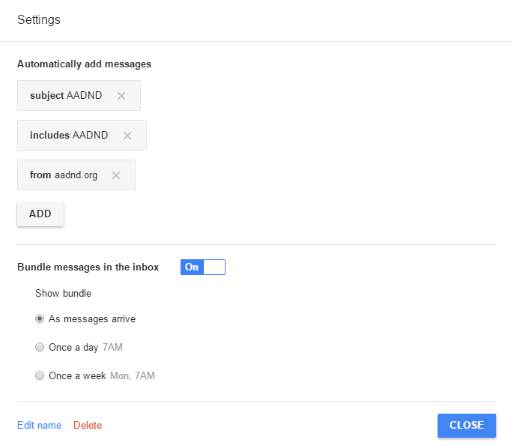
While the default bundles are useful, the real power is in defining your own. You can start from fresh or you can use an existing label. Each label is shown in Inbox as unbundled and has a settings gear that allows you to setup bundling rules. In my example, I added a rule to label emails relating to Ann Arbor .NET Developers group.

Label settings without any bundle rules
Adding a filter rule
Label settings showing bundling rules

With the bundle defined, every email that comes in matching the rule will be labelled and added to the bundle, which will appear in my inbox whenever a message arrives. Any messages I mark as done are archived4, removing them from the main inbox. However, they can be seen quickly by clicking the bundle name in the left-hand pane. This is great, except for one thing. The bundle definition only works for new emails as they arrive. It does not include messages you have received before the bundle was setup.

This just felt untidy to me so I was determined to fix it. As it turns out, Gmail provides all the tools to complete this part of Inbox bundles. Since each bundle is a set of filter rules and a label, you can actually edit those filters in Gmail, and Gmail includes the additional ability of applying that rule to existing emails.  To do this, go to Gmail and click the Settings gear, then the Filters tab within settings.

Bundling filters in Gmail
Filters that define my bundle in Gmail

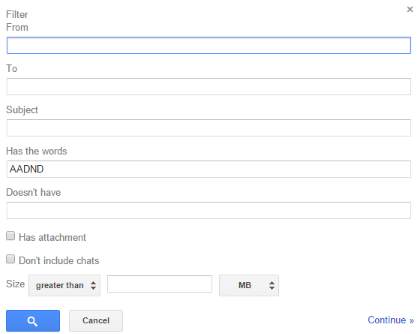
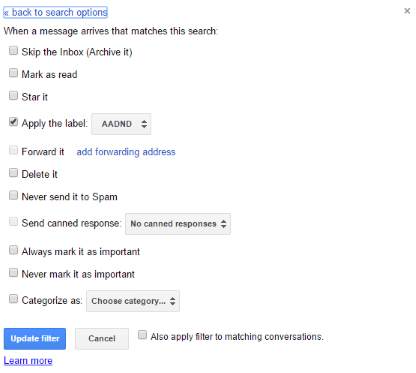
Find the filters that represent your new bundling rules, then edit each one in turn. On the first settings box for the filter, click continue in the lower right. On the following screen, check the "Apply to matching conversations" checkbox and click the "Update filter" button.

First filter edit screen
Last filter editing screen
Apply to existing messages

After performing this action for each of my bundles, I returned to Inbox and checked the corresponding bundles; all my emails were now organised as I wanted.

In summary, if you haven't tried Inbox (and you have an Android or iPhone; a strange limitation that I wish Google would lift), I highly recommend spending some time with it, getting the bundles set up how you want, and using it as your primary interface for your Google email. The combination of bundling with the ability to treat emails as tasks (mark them as done, snooze them, pin them) and see them in a single timeline with your Google reminders makes Inbox a powerful yet simple way to manage day-to-day email. Before Inbox, I abandoned Inbox Zero long ago as a "fake work" task that held no value whatsoever, my Gmail inbox had hundreds of read and unread emails in it. Now that I have Inbox, I reached Inbox Zero in a day with minimal effort that one might consider to be just "reading email". I'm not saying Inbox Zero is valuable, I'm just saying that it is realistically achievable with Inbox because Inbox gets daily email management right.

Use bundles, change your life.

  1. I use the term "pseudo-spam" to describe those emails that you don't want to necessarily totally banish as spam so that you can search them later, but that aren't important to you at all such as support emails for projects you don't work on, or wiki update notifications []
  2. One of the great features of Inbox is the ability to treat emails as tasks, adding reminders to deal with them later or mark them as done; this makes drop,delegate,defer,do a lot easier to manage []
  3. If a bundle is marked as never, it is considered "unbundled" and works just as a filter that applies a label []
  4. This can be changed to "Move to Trash" in the Inbox settings []

The Need For Speed

Hopefully, those who are regular visitors to this blog1 have noticed a little speed boost of late. That is because I recently spent several days overhauling the appearance and performance with the intent of making the blog less frustrating and a little more professional. However, the outcome of my effort turned out to have other pleasant side effects.

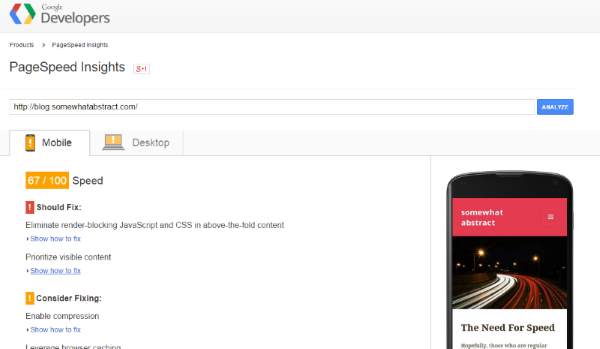
I approached the performance issues as I would when developing software; I used data. In fact, it was data that drove me to look at it in the first place. Like many websites, this site uses Google Analytics, which allows me to poke around the usage of my site, see which of the many topics I have covered are of interest to people, what search terms bring people here (assuming people allow their search terms to be shared), and how the site is performing on various platforms and browsers. One day I happened to notice that my page load speeds, especially on mobile platforms, were pretty bad and that there appeared to be a direct correlation between the speed of pages loading and the likelihood that a visitor to the site would view more than one page before leaving2 . Thankfully, Google provides via their free PageSpeed Insights product, tips on how to improve the site. Armed with these tips, I set out to improve things.

Google PageSpeed Insights

Now, in hindsight, I wish I had been far more methodical and documented every step— it would have made for a great little series of blog entries or at least improved this one —but I did not, so instead, I want to summarise some of the tasks I undertook. Hopefully, this will be a useful overview for others who want to tackle performance on their own sites. The main changes I made can be organized into server configuration, site configuration, and content.

The simplest to resolve from a technical perspective was content, although it remains the last one to be completed mainly due to the time involved. It turns out that I got a little lazy when writing some of my original posts and did not compress images as much as I probably should have. The larger an image file is, the longer it takes to download, and this is only amplified by less powerful mobile devices. For new posts, I have been resolving this as I go by using a tool called PNGGauntlet to compress my images as either JPEG or PNG before uploading them to the site. Sadly, for images already uploaded to the site, I could only find plugins that ran on Apache (my installation of WordPress is on IIS for reasons that I might go into another time), would cost a small fortune to process all the images, or had reviews that implied the plugin might work great or might just corrupt my entire blog. I decided that for now, to leave things as they are and update images manually when I get the opportunity. This means, unfortunately, it will take a while. Thankfully, the server configuration options helped me out a little.

On the server side, there were two things that helped. The first, to ensure that the server compressed content before sending it to the web browser, did not help with the images, but it did greatly reduce the size of the various text files (HTML, CSS, and JavaScript) that get downloaded to render the site. However, the second change made a huge difference for repeat visitors. This was to make sure that the server told the browser how long it could cache content for before it needed to be downloaded again. Doing this ensured that repeat visitors to the site would not need to download all the CSS, JS, images, and other assets on every visit.

With the content and the server configuration modified to improve performance, the next and most important focus was the WordPress site itself. The biggest change was to introduce caching. WordPress generates HTML from PHP code. This takes time, so by caching the HTML it produces, the speed at which pages are available for visitors is greatly increased. A lot of caching solutions for WordPress are developed with Apache deployments in mind. Thankfully, I found that with some special IIS-specific tweaking, WP Super Cache works great3 .

At this point, the site was noticeably quicker and almost all the PageSpeed issues were eliminated. To finish off the rest, I added a few plugins and got rid of one as well. I used the Autoptimize plugin to concatenate, minify, compress, and perform other magic on the HTML, CSS, and JS files (this improved download times just a touch more by reducing the number of files the browser must request, and reducing the size of those files), I added JavaScript to Footer, a plugin that moves JavaScript to after the fold so that the content appears before the JavaScript is loaded, I updated the ad code (from Google) to use their latest asynchronous version, and I removed the social media plugin I was using, which was not only causing poor performance but was also doing some nasty things with cookies.

Along this journey of optimizing my site, I also took the opportunity to tidy up the layout, audit the cookies that are used, improve the way advertisers can target my ads, and add a sitemap generator to improve some of the ways Google (and other search engines) can crawl the site4. In all, it took about five days to get everything up and running in my spare time.

So, was it worth it?

Before and after
Before and after

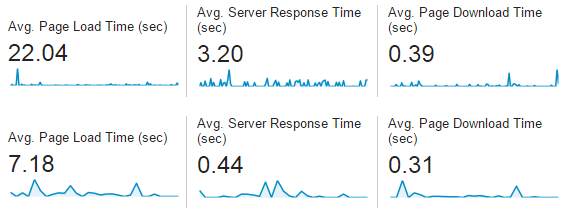
From my perspective, it was definitely worth it (please let me know your perspective in the comments). The image above shows the average page load, server response, and page download times before the changes (from January through April – top row) and after the changes (June – bottom row). While the page download time has only decreased slightly, the other changes show a large improvement. Though I cannot tell for certain what changes were specifically responsible (nor what role, if any, the posts I have been writing have played5 ), I have not only seen the speed improve, but I have also seen roughly a 50-70% increase in visitors (especially from Russia, for some reason), a three-fold increase in ad revenue6, and a small decrease in Bounce Rate, among other changes.

I highly recommend taking the time to look at performance for your own blog. While there are still things that, if addressed, could improve mine (such as hosting on a dedicated server), and there are some things PageSpeed suggested to fix that are outside of my control, I am very pleased with where I am right now. As so many times in my life before, this has led me to the inevitable thought, "what if I had done this sooner?"

  1. hopefully, there are regular visitors []
  2. The percentage of visitors that leave after viewing only one page is known as the Bounce Rate []
  3. Provided you don't do things like enable compressing in WP Super Cache and IIS at the same time, for example. This took me a while to understand but the browser is only going to strip away one layer of that compression, so all it sees is garbled nonsense. []
  4. Some of these things I might blog about another time if there is interest (the cookie audit was an interesting journey of its own). []
  5. though I possibly could with some deeper use of Google Analytics []
  6. If that is sustained, I will be able to pay for the hosting of my blog from ad revenue for the first time []