Octokit and Noise Reduction with Pull Requests

Last time in this series on Octokit we looked at how to get the commits that have been made between one release and another. Usually, these commits will contain noise such as lazy commit messages and merge flog ("Fixed it", "Corrected spelling", etc.), merge commits, or commits that formed part of a larger feature change submitted via pull request. Rather than include all this noise in our release note generation, I want to filter those commits and either remove them entirely, or replace them with their associated pull request (which hopefully will be a little less noisy).

Before we filter out the noise, it seems prudent to reduce the commits to be filtered by matching them to pull requests. As with commits, we can query pull requests using a specific set of criteria; however, though we can request the results be sorted a certain way, we cannot specify a date range. To get all the pull requests that were merged before our release, we need to query for all the pull requests and then filter by date locally.

This query can be slow, since we are getting all closed pull requests in the repository. We could speed it up by providing a base branch name in the query criteria. However, to remove as much commit noise as possible, I would like to include pull requests that were merged to a different branch besides just the release branch1. We could make things more performant by managing a list of active release branches and then querying pull requests for each of those branches only rather than the entire repository, but for now, we will stick with the less optimal approach as it keeps the code examples a little cleaner.

var prRequest = new PullRequestRequest
{
    State = ItemState.Closed,
    SortDirection = SortDirection.Descending,
    SortProperty = PullRequestSort.Updated
};

var pullRequests = await gitHubClient.PullRequest.GetAllForRepository("RepositoryOwner", "RepositoryName", prRequest);
var pullRequestsPriorToRelease = pullRequests
    .Where(pr => pr.MergedAt < mostRecentTwoReleases[0].CreatedAt);

Before we can start filtering our commits against the pull requests, we need to get the commits that comprise each pull request. When requesting a collection of items (like we did for pull requests), the GitHub API returns just enough information about each item so that we can filter and identify the ones we really care about. Before we can do things with other properties on the items, we have to request additional information. More information on each pull request can be obtained about a specific pull request by using the `Get`, `Commits`, `Files`, and `Merged` calls. The `Get` call returns the same type of objects as the `GetAllForRepository` method, except that all the data is now populated instead of just a few select properties; the `Merged` call returns a Boolean value indicating if the PR has been merged (equivalent to the `Merged` property populated by `Get`); the `Files` method returns the files changed by that pull request; and the `Commits` method returns the commits.

var commitsForPullRequest = await gitHubClient.PullRequest.Commits("RepositoryOwner", "RepositoryName", pullRequest.Number);

At this point, things are looking pretty good: we can get a list of commits in the release and a list of pull requests that might be in the release. Now, we want to filter that list of commits to remove items that are covered by a pull request. This is easy; we just compare the hashes and remove the matches.

var commitsNotInPullRequest = from commit in commitsInRelease
                              join prCommit in prCommits on commit.Sha equals prCommit.Sha into matchedCommits
                              from match in matchedCommits.DefaultIfEmpty()
                              where match == null
                              select commit;

Using the collection of commits for the latest release, we join the commits from the pull requests using the SHA hash and then select all release commits that have no matching commit in the pull requests2. However, we don't want to lose information just because we're losing noise, so we have to maintain a list of the pull requests that were matched so that we can build our release note history. To keep track, we will hold off on discarding any information by pairing up commits in the release with their prospective pull requests instead of just dropping them.

Going back to where we had a list of pull requests merged prior to our release, let us revisit getting the commits for those pull requests and this time, pairing them with the commits in the release to retain information.

var commitsFromPullRequests = from pr in pullRequestsPriorToRelease
                              from commit in github.PullRequest.Commits("RepositoryOwner", "RepositoryName", pr.Number).Result
                              select new {commit,pr};

var commitsWithPRs = from commit in commitsInRelease
                     join prCommit in commitsFromPullRequests on commit.Sha equals prCommit.commit.Sha into matchedPrCommits
                     from matchedPrCommit in  matchedPrCommits.DefaultIfEmpty()
                     select new
                     {
                         PullRequest = match?.pr,
                         Commit = commit
                     };

Now we have a list of commits paired with their parent pull request, if there is one. Using this we can build a more meaningful set of changes for a release. If I run this on the latest release of the Octokit.NET repository and then group the commits by their paired pull request, I can see that the original list of 135 commits would be reduced to just 58 if each commit that belonged to a pull request were bundled into just one entry.

Next, we need to process the commits to remove those representing merges and other noise. These are things to discuss in the next post of this series where perhaps we will take stock and see whether this effort has been valuable in producing more meaningful release note generation. Until then, thanks for reading and don't forget to leave a comment.

  1. often changes are merged forward from one branch to another, especially if there are multiple release branches to support patch development and such []
  2. The `join` in this example is an outer join; we are taking the join results and using `DefaultIfEmpty()` to supply an empty collection when there was nothing to join []

Octokit and the Content of Releases

I started out my series on Octokit by defining a goal; to use GitHub repository history to build a basic summary of changes contained in a release. In order to do this, we need to define what a release is and then determine how we get the pertinent information to say what changes that release contains.

At a basic level, a release is a tagged point in the git repository. GitHub takes this one step further by making a release a first class concept as a lightweight git tag with additional attributes like a title and release notes. Octokit even allows first class access to GitHub releases in a repository, like so:

var releases = await gitHubClient.Release.GetAll("RepositoryOwner", "RepositoryName");

Great! With a little extra code, we can determine which release was the latest and then get all the commits in that release.

var latestRelease = releases.MaxBy(r => r.CreatedAt);

var commitRequest = new CommitRequest
{
    Until = latestRelease.CreatedAt,
    Sha = latest.TagName
};
var commits = await github.Repository.Commits.GetAll("RepositoryOwner", "RepositoryName", commitRequest);

In the above code, we use MoreLinq to get the most recent release and then request all the commits in the repository on the same branch as that release up until the date the release was created. We request these commits using a `CommitRequest` object that specifies the query parameters. In this case, we want all the commits until the date of the release for the tag on which the release was made1. Of course, this will include everything ever done in that branch since the beginning of time, which is a bit of information overload. What we really want are the commits since the previous release.

var mostRecentTwoReleases= releases
    .OrderByDescending(r => r.CreatedAt)
    .Take(2)
    .ToArray();

var commitRequest = new CommitRequest
{
    Until = mostRecentTwoReleases[0].CreatedAt,
    Sha = mostRecentTwoReleases[0].TagName,
    Since = mostRecentTwoReleases[1].CreatedAt
};
var commits = await github.Repository.Commits.GetAll("RepositoryOwner", "RepositoryName", commitRequest);

Now we have taken the releases and used their `CreatedAt` dates to determine the most recent two and used the previous release date to set the `Since` date in our request. However, this code still has a flaw; we never said what branch the releases should be from. For all we know, the most recent two releases are on entirely different branches. To fix that, we need to filter the releases to just the branch we want.

var mostRecentTwoReleases= releases
    .Where(r => r.TargetCommitish = "myBranch")
    .OrderByDescending(r => r.CreatedAt)
    .Take(2)
    .ToArray();

var commitRequest = new CommitRequest
{
    Until = mostRecentTwoReleases[0].CreatedAt,
    Sha = mostRecentTwoReleases[0].TagName,
    Since = mostRecentTwoReleases[1].CreatedAt
};
var commits = await github.Repository.Commits.GetAll("RepositoryOwner", "RepositoryName", commitRequest);

The highlighted line is where we filter on the appropriate branch (it took some investigation to discover that the `TargetCommitish` property of a release is its branch name). We now have just the commits for the release branch we care about between the most recent release and the one before it.

In the next post, we will look at reducing the noise in the commit history using pull requests. Until then, thank you for stopping by and don't forget to leave a comment.


  1. The `Sha` property of the `CommitRequest` can be either a commit hash or branch/tag name []

And so it goes

You may have noticed I have not posted in a while. We recently moved from Michigan to Texas and during that time, I let a few lesser commitments slide. That is not to say I do not value my blog, I merely value other aspects of my life more1. Now that we are settled and some of the more frantic aspects of the move are over with, I thought it appropriate to get posting again and began crafting my next entry in my series on Octokit. However, there is something more pressing that I have to share first. I want to tell you about someone very special.

In 2001, a few months after having graduated from university and moving to Cambridgeshire, my housemate, Adam, and I decided to check out the local pub2. It was on that first visit to the Red Lion in Stretham that I met Mary, who at the time was working behind the bar. She was joyful, sparkling, kind, and funny. Like the most excellent of those who work a bar, she made us feel welcome, like we belonged. For the first time, I felt like Stretham was home.

The next time I remember seeing Mary was a day or so later when Adam and I were walking across the village green. She came walking towards us, holding the hand of a little girl.

Adam memorably said, “Is that yours?”

“That” turned out to be Mary’s daughter, Jordan. It also turned out that Mary, along with her adorably cheeky daughter, lived next door to us and over the months to follow we became friends. Most Thursdays3, Mary held her “Top of the P, Top of the I” club4 where we would share a drink, a smoke, and a lot of laughs, often while watching “Enders”5 or some other nonsense. I have many fond memories of us sitting in her lounge, kitchen, or backyard, in the pub, or in the beer garden behind it; all of them with Mary smiling and laughing and sparkling.

Mary and Chrissy

When I was happy, she would laugh with me. When I was sad, she would sit with me. When I was stupid, she would tell me. Mary became the best of friends; unafraid to be honest, never judging, always supportive. A counsel and a partner in crime (I suspect this is the case for many of her friends). On the day I left for the US, it was Mary that stood in her dressing gown in the backyard of her house to wave goodbye, smiling and sparkling.

On return trips to England, I always did what I could to get to Stretham and see all my friends, stopping by the Red Lion for far too many drinks and never enough good times. I did not always succeed. For those that live far from their friends and family, it is an all too familiar experience to never have enough time to see everyone. On one occasion I visited Cambridgeshire but could not see Mary, she understood.

“Next time,” she said.

And so it was that earlier this year, Chrissy and I stopped by Stretham to see Mary and Jordan. Though we spent some time at the Red Lion catching up with some old familiar faces, it was back at Mary’s I remember most. There we met the amazing young woman Jordan grew up to be, we shared stories of the times we had shared before6, and we got to know Russ, the love of Mary’s life. We spent as much time with them as they could stand and it was wonderful. Jordan was sarcastic and sassy, Russ was witty and wonderful, and Mary was smiling and sparkling, more than I ever remember her doing before. There was even one surviving PEPSI glass from the “Top of the P, Top of the I” club and we put it to good use. The time we spent with Mary and her family, seeing her happier than ever, surrounded by love was one of the highlights of our trip.

Mary and Family

"It takes a minute to find a special person, an hour to appreciate them, and a day to love them, but it takes an entire lifetime to forget them."

And so it goes. Yesterday, a dear friend reached out to me and informed me that Mary had died. Some time, while I was asleep or doing something else unremarkable, the world lost some of its shine. No reason. No fanfare. No sparkle.

Russ, Jordan, and the rest of Mary’s family and friends are grieving and I with them. There’s nothing more to say about that.

Every day of our lives, we carry our friends with us, no matter where they are. They are there when we cry and when we laugh, when we have to make difficult decisions, and when we just want to reminisce. I am grateful for the moments shared with my friends and for them making me a part of their world. Mary was one of a kind and everyone that knew her is better for it.

  1. like food, shelter, and love []
  2. I do not remember why we had not gone there sooner, nor the impetus that led to us going for the first time, though I dearly wish I could []
  3. I’m pretty sure it was Thursdays…my memory fails a little to be certain []
  4. Named after Mary’s PEPSI glasses, that had letters on the side making convenient measures for the mix of Bacardi and cola that we drank []
  5. EastEnders []
  6. like when Chrissy and Mary held me down while an 8 year old Jordan bound my hands with Selotape for no good reason other than “just because” []

Octokit and the Authenticated Access

Last week, I introduced Octokit and my plans to write a tool that will mine our GitHub repositories for information that can be used to craft release notes. This week, we will look at the first step; authentication. I am using Octokit.NET for my hackery; if you choose to use another variant of Octokit, some of the types and methods available may be different, but you should be able to follow along. In addition, I have no intention of documenting every aspect of Octokit and the GitHub API, so if you are intrigued by anything that I do not discuss, I encourage you to explore the relevant documentation.

The main `GitHubClient` class, used to access the GitHub APIs, has several constructors, some that take credentials (sort of) and some that do not. All but one of the constructors take a `ProductHeaderValue` instance, which provides some basic information about the application that is accessing the API. According to the documentation, this information is used by GitHub for analytics purposes and can be whatever you want.

Now, if you only want to read information about publicly accessible repositories, you do not need to provide any authentication at all. You can create a client instance and just get stuck in, like this:

var githubClient = new GitHubClient(new ProductHeaderValue("Tinkering"));
var repo = await githubClient.Repository.Get("octokit", "octokit.net" );
Console.WriteLine(repo.Name);

However, you can only perform some read-only tasks on public repositories and, unless you are performing the most trivial of tasks, you will hit rate limits for unauthenticated access.

NOTE: All of the Octokit.NET calls are awaitable

Authentication can be achieved in a several ways; via an implementation of `ICredentialStore` passed to a constructor of `GitHubClient`, by providing credentials to the `GitHubClient.Connection.Credentials` property, or by using the `GitHubClient.Oauth`. The `OAuth` API allows an application to authenticate without ever having access to a user's credentials; it is understandably a little more complex than approaches that just take credentials. Since, at this point, our focus is to craft some methods for extending the API functionality, we will worry about the `OAuth` workflow another time. The other two approaches are quite similar, although the constructor-based approach requires a little extra effort. The following two examples will both give you authenticated access, though I think the constructor-based access feels a little less hacky:

// Without the constructor
var githubClient = new GitHubClient(new ProductHeaderValue("tinkering"));
githubClient.Connection.Credentials = new Credentials("username", "password");
// With the constructor
public class CredentialsStore : ICredentialsStore
{
    public Task<Credentials> GetCredentials()
    {
        return Task.Run(() => new Credentials("username","password"));
    }
}

var githubClient = new GitHubClient(new ProductHeaderValue("tinkering"), new CredentialsStore());

Two-factor Authentication

Of course, using your username and password is futile because you have two-factor authentication enabled1. Luckily there is a constructor on the `Credentials` class that takes a token, which you can generate on GitHub.

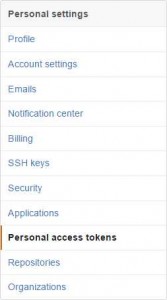
First, log into your GitHub account and choose Settings from the drop-down at the upper-right. On the fight, select Personal Access Tokens.

The right-hand side will change to the list of personal access tokens you have already created for your account (you may have created these yourself or an application may have created them via OAuth). Click the Generate New Token button and give it a useful name. You can now use this token as your credentials when using Octokit. I keep my token in the LINQPad password manager2 so that I can reference it in my code using the name I gave it, like this:

Util.GetPassword("the.name.I.gave.my.oauth.token")

In conclusion…

And that is it for this week. In the next entry of this series on Octokit, we will start getting to grips with releases and some of the basic pieces for my release note utility library.

  1. If you do not, you should rectify that []
  2. The LINQPad password manager is available via the File menu in LINQPad []

Octokit and the Documentation Nightmare

Before I get into the meat of this series of posts, I would like to set the scene. Like many organisations that perform some level of software development these days, we use GitHub. Here at CareEvolution, some developers use the web interface extensively, some use the command line, and others use the GitHub desktop client1, but most use a combination of two or more, depending on the task. This works great for developers, who have each found a comfortable workflow for getting things done, but it is not so great for those involved with DevOps, QA, or documentation where there is a need to find out user-friendly details of what the developers did. Quite often, a feature or bug fix involves several commits and while each has a comment or two, and perhaps an associated pull request (PR) or issue has a general description, but there is no definitive list of "this is what release X contains" that can be presented to a customer. Not only that but sometimes a PR or issue is resolved in an earlier release and merged forward. While we have lists of what a release is going to include, quite often there is more detail that we would like to include, and we often have additional changes as we adapt to the changing requirements of our customers. All this means that one or more people end up trawling the commits, trying to determine what the changes are. It is not a happy task.

"There is nothing more difficult to take in hand, more perilous to conduct, or more uncertain in its success, than to take the lead in the introduction of a new order of things."

Niccolo Machiavelli
The Prince (1532)

Now, I know that this could all be avoided if people documented changes more clearly, perhaps added release notes to commits, raised issues for documentation changes, or created release notes on the release when it is made. However, no matter how noble change may be, anyone who has worked in process definition for any length of time will know that changing the behaviour of people is the hardest task of all, and therefore it should be avoided unless absolutely necessary. It was with that in mind that I decided mining the existing data for information would be an easier first step than jumping straight to asking people to change. So, with the aim of making life a little easier, I started looking at ways to automate the trawling.

I figured that by throwing out noisy and typical developer non-descriptive commits like "fixed spelling" or "updated comment", and by combining commits under the corresponding PR or issue, I could create useful summary of changes. This would not be customer-ready, but it would be ready for someone to turn into a release note without needing to trawl git history. In fact, if I included details of who committed the changes, it might even provide a feedback loop that would improve the quality of developer commit messages; developers do not like interruptions, so anyone asking for more detail on a commit they made should start to reinforce that if they wrote better commits, PRs, issues, they would get less interruptions.

Octokitty2

Octokit .NET logoAfter a dismissing using git locally to perform this task (I figured those who might need this tool would probably not want to get the repository locally) and reading up on the GitHub API a little, I cracked open LINQPad —my tool of choice for hacking— and went looking for a Nuget package to help. It was during that search that I happily stumbled on Octokit, the official GitHub library for interacting with the GitHub API. At the time of writing, Octokit reflects the polyglot nature of GitHub users, providing variants for Ruby, .NET, and Objective C, as well as experimental versions for Python, and Go. I installed the Octokit Nuget package into LINQPad and started hacking (there is also a reactive version for `IObservable` fans).

Poking around the various objects, and reading some documentation on GitHub (Octokit is open source), I got a feel for how the library wrapped the APIs. Though, I had not yet got any code running, I was making progress. Confident that this would enable me to create the tool I wanted to create, I started writing some code to gather a list of releases for a specific repository and stumbled over my first hurdle; authentication. It turns out it is not quite as straight-forward as I thought (the days of username and password are quite rightly behind us3), and so, my adventure began.

And then…

This is a good place to stop for this week, I think. As the series progresses, I will be piecing together the various parts of my "release note guidance" tool and hopefully, end up with a .NET library to augment Octokit with some useful history mining functionality. Next time, we will take a look at authentication with Octokit (and there will be code).

  1. OSX and Windows variants []
  2. or, James Bond for kids []
  3. OK, that's a lie, but I want to encourage good behaviour []