Hello, everyone! Time sure does go by fast sometimes, doesn't it?
Before you continue reading, I want you to know that this post may be triggering for some folks. If you don't feel ready to read about topics like loss, death, grief, or home ownership1, stop reading now and do something else. And remember, you are loved and worthy of that love, no matter what you are going through.
If you need to talk to someone, no matter the issue, no matter where you are…
Head over to https://findahelpline.com/. Talk with a crisis counselor today. Verified global support for anxiety, depression, suicide prevention, domestic violence, sexual abuse and more.
The last time I posted, I had finished up my series on server-side rendering and had every intention of doing more posts on other topics, but as John Lennon famously said (and probably borrowed from Allen Saunders):
Life is what happens while you are busy making other plans.
While I had plans, life happened.
Martha and me, April 2022
My last post was in August 2022 and life was amazing. Earlier that year, I had met the love of my life (so far) and had been enjoying an amazing summer building a relationship that we both knew would last forever. In October, just two months later, Martha died of a stroke, aged 39. Life is what happens while you are busy making other plans, and so is Death (it's a big D kinda word). It is an understatement to say that it came as a shock; my world fell apart in an instant and I am still working to rebuild it into something new. Not only did I lose her, but so did her family, including her daughter, and I miss and worry about that smart, sassy, and curious girl every day.
In 2021, about a year earlier and before I ever met Martha and her daughter, I had decided to buy a new home. It was a condo being built in my neighbourhood and I was excited to become a homeowner again to begin a new chapter, post-divorce, post-pandemic. I signed some documents and paid my deposit, then watched as construction proceeded. During this time, I met Martha, fell in love, learned that love could be very different than what I had known before, and became excited that this new condo would be a place where we could build memories together. Life happened. The whole time I was building my relationship with Martha, I could see the progress as folks were building my new home. I remember being on a call one time with my parents while Martha was at my apartment, and I joked that she wasn't invited – it was my new home, but of course I didn't mean it, she was most definitely invited.
In July this year, on Martha's birthday – something I did not plan, I finally moved in. Moving is a great distraction and goodness knows, grief needs distractions. Though I am an atheist and I don't believe in ghosts, grief is a powerful thing and I was genuinely worried about moving. I was worried that if I moved, Martha would not be able to find me; that I was leaving her behind. With hindsight, this was a foolish thing – love isn't anchored to times or places, only to ourselves. I can see that now. My new condo is amazing and I love it, and she is everywhere I need to see her when I most need to feel her love. I talk to her everyday. I wish she was here to talk back.
Since she passed, among other changes, I stopped taking dancing lessons (though I might start again one day), and I started trying stand-up comedy. At this point in my life after the experiences of the last five years, I carry this distinct feeling that nothing matters except that which we choose – it's a scary place to be but it is also powerful and liberating. It is a lot easier to stand up on a stage and tell jokes when you really do not care that much about what others think.
There is so much more I could write about these last two years and about grief, and maybe I will, at some point. For now, what am I trying to say? I am trying to say that this sucks, that I miss her everyday and wish you had got to see just how bright she made every room she entered. I am trying to say that I am still growing and learning. I am trying to say that it gets easier. I am trying to say that I am still here and I still intend to write more blog posts. I am still making other plans.
Martha dressed as Marthaceratops pretending to be scared by my T-Rex hatchling puppet, Oct 2022
Soon, within a few days of Halloween, it will be the two year anniversary of Martha's death (perhaps I will start counting her death in years instead of months, though I suspect it will be both). Halloween was arguably her favourite holiday (she loved a good costume), and I'm thinking about aligning my housewarming party with that holiday to honour her, create new memories, and build the future I have to live without her (though not without her love). In the meantime, I've been busy trying to make a home that I am comfortable in, both within my new condo and within myself. Some days are easier than others.
Life is what happens while we are busy making other plans; making other plans is what creates the circumstances for that life to happen.
🖤
If you need to talk to someone, no matter the issue, no matter where you are…
Head over to https://findahelpline.com/. Talk with a crisis counselor today. Verified global support for anxiety, depression, suicide prevention, domestic violence, sexual abuse and more.
I don't mean to make light of the heavier topics, and I think humour is a valuable coping mechanism [↩]
Way back in January 2020, I started blogging about server-side rendering (SSR) React. I intended it to be a short, four post series that would go into the details of what SSR is, how to do it, and the pitfalls that lie within.
This is post eleven of the four post series, and perhaps the last (at least for now). Over the course of the last ten posts, we have created a simple React app that server-side renders and successfully hydrates. Along the way, we have learned about the complexities of server-side rendering and hydration, and from this we can identify some important lessons.
The initial render of client and server renders must be the same for hydration to be successful
Maintaining a server-side rendering solution can become complex, especially as the app itself becomes more complex (and it doesn't help that React only reports hydration problems in its development build until React 18)
Reasoning about an app to ensure we consider both the server-side and client-side behavior can be a pain
We cannot change the first point. In order for the hydration to be successful, we need our initial render to be the same on both client and server. To achieve this, we need to understand how our code will render in both contexts. However, with some clever components (and hooks, in some cases), we can simplify things to reduce the impact of the other two points. There are frameworks available such as NextJS that provide these features for us. However, I find great value in understanding the complexities of something to grasp exactly what tradeoffs third-party solutions are incurring, and at the time I was working on the SSR solution for Khan Academy, moving to NextJS was far too great a lift. So, in this series we have rolled our own solution.
First, by using components like WithSSRPlaceholder in Wonder Blocks Core, we abstract away the general complexity of understanding the process of server-side rendering to ensure our result hydrates properly.
Second, by testing our code in development in diverse browser environments we can check for things that often cause hydration errors (such as browser feature detection being used to change what gets rendered – remember, the server has no idea what the user has configured in their browser, what their screen size is, etc.).
Finally, by changing the server-side rendering solution from one that knows lots about our frontend code to one that knows as little as possible, we can build a server-side rendering approach that will work without needing to be redeployed every time we change our frontend. And that is where we are heading in this post as we created such a server to perform server-side rendering at Khan Academy.
Goliath and the Render Gateway
For more than two years, the Khan Academy backend that underpins our website and mobile apps has been undergoing a major re-architecture. We named this massive project, Goliath – part pun on the new backend language we had chosen, Go, and part pun on the absolutely colossal amount of work we had ahead of us to get the job done. You can read all about it in these posts on the Khan Academy Engineering blog:
The re-architecture was a big project, made ever more complex by the need to keep the site running smoothly for the millions of folks that rely on us as we transitioned things off the old architecture and on to the new, piece by piece1. As part of this re-architecture, we knew we needed to change the way our website was served and so I, along with the amazing team I work with, were tasked with creating a server that would render our web pages. We made a variety of decisions to simplify the work and to simplify maintenance long term:
We would only support rendering pages that used our latest frontend architecture Supporting legacy tech-debt laden code would only perpetuate problems and would most definitely increase the complexity and volume of work to be done. By using our current frontend architecture, all the information about the site, including what page to render for which routes, would be codified within the frontend code.
We would get it working first and get it working fast second While we made decisions all the way through to avoid performance issues, we also deliberately avoided making any performance optimizations before we knew what a working solution looked like. And we took measurements – always take measurements before and after when you are making performance improvements.
We would make it generic enough to cope with the multiple changes we make to our frontend each day. We deploy many times in one day to fix bugs and release new features. Our engineers work hard to make these deployments invisible to users and we wanted to implement a solution that would support that effectively.
Our strategy was to get something working, move eligible routes over to that something one by one, and make incremental changes as we went to improve performance and fix bugs.
We knew up front that we would be using an edge cloud platform like Fastly to route the traffic and ultimately provide caching for our SSR'd pages, so we made sure that our design incorporated support for things like the Vary response header to support efficient caching (though we did not use that to begin with, no premature optimization). We went as far as including code in our frontend that could track what request headers were used by a page rendering so that we could build that Vary header with a view to utilizing it once we were at a stage where cache optimization made sense2.
After a little back-and-forth we settled on a name for this new approach to rendering our website; the Render Gateway.
What we did
We spent quite some time building the main Render Gateway code, solving many problems like:
How do we know what code to run?
How do we build a result that the cloud edge service can understand?
What does that result look like?
Many test implementations were stood up as we added more features, including the ability to:
Verify incoming requests so that we can immediately throw away spam
Add different status values and headers to the response to support redirects
Track request header access and add proper support for the Vary header
Log and trace requests in sufficient detail to debug issues in production
By mid-2020 we had a working server and we went live, serving the logged-out homepage and more from this new service. It worked!
It was also slow and had a massive memory leak. 😢
And so began the arduous work of performance testing and memory investigations as we worked to improve things. Our biggest performance wins came from reducing the amount and size of the JavaScript that it takes to render our site (an ongoing and effective focus for site performance in general) and from utilizing the Vary header along with our cloud edge service to reduce the amount of traffic the server needs to handle. For example, we do not gain much value from rendering pages that are for logged-in users so our cloud edge does not ask us to SSR those pages. In addition, better use of the Vary header increases our cache hit rate, leading to more logged-out users benefitting from SSR'd pages.
The Memory Leak
Sadly, the memory leak was a real pain. Every 20 to 40 production requests, an instance would hit a soft or hard memory limit and die. Google App Engine (GAE) works admirably in the face of an unstable app. It will detect the soft or hard memory limit violation, kill the service and spin up new instances as needed, even resubmitting the failed request so that the caller only sees the impact as a slower request rather than a complete failure. This meant that we could keep our leaky implementation serving production users while we investigated the problem, allowing us to continue supporting the Goliath project, albeit with a bit of a limp.
Myself and John Resig spent many hours performing memory investigations, writing multi-process render environments and more in our attempts to both track down and mitigate the memory leak. Just when we thought we had noticed what was holding onto memory, we would realise we were wrong and seek a new path. This was only exacerbated by how hard it was to generate the leak in development, especially since the Chrome dev tools used to investigate memory issues would hold onto references of the code it loaded, and our main usage of memory was that very code that we loaded dynamically. It was weeks of effort until another colleague noted a similar leak in another node service that we had in production. It turned out that the @google-cloud/debug-agent package we were using has a problem and it appears to be down to the very same v8 engine issue we encountered when using Chrome dev tools to investigate the memory issue. Once we removed that dependency, the memory leak went away and instead of crashing every 20-40 requests, each instance of the Render Gateway can handle millions of requests without a care3.
How it works
At its core, the Render Gateway is a generic express server written in JavaScript to operate in Node on Google App Engine. It takes a URL request and renders a result using a configured render environment. Because it uses an API to define that render environment, it is incredibly versatile. There are no rules to what that render environment does other than take in a request and provide a response. Here's an example from the publicly available repository4:
If you were to run this code with node, you would get a server listening on port 8080 of your local machine with support for the following routes:
/_api/ping This will return pong, and provides a way to test if the server is responsive.
/_api/version This will return the value of the GAE_VERSION environment variable, something that Google App Engine sets which you can configure at deployment to specify the version of the server code being run.
/_ah/warmup Google App Engine supports a warmup handler that it sometimes runs to warm up new instances of an app when scaling. By default, this just returns OK, but the app can be configured to do additional work as needed.
/_render This performs the actual render. The URL to be rendered is specified using a url query param.
If you invoked http://localhost:8080/_render?url=http://example.com with this server running, it would respond with a 200 status code and the text You asked us to render http://example.com.
The magic is the render environment, which in this case is a very simple object with a single render function:
The Render Gateway source also includes an environment implementation that uses JSDOM, allowing you to construct a more complex environment. However, it does nothing specifically related to React because how your code actually renders server-side is up to you and how you configure it. In fact, because it is built on express, you can plug-and-play the various pieces used to build the main startGateway call to implement your own approach if you so desire, even if you don't want to use Google App Engine.
At Khan Academy, we have a custom render environment that uses some organizational conventions and custom header values populated by our cloud edge service to identify which version of our frontend code is needed. The render environment then downloads (or retrieves from cache) that code and executes it within an isolated node environment to produce the body, status, and response headers (including the aforementioned Vary header) for the result. This is then sent in response to the caller. All the code executed to actually produce a result is from the downloaded code at the time of the request. To support this, we have some conventions, components, and frameworks that allow developers to access request header values, set response header values, and update the response status code from within our frontend code in a manner that feels natural (for example, a <Redirect/> component abstracts away the work of setting the status code and the Location header as needed). This means that our engineers, when working on our frontend code, do not need to context switch between thinking about client-side rendering and server-side rendering; instead, they have idioms to hand that enable them to build frontend user experiences that just work.
Our simple app revisited
Now to come full circle, we can envisage what our server-side rendering solution might look like using the Render Gateway. Instead of importing the client-side code at build time, we could leverage a render environment using JSDOM to dynamically load the code when a request is made, decoupling our server from our client.
I have made some changes to demonstrate this concept of using a manifest. However, this change still assumes a client build local to the server. If we wanted to make this entirely client-build agnostic, we would change our render environment to download the files (including the manifest) from a CDN instead. The GAE_VERSION environment value, or some header we receive could indicate the version of our frontend we need. We can then look up a manifest in our CDN to tell us the URLs of files we need, download them, execute them, and invoke the rendering process to get a result.
For now, if we are in production, we look for ../client/build/ folder to load the manifest and then load the files from that same folder; in development, we defer to the client webpack server. So, in a way, the development setup is closer to our envisaged CDN-based setup, with webpack acting as that third-party file host.
Take a look at the branch and think about how you might modify things to use a CDN for production. Note that the render-gateway code is currently specific to Google App Engine.
Some final SSR thoughts
Server-side rendering is great for providing search engines with a more complete version of your page when they come crawling your site. It is also great at showing more of your page to your users on first display. And if used unnecessarily, it is a great way to sloooooooow the delivery of your site 😱.
If you always SSR a page before serving it to users, you could wait quite a while for that page to finally land in front of the user. The real value of SSR is only realised when it is coupled with caching so that an SSR result can be re-used for multiple requests. This can be easy to setup with a service like CloudFlare or Fastly, but to do it right and get the best cache hits without compromising your users data or the utility of your site can take a little more work. You will want to familiarise yourself with things like the Vary response header, edge-side includes, and other useful concepts. Not to mention performance and other site metrics so that you can measure the impact of your SSR strategy and make sure it is serving its purpose without hindering your site or your users.
Whatever you choose to do next, I hope this series on server-side rendering with React has demystified the topic and provided you with some helpful resources as you consider SSR and what it may mean to your current or next project – please stop by and let me know about your SSR adventures in the comments. In the meantime, as the React team works more on React and features like Suspense, the server-side rendering story, like so many software developments stories, is going to change.
For now, thank you for joining me on this SSR journey. When I started, I thought I knew everything I needed to know about SSR in order to tell you everything you needed to know about it. It should come as no surprise to any of us that I still have things to learn.
The pandemic that showed up right after we started also contributed to the complexity of the project as more and more folks around the world turned to us to support their education [↩]
The Vary response header allows a server to tell a cache like the one Fastly provides with headers in the request were used to generate that response. Along with the URL and other considerations, this tells the cache what header values need to match for a cached page to be used versus requesting a new response from our server [↩]
At the time of writing, that issue is still open although there is ongoing movement to suggest it may soon be resolved, or made redundant with the removal of that feature from Google's offering [↩]
There are currently no NPM packages to install for this, though I hope to change that – instead, the dist is included in the repo and we install via commit SHA [↩]
My series of blog posts about React server-side rendering and hydration is almost at a close.
Before we get to the end, I wanted to take a moment to share a little utility I created that has helped us at Khan Academy to catch and fix hydration errors during development. Normally, these are only reported to the console and as such are not very visible to folks when working on their frontend features. So, I added a development-time trap to catch and surface them in the user interface – raising their visibility and improving our chances of catching them before they reach production. It is not foolproof, but it does help; especially since until React 18 there is no built-in way to detect hydration issues for production; after React 18 a similar approach works in production as these errors do get reported, though with less information than the development build.
There are two parts to the hydration indicator; the trap that catches the error and the UX component that surfaces it within the app. The trap patches the console.error method and looks for specific message patterns. We only apply the trap during hydration; we have a call to apply the trap and another to remove it. We also have a simple method to format the error message in a similar manner to the console so that our indicator component will have some nice text to show to developers. The component is then rendered based off the presence of that trapped error. In our development server, we show a status icon for the hydration state and then have a popover to show more error info if the icon is clicked. In the example given here, I just render the captured error message, though I am sure you could take this and expand it into something much more helpful to your use case (for example, there is an graphical indicator of the hydration state in our development UX that has a tooltip with more information on the actual error).
/**
 * This little function does the `%s` string substitution that
 * `console.error|log|warn` methods do. That way we can show a meaningful
 * message in our alert.
 */
const formatLikeLog = (message, args) => {
    let i = 0;
    return message.replace(
        /%s|%d|%f|%@/g,
        (match, idx) => args[i++],
    );
};

let removeTrapFn = null;
let error = null;

export const removeTrap = () => removeTrapFn?.();

export const getHydrationError = () => error;

/**
 * Patch a console with new error method to capture rehydration errors.
 *
 * By default, this patches the global console and with a callback to show an
 * alert dialog in the browser.
 */
export const applyTrap = (
    elementId,
    consoleToPatch = console,
): ( () => void ) => {
    if (removeTrapFn != null) {
        throw new Error("Trap already applied.");
    }

    const originalError = consoleToPatch.error;

    // Record the removal fn.
    removeTrapFn = () => {
        consoleToPatch.error = originalError;
        removeTrapFn = null;
    };

    // Reset the hydration error.
    error = null;

    // Patch the console error method so we can intercept rehydration errors.
    consoleToPatch.error = (message, ...args) => {
        // First, log to the console like usual.
        originalError(message, ...args);

        /**
         * Detecting hydration errors is much nicer in more recent versions of
         * React, thank goodness. While the error message used to not
         * indicate a hydration-specific issue, it now does contain text that
         * alludes to hydration problems.
         *
         * See ./node_modules/react-dom/cjs/react-dom.development.js for
         * all the various warnings - snippers of relevant hydration warnings
         * are used here to detect them.
         */
        const possibleWarnings = [
            "Expected server HTML ",
            "Text content did not match.",
            "Prop `.*` did not match.",
            "Extra attributes from the server",
            "Did not expect server HTML to contain",
        ];
        const mapper = (w) => `(?:${w})`;
        const warningsGrouped = possibleWarnings.map(mapper).join("|");
        const warningRegex = new RegExp(`Warning: ${warningsGrouped}`);
        if (warningRegex.test(message)) {
            // Looks like a hydration error.
            const formattedMessage = formatLikeLog(message, args);
            error = {
                message: formattedMessage,
                elementId,
            };
            removeTrap();
        }
    };

    return removeTrap;
};
import {getHydrationError} from "./trap.js";

export const HydrationErrorIndicator = () => {
    if (process.env.NODE_ENV === "production") {
        return null;
    }

    const [showError, setShowError] = useState(false);
    useEffect(
        () => {
            setShowError(true);
        },
        [showError],
    );

    const error = getHydrationError();

    // Very simple rendering of the error.
    return showError && error && <div>{error.message}</div>;
};
The trap is applied around the React.hydrate call. Here's a simple example though you may want to modify this to only load the trap in non-production code, for example.
I hope others find this useful. It has certainly helped us to gain confidence in our server-side rendering and hydration, giving us an early signal to investigate potential issues. If you make use of this or have other ways you have improved your server-side rendering reliability, please do share in the comments.
Happy New Year, everyone and welcome back to my series on React server-side rendering (SSR)! It has been a while. I apologise for the absence; it has been a difficult time for us all during this pandemic. Perhaps I will address that fully in another post sometime; for now, let's dig back into SSR!
I have re-read all of the previous posts in this series and the notes I made on what the next entries should be. As with most software development endeavours (like all those side projects we have going on), I have lost track of what was going on and my notes did not have anywhere near as much context as I had hoped when I wrote them. So, before we dig into what is next, let's briefly recap where we were and buy me a little more time to get it together.
📜 The story so far…
This is post nine in what I thought was going to be a four post series (estimates are hard). Here are the previous entries:
In the entries so far we have created a React app and built ourselves a render server that provides a result we can hydrate. It is almost working beautifully, but when we tried to hydrate our SSR (server-side rendered) result, we hit a snag; our SSR result does not cleanly hydrate because the path to our logo SVG file is different between the server and the client renderings. As you may recall, for hydration to work properly, the initial render cycle of our React app on both the server and client must produce the same HTML.
So, this week, let's dig into that hydration issue with some ideas on how to debug it and how to fix it. If all goes well and I remember what my fix was going to be, we will have a successfully server-side rendered application that hydrates by the end of this post. I don't know about you, but I'm excited to find out if I can do it.
🔎 Discovering Hydration Errors
React has improved since I first started writing this series (it has been a couple of years, after all). Hydration errors now contain much more information about the error that helps us identify the problematic component – while our app is simple and therefore, a lot easier to reason about and find the source of a problem, many production apps are incredibly complex and therefore not so easy to debug.
Our app after hydration failed
Back when we were last looking at this and our app hydrated without its spinning logo, here is what the hydration error looked like:
Hydration error in React 16.12
In this example (from an earlier version of React 16), we are told is that a src attribute did not match and we are told what the two different values are. For a case like an image that only appears in one place in our app, this is not so hard to track down, but many hydration issues are not so easy to spot.
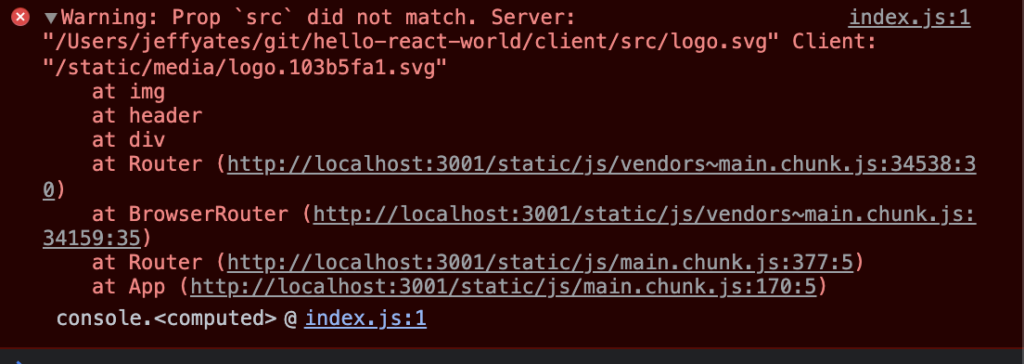
And here is what React says about the same error today:
Hydration error in React 17.0
This is from React 17, though more recent versions of React provide similar detail. This updated hydration error output not only gives us the information we had before, but also gives us a stack of components showing us exactly where in the component hierarchy the issue lives. I think you will agree that this is a vast improvement. It certainly reduces the things I was originally going to discuss about debugging hydration1.
From this more detailed error message, we can determine that our issue (as we already know from looking at the hydrated result) is that the URL for the logo is wrong; the server is setting it to an absolute file path instead of the magic sauce that the webpack build is using.
This is one of many hydration errors that can show up. Some of the more common errors relate to browser feature detection being used as conditions within components — since the server has no idea about the user's browser, its screen dimensions, features, or other details, any decisions it makes based on such information will likely not match the same decision when made on the client, and therefore, hydration errors. To avoid these, the initial render cycle on both the client and the server must be the same, saving any browser-specific decisions until after that first render cycle is complete. Unfortunately, if we were running production React here, we would not be guaranteed to have an obvious indication of the hydration error. In fact, this specific issue would not even be a hydration issue in production since attributes are not compared during hydration in the production build of React. However, if this were a more serious issue where the component hierarchy itself changed between server and client, the hydration failure could cause the entire application to re-render from scratch. Spotting hydration errors and fixing them can prevent serious user-facing performance issues, and since we do not get a signal during production we have to make sure we are looking for these errors during development2.
Fixing Our Image Hydration
Before we finish this post, we should really fix our image. The image URL is not working because the server handles the SVG in a very naïve way; we just use the import path, which will not match the path the client ultimately uses.
There are a few ways we can fix this and like so many things in software development, there is no single "right way" – it always depends on how much effort one wants to make and how much time we have in order to achieve a desired outcome. Here are our immediate options:
Overhaul the build so that we can reuse on the server the same file paths generated by the client build.
Use yarn build to generate the production site and then let the server use the same files.
Introduce a delayed rendering so that the initial renders of server and client will always match.
Option 1 is where I would like us to ultimately be. It allows us to decouple the deployment of the static site and the server-side rendering setup, giving us a scalable solution. The render server at Khan Academy uses a similar to this approach and my work on that server inspired me to write this blog series in the first place.
Option 2 is what many sites do. They deploy the render server with the built client code, and as such, it always has the right paths. While we are leveraging this approach a little since our server imports code from the client folder, going all the way to having to do production builds just to test this in development is not helpful. In addition, this approach does not scale very well.
Option 3 is a very useful approach. Using a hook or stateful component to delay client-specific code until after the initial render is a versatile solution to many hydration issues. For example, if you want to add identifiers to your elements to satisfy accessibility requirements (which you should want), you can use a mechanism like this to ensure those identifiers are the same during initial render between the server and client. Those pesky feature detection issues mentioned earlier are also easily fixed with this approach. This is known around Khan Academy as using an SSR placeholder; as in rendering placeholder content during the initial render on both client and server, then replacing that with the real content on subsequent re-renders. There can be a lot of complexity here to avoid unnecessary re-rendering, but when done right, it is a useful tool in the server-side rendering toolkit.
The SSR Placeholder
In order to avoid unnecessary rendering, such as odd cascading renders where one component delays until the 2nd render, then it's children do the same, to the point where things nested n levels deep are waiting n+1 render cycles to render for the first time, we have to be smart about implementing our delayed rendering component.
For one solution, take a look at the WithSSRPlaceholder component I wrote for Khan Academy's Wonder Blocks component library, based on earlier work in our engineering team. It tracks state and makes sure that nested uses do not delay any longer than the root instance, avoiding cascading render cycles. Because the server only does a single render and does not mount the component, state changes do not get rendered on the server and we just get a single render, but in the client, the state change triggers another render and we get the update we are looking for3. It may seem tempting to just use useEffect or useState, but if you want nice reusable components that can nest happily without those aforementioned cascading renders, then some sort of context is going to be needed.
That said, useEffect and useState are perfect for our really simple app to get us hydrating, as this note in the React documentation suggests:
To exclude a component that needs layout effects from the server-rendered HTML, render it conditionally with showChild && <Child /> and defer showing it with useEffect(() => { setShowChild(true); }, []). This way, the UI doesn’t appear broken before hydration.
import React from 'react';
import {Link, Route, Switch} from "react-router-dom";
import Router from "./Router.js";
import SpinningLogo from "./SpinningLogo.js";
import './App.css';

function App(props) {
  const {ssrLocation} = props;
  return (
    <Router ssrLocation={ssrLocation}>
      <div className="App">
        <header className="App-header">
          <SpinningLogo />
          <div className="App-links">
            <Link className="App-link" to="/">Home</Link>
            <Link className="App-link" to="/about">About</Link>
            <Link className="App-link" to="/contact">Contact</Link>
          </div>
        </header>
        <section className="App-content">
          <Switch>
            <Route path="/about">
              This is the about page!
            </Route>
            <Route path="/contact">
              This is the contact page!
            </Route>
            <Route path="/">
              This is the home page!
            </Route>
          </Switch>
        </section>
      </div>
    </Router>
  );
}

export default App;
Now we have a component, SpinningLogo, that manages some state and only renders our logo image when that state is set true. On the initial render in both server and client, it is false and so renders nothing, but on the subsequent render in the client, it is true and we get our logo.
Or at least we should. Sadly, running this refactored code causes our server to stop working altogether and we get a confusing error.
/Users/jeffyates/git/hello-react-world/client/node_modules/react/cjs/react.development.js:1476
      throw Error( "Invalid hook call. Hooks can only be called inside of the body of a function component. This could happen for one of the following reasons:\n1. You might have mismatching versions of React and the renderer (such as React DOM)\n2. You might be breaking the Rules of Hooks\n3. You might have more than one copy of React in the same app\nSee https://reactjs.org/link/invalid-hook-call for tips about how to debug and fix this problem." );
            ^
Error: Invalid hook call. Hooks can only be called inside of the body of a function component. This could happen for one of the following reasons:
1. You might have mismatching versions of React and the renderer (such as React DOM)
2. You might be breaking the Rules of Hooks
3. You might have more than one copy of React in the same app
See https://reactjs.org/link/invalid-hook-call for tips about how to debug and fix this problem.
    at resolveDispatcher (/Users/jeffyates/git/hello-react-world/client/node_modules/react/cjs/react.development.js:1476:13)
    at useState (/Users/jeffyates/git/hello-react-world/client/node_modules/react/cjs/react.development.js:1507:20)
    at SpinningLogo (/Users/jeffyates/git/hello-react-world/client/src/SpinningLogo.js:6:37)
    at processChild (/Users/jeffyates/git/hello-react-world/server/node_modules/react-dom/cjs/react-dom-server.node.development.js:3353:14)
    at resolve (/Users/jeffyates/git/hello-react-world/server/node_modules/react-dom/cjs/react-dom-server.node.development.js:3270:5)
    at ReactDOMServerRenderer.render (/Users/jeffyates/git/hello-react-world/server/node_modules/react-dom/cjs/react-dom-server.node.development.js:3753:22)
    at ReactDOMServerRenderer.read (/Users/jeffyates/git/hello-react-world/server/node_modules/react-dom/cjs/react-dom-server.node.development.js:3690:29)
    at renderToString (/Users/jeffyates/git/hello-react-world/server/node_modules/react-dom/cjs/react-dom-server.node.development.js:4298:27)
    at renderPage (/Users/jeffyates/git/hello-react-world/server/index.js:13:31)
    at IncomingMessage.<anonymous> (/Users/jeffyates/git/hello-react-world/server/index.js:68:29)
There's no need to panic. There are three possible reasons this error suggests might be the cause of our issue:
You might have mismatching versions of React and the renderer (such as React DOM's renderer)
You might be breaking the Rules of Hooks
You might have more than one copy of React in the same app
If we reason through our code, we can work out what is really going on. First, we can check the server and client and verify they are both using the same versions of React and React DOM, and yes, they most definitely are. Second, from looking at the documentation and the fact that this is such a simple case, it is unlikely we are breaking the Rules of Hooks. This leaves option three, but how could we have multiple copies of React?
If you recall, we got our server working originally by importing the App component directly from our client code into the server. Of course, that component imports React from its context and therefore resolves to the client code's node module dependencies, but our server is already importing React and ReactDOM from its own node module dependencies, and voila, we have the potential for two copies of React.
To fix this, we can have the server import React and ReactDOM from the client codebase too.
require("./require-patches.js");
const http = require("http");
const express = require("express");
const React = require("../client/node_modules/react");
const {renderToString} = require("../client/node_modules/react-dom/server");
const getProductionPageTemplate = require("./get-production-page-template.js");
const App = require("../client/src/App.js").default;

const port = 3001;
const app = express();

const renderPage = (pageTemplate, reactComponent) => {
    const renderedComponent = renderToString(reactComponent);
    return pageTemplate.replace('<div id="root"></div>', `<div id="root">${renderedComponent}</div>`);
};

if (process.env.NODE_ENV === "production") {
    app.use(express.static("../client/build"));
}

app.get("/*", (req, res, next) => {
    /**
     * Production is easy. We'll load the template and render into it.
     */
    if (process.env.NODE_ENV === "production") {
        res.send(
            renderPage(getProductionPageTemplate(), <App ssrLocation={req.url} />),
        );
        next();
        return;
    }

    /**
     * During development, we're going to proxy to the webpack dev server.
     */
    if (process.env.NODE_ENV !== "production") {
        /**
         * Let's make life easier on ourselves and only accept UTF-8 when it's
         * a text/html request. We're in dev, so we don't need GZIP savings.
         */
        const headers = Object.assign({}, req.headers);
        if (req.headers["accept"] && req.headers["accept"].indexOf("text/html") > -1) {
            headers["accept-encoding"] = "utf8";
        }

        /**
         * Now call the client dev server, which we know is on port 3000.
         */
        http.get(
            {
                port: 3000,
                path: req.url,
                headers: headers,
            },
            (proxiedResponse) => {
                /**
                 * If our original request was text/html, we want to render
                 * react in there. So, let's gather that response and then
                 * render the page.
                 */
                if (req.headers["accept"] && req.headers["accept"].indexOf("text/html") > -1) {
                    let responseBody = "";
                    proxiedResponse.setEncoding("utf8");
                    proxiedResponse.on("data", (chunk) => {
                        responseBody += chunk;
                    }).on("end", () => {
                        res.send(
                            renderPage(responseBody, <App ssrLocation={req.url} />),
                        );
                        next();
                    }).on("error", e => {
                        res.status(500);
                        res.send(e);
                    });
                    return;
                }

                res.writeHead(proxiedResponse.statusCode, proxiedResponse.headers);
                proxiedResponse.pipe(res, {end: true});
                next();
            },
        );
    }
});

app.listen(port, () => console.log(`Example app listening on port ${port}!`));
With React, ReactDOM and our App all coming from the client code, the hydration of our SSR result is now working!
Our server-side rendered and hydrated application now looks the same as if it was render solely client-side
🎉We have done it. Our first server-side rendered app that is properly hydrating. We have cut a few corners to get here, and learned a few things along the way. Hopefully, this exercise has not only highlighted the complexities of implementing successfully hydrating code, and spotting and debugging hydration issues, but it has also begun to demonstrate how complex our code can get as we try to implement a working server-side rendering solution.
Join me for the next post in this series when we leverage the knowledge we have built so far to find a server-side rendering approach that is scalable, generic, and cuts a lot less corners. In the meantime, please leave any questions or concerns in the comments – the more I code and blogs I write about this topic, the more I learn, and I am certain there are things I can learn from you too.
Setting breakpoints, peeking at values inside React, etc. You know, real dirty debugging stuff – getting right down there in the dirt. [↩]
One goal with this series of posts is to eventually create a render server architecture that will make production-time detection of hydration issues easier to spot; time will tell if I achieve that goal. [↩]
For the hooks world, my colleague, Kevin Barabash has expanded this solution to use a RenderStateRoot component that sets up and manages the context, and a useRenderState hook for determining what phase of rendering a component is in [↩]
Hello, everyone! It has been a long time. As the pandemic got into full swing last year, my bandwidth for cognitive tasks took a big hit and some things fell by the wayside, such as this blog. I did not intend to ghost y'all like that; alas, here we are. Perhaps I'll write more on that another time, for now, let's jump into something that I was recently tackling1.
What is Dependabot?
Dependabot is a handy tool now owned and incorporated into GitHub that monitors your repositories dependencies and updates them, a chore that many maintainers can find laborious. It is not the only tool available to perform this task, but it is the one that many will use if they are already on GitHub since it is easy to setup and manage.
When Dependabot identifies a package you use that can be updated (based on your semver rule in package.json, for example), or it knows of a security issue in a package you use or referenced by a package you use, Dependabot can create a PR (pull request) to update that package. It is pretty smart and will only ever have one PR per package, so if multiple releases occur, it will close out any pending PR for that package and make a new one. It is a really handy tool with a variety of configuration options; I'm not going to delve into those here – you can read about them in the official documentation.
When Dependabot was in preview, it would create the PR, wait for all relevant checks to have been performed – such as your CI (continuous integration) processes like linting and testing, and then on success of these checks, auto-merge the change into the branch you configured it to target. However, this is a security issue, especially if you also have CD (continuous deployment) set up as a malicious package could be published, causing Dependabot to trigger a new deployment, which could then propagate that malicious package to all your package users, and their users, etc. Quite rightly, the decision was made to take that feature out of Dependabot and leave it to each individual use-case to decide what to do with the PRs created by Dependabot. However, this then led to a new problem – managing the PRs.
To avoid security issues in your releases, make sure that there is a manual QA (quality assurance) step somewhere between any automated update and an actual release of the updated code.
Dependabot has the ability to limit how many open PRs it creates, which is helpful, but they still require manual intervention. If you have rules like "every PR needs at least X reviewers", then it can quickly become a chore almost as annoying as the one it tries to address.
So what to do? Auto-merge is a potential security issue, not auto-merging is a time sap.
Do not enable auto-merging on a branch used for CD. It really is a bad idea and a big security risk. Packages do get hacked sometimes and tidying up after a malicious publish is not easy. To avoid security issues in your releases, make sure that there is a manual QA (quality assurance) step somewhere between any automated update and an actual release of the updated code. For example, you could do this by having Dependabot operate on a branch that is a copy of the CD branch and then have a process for merging the Dependabot updates across to your main branch before a release.
💡Check out CodeQL, another GitHub feature, if you want to add some automated vulnerability checking to your repository
For the remainder of this entry, we will assume that you are using Dependabot on a main branch that is not continuously deployed. However, just as with licensing, it is ultimately your responsibility to make sure the code you release, including its dependencies do not introduce vulnerabilities, so make sure to consider your specific scenario before enabling things like Dependabot and auto-merging of the changes it makes.
What are GitHub Actions?
GitHub Actions are GitHub's approach to supporting the kinds of tasks that have traditionally been performed by CI and CD platforms like Travis, CircleCI, and Jenkins. Using a combination of YAML configurations and scripts referred to as actions, you can build workflows that perform all kinds of automated processes from running tests to managing your GitHub repository issues. They are incredibly powerful (and therefore, should be used responsibly).
Many first and third-party actions exist to help you build your workflows. I have used actions to run tests across multiple platforms, update code coverage stats in CodeCov, and, most recently, help manage Dependabot PRs. In addition, GitHub Actions have access to the incredibly powerful gh CLI tool.
GitHub Actions are free for public repositories, see the GitHub Actions documentation for more information, including pricing for private repository usage.
Setting Things Up
1. Your GitHub Repository Settings
Before you setup the merging workflow, you need to make a few changes to your GitHub repository.
Auto-merge
The Settings tab of a repository on GitHub with the Options section selected
The Allow auto-merge repository setting
First, go to your repository Settings tab and under the Options section, ensure that Allow auto-merge is checked. This does not make every PR auto-merge, but it does allow for specific PRs to be set to auto-merge – this will be important.
Status Checks
If you don't have status checks enabled for your repository, then it means that a PR can just be merged without any reviews or code quality checks occurring. I highly recommend setting status checks as it ensures at least some level of code quality assurance before your code or anyone else's is merged.
For the purposes of this discussion, it is assumed that you have set your repository to require at least one review per PR before it can be merged, and at least one non-instant code quality check (such as a test run, or lint check).
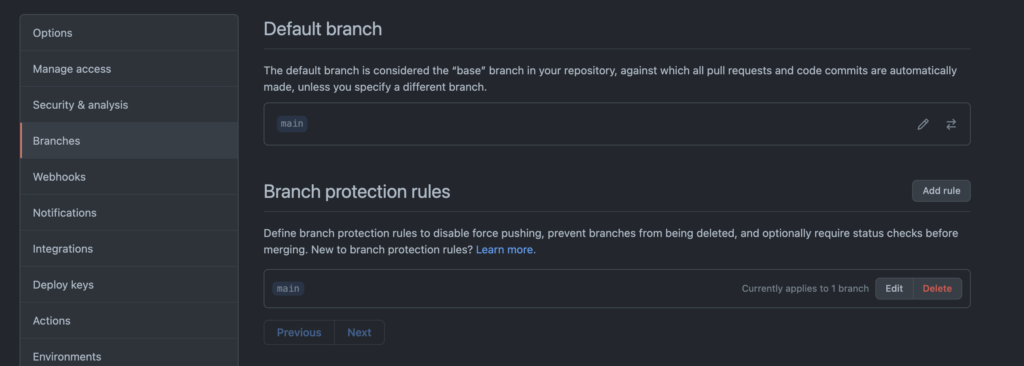
Status checks are mandated for PRs to specific branches by using Branch Protection Rules. These are configured in your repositories Settings under Branches. In the following screenshot, the main branch – the default branch, has branch protection rules applied. Branch protection rules can be applied to specific branches, or a range of branches by using a selector like feature/*.
The Branches section of a GitHub repository with rules applied to the main default branch
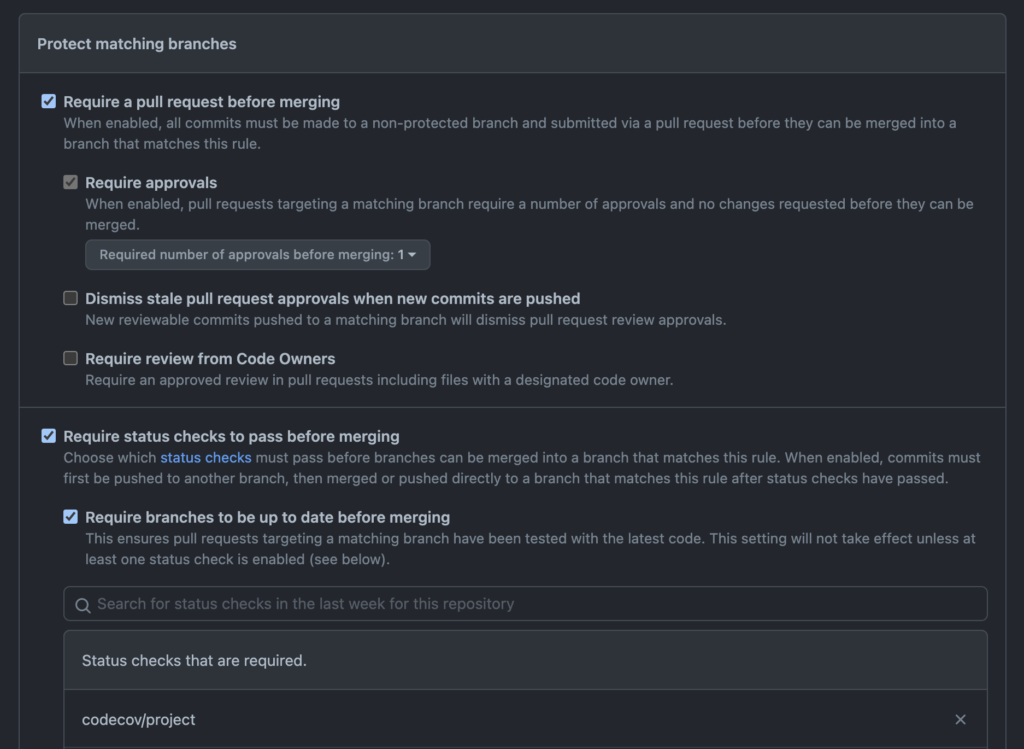
If you add rules for a branch (or set of branches) or edit an existing rule, you can specify all sorts of measures to control when code is suitable for merging in the branches that match that rule. In the following screen, the rule has been configured such that code can only be merged when:
It comes from a PR
It has at least one approving reviewer
It is up-to-date with the target branch
The codecov/project status check has passed
A subset of the rules one can apply to protect your branches in GitHub
Why at least one non-instant quality check?
The auto-merge setting for GitHub PRs is only useful for PRs that are not already passing all status checks. I do not know if this is still the case, but at one time it was the case that the command we are going to use to tell GitHub to auto-merge the PR would fail if the PR is already in a mergeable state. If you want to auto-merge PRs that are already mergeable when our new workflow runs, you will need to call a different command. This is left as an exercise for the reader.
2. Dependabot
You will need to enable Dependabot on your repository. Follow GitHub instructions to set it up how you want it. This blog assumes defaults, but you should be able to make it work with other configurations.
3. GitHub Actions
With Dependabot in place (and probably creating PRs for you already) and your status checks running, we can now setup our automation.
There are two things we need our automation to do.
We need it to approve the PR as we have mandated that we need at least 1 reviewer in order for code to be allowed to merge.
We need to enable auto-merge for the PR so that it will merge once our status checks are completed.
To add a GitHub Actions workflow, all you need to do is add a YAML file describing the workflow to the .github/workflows folder of your repository. Each YAML file describes a specific workflow, including what triggers the workflow, what permissions it has, and the jobs that it performs. Triggers can be specific events in your repository (such as creating a PR or raising an issue), webhooks, on a specific schedule such as once a week, or even via events fired from another workflow.
Let's take a look at the workflow for our approve and auto-merge workflow, and then we can discuss some of the important pieces. Since this isn't a deep dive into GitHub Actions, I will skim over some of the details to get to the pertinent info.
name: Dependabot Pull Request Approve and Merge

on: pull_request_target

permissions:
  pull-requests: write
  contents: write

jobs:
  dependabot:
    runs-on: ubuntu-latest
    # Checking the actor will prevent your Action run failing on non-Dependabot
    # PRs but also ensures that it only does work for Dependabot PRs.
    if: ${{ github.actor == 'dependabot[bot]' }}
    steps:
      # This first step will fail if there's no metadata and so the approval
      # will not occur.
      - name: Dependabot metadata
        id: dependabot-metadata
        uses: dependabot/fetch-metadata@v1.1.1
        with:
          github-token: "${{ secrets.GITHUB_TOKEN }}"
      # Here the PR gets approved.
      - name: Approve a PR
        run: gh pr review --approve "$PR_URL"
        env:
          PR_URL: ${{ github.event.pull_request.html_url }}
          GITHUB_TOKEN: ${{ secrets.GITHUB_TOKEN }}
      # Finally, this sets the PR to allow auto-merging for patch and minor
      # updates if all checks pass
      - name: Enable auto-merge for Dependabot PRs
        if: ${{ steps.dependabot-metadata.outputs.update-type != 'version-update:semver-major' }}
        run: gh pr merge --auto --squash "$PR_URL"
        env:
          PR_URL: ${{ github.event.pull_request.html_url }}
          GITHUB_TOKEN: ${{ secrets.GITHUB_TOKEN }}
There is a bit to unpack there, so let's go over it.
name: Dependabot Pull Request Approve and Merge
First, we have the name of the workflow, which is "Dependabot Pull Request Approve and Merge". This will be shown in the GitHub user interface when referring to your workflow.
on: pull_request_target
Next, we have the triggers. In this case, we have just one trigger; pull_request_target. This trigger should rarely be used and, when it is used, used with care as it provides a read/write access token. We need this as it allows us to perform tasks to update our PR. There are specific types of each trigger if you need to narrow down exactly when your workflow occurs; pull_request_target defaults to opened, reopened, and synchronize, which means our workflow will trigger when a PR is opened, updated, or reopened. For more information on this trigger and its types, see the GitHub documentation, also check out this blog on security implications of misusing this trigger.
permissions:
  pull-requests: write
  contents: write
After specifying the trigger for the workflow, we specify the scope of permissions we are granting the workflow. Every workflow has a secret available, GITHUB_TOKEN, which is used to authenticate the actions that the workflow wants to perform. Each trigger type has a restricted level of permissions, and while we cannot elevate permissions outside of those restrictions, we can control the scope of permissions allowed within the restrictions.
In our case, we need write access to the pull requests so that we can modify the PR itself, and we need write access to the repository contents because we need to be able to request merging. Even though setting a PR to auto-merge may seem like we are just editing the PR, because it results in the code getting merged, we have to make sure we have permission to do that future merge too.
jobs:
  dependabot:
    runs-on: ubuntu-latest
    # Checking the actor will prevent your Action run failing on non-Dependabot
    # PRs but also ensures that it only does work for Dependabot PRs.
    if: ${{ github.actor == 'dependabot[bot]' }}
    steps:
      # This first step will fail if there's no metadata and so the approval
      # will not occur.
      - name: Dependabot metadata
        id: dependabot-metadata
        uses: dependabot/fetch-metadata@v1.1.1
        with:
          github-token: "${{ secrets.GITHUB_TOKEN }}"
      # Here the PR gets approved.
      - name: Approve a PR
        run: gh pr review --approve "$PR_URL"
        env:
          PR_URL: ${{ github.event.pull_request.html_url }}
          GITHUB_TOKEN: ${{ secrets.GITHUB_TOKEN }}
      # Finally, this sets the PR to allow auto-merging for patch and minor
      # updates if all checks pass
      - name: Enable auto-merge for Dependabot PRs
        if: ${{ steps.dependabot-metadata.outputs.update-type != 'version-update:semver-major' }}
        run: gh pr merge --auto --squash "$PR_URL"
        env:
          PR_URL: ${{ github.event.pull_request.html_url }}
          GITHUB_TOKEN: ${{ secrets.GITHUB_TOKEN }}
At the end of the file, we have the jobs themselves. In this case, we have a single job named dependabot. This job runs on an instance of the latest Ubuntu image, as specified by runs-on: ubuntu-latest. GitHub Actions support a range of operating systems and versions, and you can even configure a job to run on a matrix of these things, but we do not need that fanciness – the Ubuntu images tend to be the cheapest and the fastest, so we that is what we are using.
We control when the job runs with a condition, if: ${{ github.actor == 'dependabot[bot]' }}. This means that if the PR was created by some entity other than dependabot[bot], we won't do anything, preventing us from auto-approving other folks code contributions.
Finally, we describe the steps in the job. In this case there are three steps:
name: Dependabot metadata This step uses an action from Dependabot that gets us information about the update.
name: Approve a PR This step performs the review approval. We do this using the awesome gh CLI.
name: Enable auto-merge for Dependabot PRs This step sets the PR to auto-merge using a squash merge strategy. You could change this strategy to whatever you prefer – possibly omitting it if you want the repository default to be used.
Versions
You may have noticed that the last step in our job has a condition:
This is why we have the "Dependabot metadata" step. In this condition, we use that metadata to ensure that we only allow auto-merging of minor and patch level updates. After all, a major version change is likely a breaking a change, and we don't want to automatically include those, even if they do pass our status checks. So, this condition ensures that we leave major updates as open PRs for manual verification before merging.
If you decided not to merge these PRs, you can tell Dependabot exactly how to handle this dependency in future, even preventing it suggesting major updates to that package again.