Using PowerShell to make BrowserStack local testing easier with Microsoft Edge

BrowserStack has been an incredibly useful resource for tracking down bugs and testing fixes when I am working on websites. This often requires accessing locally deployed sites or sites accessible over a VPN connection, and to do that, BrowserStack needs some local code running to be able to route the traffic accordingly.

BrowserStack logoUp until recently, my browser of choice has been Google Chrome, for which BrowserStack provides a handy extension to add support for local sites. However, since the Windows Creators Update, I have been giving Microsoft Edge a shot1 and no such extension exists. Instead, BrowserStack provides a download, BrowserStackLocal.exe , and a secret with which to run it. This works great, but there are a couple of annoyances.

  1. I have to remember to run it.
  2. It is a blocking process.

There are a variety of ways this problem can be solved. I decided to take the opportunity to expand my PowerShell fu and put together some cmdlets to run the BrowserStackLocal process in the background. Specifically, I wanted to compare PowerShell jobs with plain old processes for this specific purpose.

First: Jobs

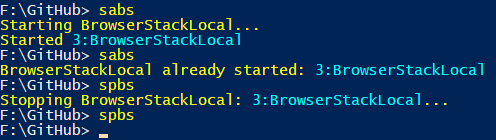
Since the running the command is a blocking operation, I decided to try wrapping it in a PowerShell job so that it would sit in the background. This is useful since the job gets terminated when the PowerShell session ends, which makes it less likely for me to forget. The downside is that each PowerShell session could have its own job, but only the one that started BrowserStackLocal will actually end it, but I was certain I could work with that.

Getting started

The first cmdlet for starting BrowserStackLocal is cunningly named Start-BrowserStackLocal , shown here:

function Start-BrowserStackLocal()
{
    $browserStackSecret = "<YOUR-SECRET-HERE>"
    $browserStackLocalDir = "F:\Program Files (x86)\BrowserStackLocal"
    $bslocal = Get-Command "$browserStackLocalDir\BrowserStackLocal.exe" -ErrorAction SilentlyContinue

    $job = Get-Job BrowserStackLocal -ErrorAction SilentlyContinue
    if ($job) {
        Write-Host "BrowserStackLocal already started: " -ForegroundColor Yellow -NoNewline
        Write-Host "$($job.ID):$($job.Name)" -ForegroundColor Cyan
        return
    }
    
    if (-Not $bslocal) { throw "Cannot find BrowserStackLocal" }

    Write-Host "Starting BrowserStackLocal..." -ForegroundColor Yellow
    $job = Start-Job -Name BrowserStackLocal -ScriptBlock {
        try {
            Push-Location $using:browserStackLocalDir
            & $using:bslocal.Path $using:browserStackSecret
        }
        finally {
            Pop-Location
        }
    }

    if2
    {
        Write-Host (Receive-Job $job)
        Remove-Job $job
    } else {
        Write-Host "Started " -NoNewline -ForegroundColor Yellow
        Write-Host "$($job.ID):$($job.Name)" -ForegroundColor Cyan
    }
}

This has basic room for improvement, like having the secret and the path be parameters to the cmdlet, or environment variables; I happened to stop tinkering once it worked for me, so feel free to expand on it.

At the start, we check to see if we already have a job for BrowserStackLocal since we only need one. If we do not, then we get on with making sure BrowserStackLocal can be found where we expect it. If everything looks good, then the job gets started.

To tackle the chance that my script may fail due to the BrowserStackLocal command either getting an incorrect key or discovering it is already running, I added a Wait-Job call. The nice thing here is that since normally BrowserStackLocal blocks, we can assume that if the job did not reach a completion state, then the executable command is running. I take advantage of that fact, so if the Wait-Job returns, we can assume things went wrong and dump the details of the problem back to the console.

Stopping the job

Once the job is running, we need to be able to terminate it.

function Stop-BrowserStackLocal()
{
    $job = Get-Job BrowserStackLocal -ErrorAction SilentlyContinue
    if (-Not $job) {
        return
    }
    Write-Host "Stopping BrowserStackLocal: " -ForegroundColor Yellow -NoNewline
    Write-Host "$($job.ID):$($job.Name)" -ForegroundColor Cyan -NoNewline
    Write-Host "..." -ForegroundColor Yellow
    Stop-Job $job
    Remove-Job $job
}

This is a much simpler cmdlet than the one to start the job. It has two main tasks:

  1. See if the job is actually running
  2. If it is, stop it

I added some helpful output so we could see it working and that was that.

Output from jobs-based cmdlets

Problems with jobs

This solution using jobs works great but it is not ideal. Each PowerShell session has its own jobs, so you have to know which session actually started BrowserStackLocal in order to stop it. Not only that, but if PowerShell did not start it at all, you cannot stop it from there with these commands at all. Jobs are great but they are not really the right tool for this…er…job.

Second: Processes

The wise man would have probably started here. I did not because I wanted to learn about jobs. Now that I have, I am wiser and so, I thought I would recreate my success but this time using the Xxx-Process  cmdlets of PowerShell.

Getting started again

Using processes, the start cmdlet looks like this:

function Start-BrowserStackLocal()
{
    $browserStackSecret = "<YOUR-SECRET-HERE>"
    $browserStackLocalDir = "F:\Program Files (x86)\BrowserStackLocal"

    $processes = Get-Process BrowserStackLocal -ErrorAction SilentlyContinue
    if ($processes) {
        Write-Host "BrowserStackLocal already started: " -ForegroundColor Yellow
        foreach ($process in $processes) {
            Write-Host "    $($process.ID): $($process.Name)" -ForegroundColor Cyan
        }
        return
    }

    $bslocal = Get-Command "$browserStackLocalDir\BrowserStackLocal.exe" -ErrorAction SilentlyContinue
    if (-Not $bslocal) { throw "Cannot find BrowserStackLocal" }

    Write-Host "Starting BrowserStackLocal..." -ForegroundColor Yellow
    Start-Process -FilePath $bslocal.Path -WorkingDirectory $browserStackLocalDir -ArgumentList @($browserStackSecret) -WindowStyle Hidden

    Wait-Process -Name BrowserStackLocal -Timeout 3 -ErrorAction SilentlyContinue
    $processes = Get-Process BrowserStackLocal -ErrorAction SilentlyContinue
    if ($processes)
    {
        foreach ($process in $processes) {
            Write-Host "    $($process.ID): $($process.Name)" -ForegroundColor Cyan
        }
    }
}

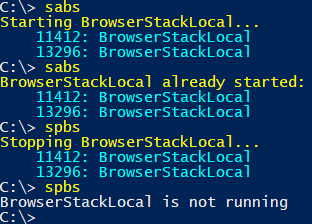
Since the BrowserStackLocal executable starts more than one process, I added some loops to output information about those processes. Now if we try to start the command and it is already running, we will get the same feedback, regardless of where the command was started.

Stopping the process

Switching to processes makes the stop code a little more complicated, but only because I wanted to provide some additional detail (we could have just called Stop-Process BrowserStackLocal and it would stop all matching processes).

function Stop-BrowserStackLocal()
{
    $processes = Get-Process BrowserStackLocal -ErrorAction SilentlyContinue
    if (-Not $processes) {
        Write-Host "BrowserStackLocal is not running"
        return
    }
    Write-Host "Stopping BrowserStackLocal..." -ForegroundColor Yellow
    foreach ($process in $processes) {
        Write-Host "    $($process.ID): $($process.Name)" -ForegroundColor Cyan
        Stop-Process $process
    }
}
Output from process-based cmdlets

Helpful aliases

Finally, to make the task of starting and stopping a little less arduous, I added some aliases (inspired by the helpful sasv and spsv aliases of Start-Service and Stop-Service).

Set-Alias sabs Start-BrowserStackLocal
Set-Alias spbs Stop-BrowserStackLocal

Conclusion

TL;DR: Use processes to start processes in the background3.

The rest

I am pretty pleased with how this little PowerShell project worked out. I get to keep using Microsoft Edge with minimal effort beyond what I had when using Google Chrome for my BrowserStack testing, enabling me to take advantage of the performance and battery-life improvements Edge has over Chrome. Not only that, but I got to learn some new things about PowerShell.

  1. You don't get closures entirely for free in PowerShell. I suspected this, but I learned the hard way. However…
  2. We can pass local variables into script blocks using the $using:<variable> syntax instead of passing an argument list and adding parameters to our script.
  3. Debugging jobs can be a pain until you learn the value of Receive-Job for getting error information.
  4. Use Wait-Job with a little time out to give your job chance to fail so that you can spit out some error information.
  5. You have to stop a job before you can remove it.
  6. Don't use jobs to control background processes; use processes instead

I have not gone so far yet as to start the BrowserStackLocal service automatically, but I can see value in doing so, especially if I did a lot of BrowserStack testing on local sites every day (of course, I'd probably want to redirect the output to $null in that scenario rather than see feedback on the running processes with every shell I opened).

What are your thoughts? Do you use PowerShell jobs? Do you use BrowserStack? Will you make use of these cmdlets? Fire off in the comments.

  1. Yes, the battery life is noticeably better than when using Chrome; yes, I am frustrated that I cannot clear cookies for a specific site []
  2. Wait-Job $job -Timeout 3 []
  3. Well, duh. But if I had taken that attitude, I would not have learned about jobs. []

Signing GitHub Commits With A Passphrase-protected Key and GPG2

GitHub recently added support for signed commits. The instructions for setting it up can be found on their website and I do not intend to rehash them here. I followed those instructions and they work splendidly. However, when I set mine up, I had used the version of GPG that came with my Git installation. A side effect I noticed was that if I were rebasing some code and wanted to make sure the rebased commits were still signed (by running git rebase with the -S option), I would have to enter my passphrase for the GPG key for every commit (which gets a little tedious after the first five or so).

Shows some commits on GitHub with the Verified indicator showing those that have been signed
How GitHub shows signed commits

Now, there are a couple of ways to fix this. One is easy; just don't use a passphrase protected key. Of course, that would make it a lot easier for someone to sign commits as me if they got my key file, so I decided that probably was not the best option. Instead, I did a little searching and found that GPG2 supports passphrase protected keys a little better than the version of GPG I had installed as part of my original git installation.

Using the GPG4Win website, I installed the Vanilla version1. I then had to export the key I had already setup with GitHub from my old GPG and import it into the new. Using gpg --list-keys, I obtained the 8 character ID for my key (the bit that reads BAADF00D in this example output):

gpg: WARNING: using insecure memory!
gpg: please see http://www.gnupg.org/documentation/faqs.html for more information
/c/Users/Jeff/.gnupg/pubring.gpg
--------------------------------
pub   4096R/BAADF00D 2016-04-07
uid                  Jeff Yates <jeff.yates@example.com>
sub   4096R/DEADBEEF 2016-04-07

Which I then used to export my keys from a Git prompt:

gpg -a --export-secret-keys BAADF00D > privatekey.txt
gpg -a --export BAADF00D > publickey.txt

This gave me two files (privatekey.txt and publickey.txt) containing text representations of the private and public keys.

Using a shell in the GPG2 pub folder ("C:\Program Files (x86)\GNU\GnuPG\pub"), I then verified them (always a good practice, especially if you got the key from someone else) before importing them2:

> gpg privatekey.txt

And rather than give me details of the key, it showed me this error:

gpg: no valid OpenPGP data found.
gpg: processing message failed: Unknown system error

What was going on? I tried verifying it with the old GPG and it gave me a different but similar error:

gpg: WARNING: using insecure memory!
gpg: please see http://www.gnupg.org/documentation/faqs.html for more information
gpg: no valid OpenPGP data found.
gpg: processing message failed: eof

I tried the public key export and it too gave these errors. It did not make a whole heap of sense. Trying to get to the bottom of it, I opened the key files in Visual Studio Code. Everything looked fine until I saw this at the bottom of the screen.

Encoding information from Visual Studio Code showing UTF16
Encoding information from Visual Studio Code

It turns out that Powershell writes redirected output as UTF-16 and I had not bothered to check. Thinking this might be the problem, I resaved each file as UTF-8 and tried verifying privatekey.txt again:

sec  4096R/BAADF00D 2016-04-07
uid                            Jeff Yates <jeff.yates@example.com>
ssb  4096R/DEADBEEF 2016-04-07

Success! Repeating this for the publickey.txt file gave the exact same information. With the keys verified, I was ready to import them into GPG2:

> gpg --import publickey.txt
gpg: WARNING: using insecure memory!
gpg: please see http://www.gnupg.org/documentation/faqs.html for more information
gpg: key BAADF00D: public key "Jeff Yates <jeff.yates@example.com>" imported
gpg: Total number processed: 1
gpg:               imported: 1  (RSA: 1)
> gpg --import privatekey.txt
gpg: WARNING: using insecure memory!
gpg: please see http://www.gnupg.org/documentation/faqs.html for more information
gpg: key BAADF00D: secret key imported
gpg: key BAADF00D: "Jeff Yates <jeff.yates@example.com>" not changed
gpg: Total number processed: 1
gpg:              unchanged: 1
gpg:       secret keys read: 1
gpg:   secret keys imported: 1

With the keys imported, I ran gpg --list-keys to verify they were there and then made sure to delete the text files.

Finally, to make sure that Git used the new GPG2 instead of the version of GPG that it came with, I edited my Git configuration:

> git config --global gpg.program "C:\Program Files (x86)\GNU\GnuPG\pub\gpg.exe"

Now, when I sign commits and rebases, instead of needing to enter my passphrase for each commit, I am prompted for the passphrase once. Lovely.

  1. You could also look at installing the command line tools from https://www.gnupg.org/download/ though I do not know if the results will be the same []
  2. Note that I am not showing the path to the file here for the sake of brevity, though I am sure you get the idea that you'll need to provide it []

Getting posh-git in all your PowerShell consoles using GitHub for Windows

If you use git for version control and you use Microsoft Windows, you may well have used posh-git, a module for PowerShell. For those that have not, posh-git adds some git superpowers to your PowerShell console including tab completion for git commands, files and repositories, as well as an enhanced command prompt that tells you the current branch and its state1.

PowerShell console using posh-git
GitHub for Windows
GitHub for Windows

GitHub for Windows includes posh-git for its PowerShell console, if you choose that console when installing or later in the settings. It even adds a nice console icon to the task bar and Start screen2. Unfortunately, posh-git is only installed for the special version of the console that GitHub for Windows provides and you cannot make that prompt run as administrator, which can be useful once in a while.

Now, you could install a separate version of posh-git for all your other PowerShell needs, but that seems wrong. Especially since GitHub for Windows will happily keep its version up-to-date but you'd have to keep track of your other installation yourself.

Faced with this problem, I decided to hunt down how GitHub for Windows installed posh-git to see if I could get it into the rest of my PowerShell consoles. I quickly discovered ~\AppData\Local\GitHub containing both the posh-git folder and shell.ps1, the script that sets up the GitHub shell. The fantastic part of this script is that it sets up an environment variable for posh-git, github_posh_git, so you don't even need to worry about whether the folder changes3.

Armed with this information, you can edit your PowerShell profile4 and edit it to call both the GitHub shell script and the example profile script for posh-git5.

# Load posh-git example profile
. (Resolve-Path "$env:LOCALAPPDATA\GitHub\shell.ps1")
. (Resolve-Path "$env:github_posh_git\profile.example.ps1")

cd ~/Documents/GitHub

Once the edits are saved, close and reopen the PowerShell console to run the updated profile. Posh-git should now be available and all you have to do to keep it up-to-date is run the GitHub for Windows client once in a while.

  1. such as if there are any unstaged or uncommitted files and whether the branch is behind, ahead, or diverged from the remote []
  2. or menu, if you're pre-Windows 8 or installed something to bring the Start menu back []
  3. and if you've seen the folder name for posh-git in the GitHub for Windows installation, you'll see why that's useful []
  4. just enter `notepad $profile` at the PowerShell prompt []
  5. you may want to do the same thing for the PowerShell ISE, as it uses a separate profile script []

Git integration for all your PowerShells with Github for Windows

We use git for our source control at work. In fact, we use Github. I have GitHub for Windows (GfW) installed because it's one of the easiest ways to install git on a Windows desktop. As part of the installation, you get to choose how the git shell is provided; I selected PowerShell (PS). This works well. You can access the integrated console via a separate shortcut or by the ~ key when viewing a repository in GfW.

However, the git integration (provided by posh-git) isn't available in the standard PS console nor PS ISE1. I use PS ISE a lot more these days as it gives me tabbed console windows and some cool features like auto-complete dropdowns2, so I wanted git integration there too.

As I already have git and posh-git installed via GfW, I didn't want to install both separately again just to get this support, I wanted to use what was already there.

To do this, open your PS or PS ISE console (you'll need to do this for both as they have separate profiles) and enter:

notepad $profile

Then add the following lines and save:

# Load github shell and posh-git example profile
. (Resolve-Path "$env:LOCALAPPDATA\GitHub\shell.ps1")
. (Resolve-Path "$env:github_posh_git\profile.example.ps1")

To see the changes, you need to restart your console. If you're sure there'll be no nasty side-effects from running your profile twice in one session, you could also just enter:

. $profile

And there you have it, git support using the GitHub for Windows installation in all your PowerShell windows.

  1. Integrated Scripting Environment []
  2. There are some caveats to using the ISE console tab over a regular PS console []

Ann Arbor Day of .NET

On Saturday (29th Oct), I attended the Ann Arbor Day of .NET. I thought it would be nice to summarise what I heard. I doubt these notes on their own will be greatly useful, but I hope they act as a launch pad into deeper dives on the topics covered as well as a review of what topics were covered. There were five different tracks for the day: Cloud, Framewords & Platforms, Soft Skills, Tools and Mobile. I chose talks from the first four of these based on the talk itself, rather than the track to which it belonged (I ruled out presentations that I had seen a variation of before such as David Giard's (@DavidGiard) Introduction to Microsoft Windows Workflow and Jay R. Wren's (@jayrwren) Let's Go to C# On The iPhone, though they were excellent when I saw them).

Be A Better Developer

I started out the with Mike Wood (@mikewo) and his session, Being A Better Developer. This was a soft skills talk, meaning it was not there to show off some cool .NET feature or technology, or teach me all about C#. Instead, the focus was on what makes a great developer and what we can do to attain that status.

Mike explored the various roles that developers have to take on, the hats we have to wear. From the student learning new things everyday, to teacher imparting knowledge to those around them. From janitor—maintaining what already exists, to researcher—investigating and choosing frameworks, languages, platforms, etc. Using these roles as a foundation, we then moved on to some tips such as setting up time blocks in which to work. If the time limit is reached and the problem isn't solved, turn to someone else for help (or somewhere else, like the Internet1) to avoid thrashing and time wasting. This seems somewhat obvious and yet I'm betting that many of us don't do it as often as we should. The other tips were equally useful, obvious and often compromised in our daily development lives:

  • organize
  • prioritize
  • know your tools
  • set SMART2 goals
  • be a catalyst for change
  • be lazy…

Right, that last one is maybe a little less obvious, but the point wasn't: don't do more than you have to.

One of the best pieces of advice from this talk was to choose a good mentor. I was very fortunate when I started out my career to have several excellent mentors and I miss working with them almost every day. Even now, I imagine what they might have said in order to guide my efforts3. For an hour, Mike filled that role.

There was much more to this talk than what I've written here. This session was an excellent way to spend an hour. While much of what Mike presented could be considered commonsense, it was reassuring and also provided some new tricks for my arsenal to be deployed in any situation, not just day-to-day software development.

Things to check out after this talk


How I Learned To Love Dependency Injection

Next, on to James Bender (@jamesbender) and his presentation on how he much loves dependency injection4. This talk started out looking at the way things were and the ideas behind a loosely-coupled system; a system where each component knows as little as possible about the other components in its parent system, whether it uses the services those components provide or not. Tightly-coupled systems don't promote reuse, create brittle systems and are inherently difficult to test.

James told a compelling story, starting out with familiar concepts—a constructor that takes various interfaces through which the created object can obtain various services, the factory pattern, etc., but soon we were looking at an overview of dependency injection frameworks, what they do and how they do it.

And then, code. Code about cooking bagels. The only bad part about this was the lack of bagels to eat5. The talk moved quickly on to the various features of Ninject, an open source dependency injection framework. I would've preferred it if there was more emphasis on dependency injection, using Ninject to provide examples, rather than the "how to use Ninject" approach that was given. However, this was still very informative and laid a path towards the next part of the talk which showed how dependency injection and TDD6 go hand in hand. This in turn led to an introduction of mocking (the mock framework of choice in these examples was Rhino Mocks, but James recommended Moq for new work).

Things to check out after this talk


A Field Guide for Moving to the Cloud

We're back with Mike Wood (@mikewo) for this one. I've never done any Cloud development but I'm really interested in it and what it may do for me and the work I do, so I'm hanging a lot on this introduction (no pressure, Mike).

Mike started off with a Batman reference, tying the reason why I'm so tired (Batman: Arkham City) with the reason why I'm here. He then fired off some acronyms: IaaS, SaaS, PaaS. This is a great starting point for me as terminology is often the last refuge of miscommunication and I hate not understanding what all those acronyms and terms mean. One participant immediately asked, "What's the difference between IaaS and PaaS?" and most of us nodded, realising we didn't know either. To paraphrase, IaaS gives the most control as you're responsible for patching your OS, upgrading the frameworks, etc. PaaS manages all that for you. Mike did a great job explaining this (unlike my paraphrasing—Mike used a whiteboard and everything) and we moved on, that bit more informed and ready to learn more.

At this point, Mike gave us a run through of the Windows Azure platform, again making sure we're all talking the same language as the presentation progresses. Mike's presentation style is nice and fluid, taking questions and interruptions in his stride, and he clearly knows his topic well (Mike is an Azure MVP, after all). He walked us through the various parts of Windows Azure, Microsoft SQL Azure and Windows Azure AppFabric before we moved on to planning for our move to the Cloud.

Mike discussed identifying suitable applications for moving to the Cloud, scale of the application and the independence of scale, the services used and tight integration with loose coupling (not the first time we've heard this today but I would hope, not the first time in our careers either, otherwise, you're doing it wrong), usage patterns, latency, security and many other facets to be considered when moving to the Cloud.

The final point related to whether the move would save money or not and the importance of answering that question before making the move. This kind of information was great to see and may prove very useful when talking with project managers or business development types. Mike also pointed out using techniques like multipurpose worker roles and disposable compute instances to save as much as 50% in costs.

And then it was lunch.

Things to check out after this talk


Develop IT: Intro to PowerShell

I admit it, I have only ever used PowerShell for things that I could've done from a regular command prompt, so this talk was one I didn't want to miss. I want to know more so I can do more. I feel like PowerShell is an exclusive club for productive individuals and I'd at least like to take a look inside, so this was my opportunity. Sarah Dutkiewicz (@sadukie) was the presenter for this session, a C# MVP and co-author of Automating Microsoft Windows Server 2008 R2 with Windows PowerShell 2.0. This talk was entirely presented using PowerShell, which certainly made it stand apart from other presentations given so far today.

The initial examples given by Sarah quickly demonstrated how PowerShell provides similar behaviour to the traditional command prompt but also how it is different, providing .NET objects (dir w* | Get-Member demonstrated how dir provides an object—very cool). We then learned all about the standard PowerShell syntax that provides an easily dicoverable set of commands (known as Cmdlets in the PowerShell world) and some useful Cmdlets like Get-Help and Out-GridView (which outputs things to its own filterable grid in a window).

Sarah continued introducing us to a variety of PowerShell concepts and features including but not limited to:

  • functions
  • modules
  • manifests
  • PowerShell ISE7
  • providers
  • aliases
  • registry interaction

My biggest takeaway is how easy it can be to work with the registry from within PowerShell (just open PowerShell and enter cd hkcu: then dir to see what I mean). Overall, a great introduction that has given me a starting point for exploring PowerShell and becoming more efficient.

Things to check out after this talk


Stone Soup or Creating a Culture of Change

For the final session of the day, I rejoined James Bender (@jamesbender). I was really looking forward to this having faced many challenges in changing culture as part of my efforts for meeting the requirements of CMMI8. This was expected by event organisers to be a popular talk and I still feel that it should have been; however, the turnout was disappointingly low. This made for a more intimate session and certainly did not detract from the informative content. James expressed that this was probably the last time he would present this talk, which is a shame as I found the anecdotes and the lessons that were drawn from them to be very insightful.

The things I've learned will definitely help me in my work and elsewhere. Things like:

  • Go for low hanging fruit
  • Don't change too much at once
  • Support the change and let it simmer
  • Don't judge
  • Know your tools
  • Only introduce changes you believe in
  • Understand the business
  • Know when to say when
  • Evangelize
  • Build a network of like-minded people
  • Be a politician
  • Be a therapist
  • Realise that it might be difficult to reach everyone
  • When all else fails, buy doughnuts
  • Be patient

There's not much more I could say about this talk that would do it justice (not that my notes have really given justice to the earlier talks), but suffice to say this presentation was very relevant to me and I am very grateful to have been able to see it.

Things to check out after this talk


To conclude, I had a great day. The organisers, sponsors and speakers deserve a huge "thank you" for setting up and supporting this event. Wandering the hallways of Washtenaw Community College, attending talks in rooms and lecture halls reminded me a little of being back at university, but the speed at which the day flew by certainly did not. It was a very informative and enjoyable way to spend the day and among the best $10 I've spent this year.

  1. Use Internet search before you ask someone. []
  2. Specific, Measurable, Achievable, Realistic/Relevant, Trackable []
  3. Besides, "Shut up, Jeff!" []
  4. An appropriate amount as allowed by law. []
  5. Mmm, bagels. []
  6. Test Driven Development []
  7. Integrated Scripting Environment []
  8. Capability-Maturity Model Integration []