Breaking The Code

Last week saw the return of Learn Something, a monthly software hacking event held at the offices of Fanzoo Technology in Ann Arbor. Each month, attendees can choose to hack on their own projects or take part in the monthly Learn Something challenge. Teams and pairing are encouraged, providing opportunities to work with new people, tools and techniques.

The message we had to decode

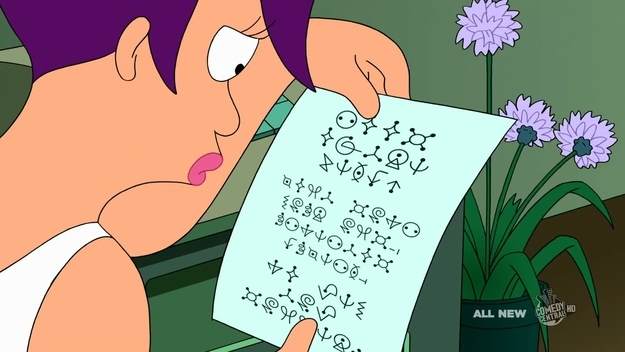
This month the challenge was to decipher a message encoded using a simple substitution cipher. Participants started with a copy of the encoded message (known as the ciphertext) and a text file of words from the English language. The message (shown above) is one example of a cipher, known as 'alienese', that appeared in several episodes of Futurama. Though fans of the show have already solved the cipher and we could have searched the Internet for the solution, our goal at Learn Something was to create a software solution that could solve it (or at least narrow down the possibilities1).

What is a simple substitution cipher? A simple substitution cipher is a way of encoding a message by replacing (substituting) each letter of the alphabet with a different letter or symbol. For example, if we had the substitutions `t` to `a`, `h` to `g`, and `e` to `o`, the word `the` would become `ago`.

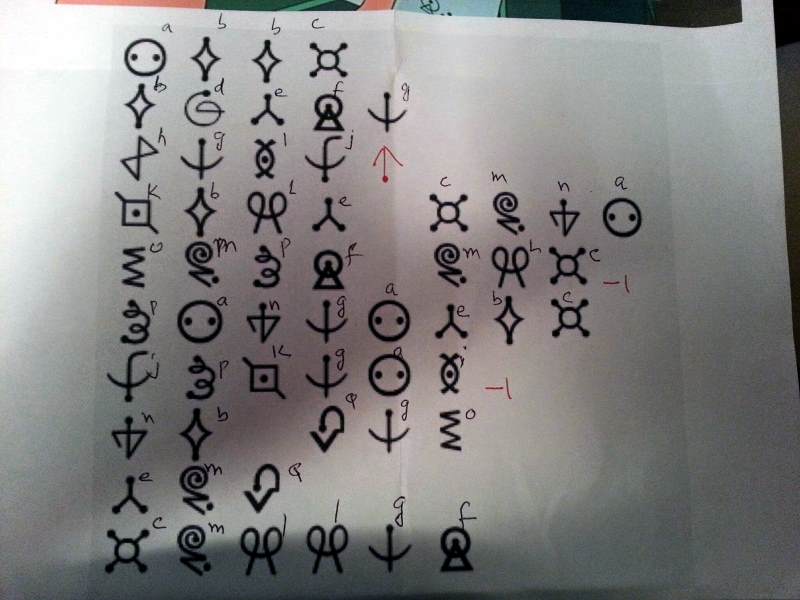
Alex Zolynsky, one of the organizers of Learn Something, provided a clearer print out of the message with punctuation symbols written in red (see below). The intention was to ignore the punctuation and focus on the actual words, so before we started, one of the participants assigned a letter to each symbol such that we had the message written in a more familiar alphabet (and one that was easier to type on our laptops).

The annotated message

The resulting message read:

`abbc bdefg hgij kble cmna ompf mlc pangaebc jpkgai nb qgo emq cmllgf`

Clearly, our work was far from done, but before I continue with this blog, I need to come clean.

At Learn Something last week, I was buried in some work of my own, and other than the occasional interjection, I was not involved in the challenge. However, at the end of the night, I took the cipher home with me and the following evening, I got stuck in. It took me about three hours to crack the message. How did I do it?

Well, there are many ways to tackle breaking a substitution cipher. For example, if the ciphertext is long, we could use frequency analysis to gain some hints at the substitutions2. However, this ciphertext was short and as such, frequency analysis was not particularly helpful3. Instead, I decided to follow the same track as the participants at Learn Something and take the longest word in the phrase then find words in English that had the same pattern and use that to start reducing the possibilities. So, I opened up LINQPad (my tool of choice for hacking around), and got started.

The longest word in the ciphertext is `pangaebc`. To match words that follow the same pattern, I treated the word as its own ciphertext and made another substitution, just as the symbols had been substituted for letters earler. This allowed me to normalize different words to see if they matched the same patter. Only words that normalized to the same string would be of the same pattern. So, for `pangaebc`, the normalized version is `abcdbefg`. Examples of English words that match this pattern are `airfield`, `windiest`, and the gross`pustular`, each of these has the pattern `abcdbefg` when normalized. In fact, in the dictionary I used there were over 500 matches, over 500 possibilities for the word that could be in our decoded message. Each of the possible matches for the longest word provided a possible part of the substitution cipher. The next step was to take another word from the ciphertext and find English words that matched the pattern of that ciphertext word as well as the substitutions found from the first word, `pangaebc`. This started to build up a tree of candidate words for the decoded message. Each node in the tree contained words that match the substitutions required by its parent node but also matched the pattern of a word in the ciphertext. By recursing this approach for each word in the ciphertext sentence, a tree of possible plaintext4 sentences could be generated.

Once all words in the ciphertext had been processed, I could take the branches of the resulting tree that included the same number of nodes as words in the ciphertext and determine the possible substitutions that might give the right plaintext solution. This produced 15 possible sentences. It was then up to me to read each one and pick the one that made the most sense. Of course, I'm not going to spoil it by telling you the solutions I found. Instead, I encourage you to give the challenge a go for yourselves and see what you come up with (we both know you could cheat by searching the Internet for an answer, but you're better than that, right?).

I really enjoyed tackling this problem. Not only was it a fun distraction, but now I have a LINQPad query that can solve any substitution cipher as long as I know what language in which the message is written. I am definitely looking forward to the next time I attend Learn Something. Hopefully, your interest is piqued and I will see you there. In the meantime, if you give this challenge a go, I would love to hear how you tackled it, what you did differently to me, and what you learned. Until next time, thanks for reading.

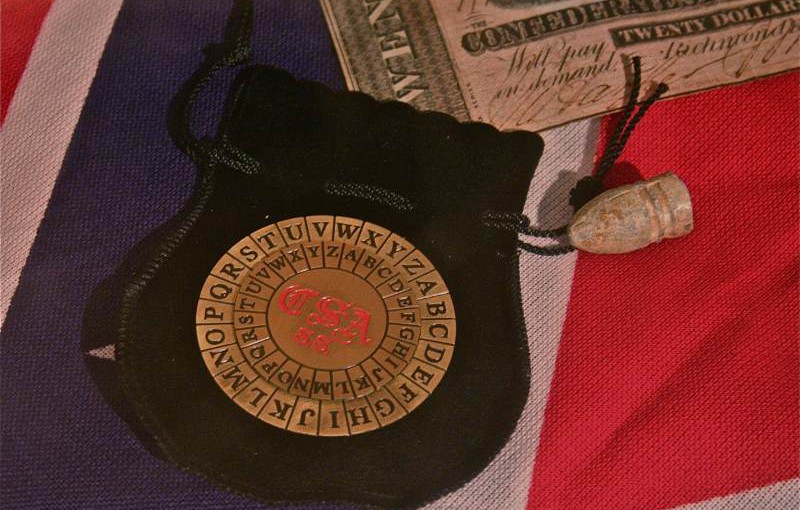
Featured image: "Confederate cipher disk" by RadioFan (talk) – I (RadioFan (talk)) created this work entirely by myself. Licensed under CC BY-SA 3.0 via Wikipedia.

  1. to fully solve it programmatically would have needed our software solutions to have understanding of English sentence structure, which was thankfully outside the scope of the challenge []
  2. assuming we know the language in which it is written []
  3. I did try it just to see, but frequency analysis needs a longer ciphertext than we had for this challenge []
  4. decoded text []

Hackery: Line following bots at CodeMash

NodeBots @ CodeMash

CodeMash 2.0.1.5, the latest installment of the popular community-organised conference is fast approaching. This time, I will be attending with several of my colleagues from CareEvolution, which is sponsoring the NodeBot precompiler sessions. One such colleague and good friend, Brian Genisio (also a co-organiser of the Southeast Michigan JavaScript group more commonly known as SEMjs) has been working night and day for months to prepare for each of the two epic software and hardware hacking events that will be the NodeBot precompilers. Though myself and a few other friends (many of which you can meet in person at CodeMash) have assisted Brian over the last few weeks, the success of this event really is down to his vision and commitment. From creating documentation to submitting Johnny Five pull requests1, ordering components to building kits, Brian's efforts have been considerable; if you join us to hack NodeBots (and you really should), be sure to take a moment and show him your gratitude.

My biggest contribution to the NodeBots preparation was to organize and take part in a hack day at work where Brian, a few colleagues (Brandon Charnesky, Greg Weaver, and Kyle Neumeier), John Chapman (another co-organizer of SEMjs and the NodeBots precompilers), and I could test and finalize kits and components, review and update documentation, and give some of the challenges and components a dry run in the process. Participants at CodeMash will be able to take part in one of two competitions with their NodeBots; a sumo-inspired Battle Bots competition where bots can compete for supremacy in the ring, or a line racing time trial where bots must follow a track in the fastest time2. My main efforts during the hack day were to create a sample line-following bot and provide some example code as a starting point for our precompiler hackers. The examples for both the basic line follower and basic sumo bot, as well as some other examples for specific components, can be found on GitHub in the CodeMash NodeBots Docs repository. Instructions on getting started are available on the official CodeMash NodeBots website.

Healthcare and NodeBots?

CareEvolution logo

Some of you may have been wondering: "why would a healthcare IT company like CareEvolution chose to sponsor an event hacking robots?" If you would like to know more, please come to our vendor session at CodeMash (2 p.m. on Thursday, January 8) where I will be presenting "We're Not All Robots: Hacking NodeBots, Healthcare, and the Workplace".

The Line-Following Hardware

Before hacking the code, I needed to work out how the hardware worked and build my bot. I started out with the IR (infrared) reflectance array component; an array of six IR emitters and corresponding receivers that will be the eye to see the line.

IR array and cable
IR array and cable

In the image above, you can see the front of the array as well as the cable to attach the array to the controller (we are using Arduino Uno clones for the precompilers). Using the pins already attached3, I connected the array to the board.

Rear of array showing attached pins
Wiring diagram of reflectance array connected to the controller

In the wiring diagram above, you can see each of the six analog pins on the Arduino going to one of the output pins (labelled 1-6) on the reflectance array4. Pin 13 of the Arduino has been connected to the LED ON pin of the reflectance array, which is used to activate the infrared LED's.

With everything connected, I used the usage code from the Johnny Five documentation to create a quick tester and verify that I was able to receive output from my reflectance array.

var five = require("johnny-five"),
    board = new five.Board();
 
board.on("ready", function() {
  
  var eyes = new five.IR.Reflect.Array({
    emitter: 13,
    pins: ["A0", "A1", "A2", "A3", "A4", "A5"]
  });
 
  eyes.on('line', function(err, lineValue) {
    console.log( "Line Position: ", lineValue);
  });
 
  eyes.enable();
});

After verifying the reflectance array was wired and working, I followed the reference kit build instructions to create a robot chassis on which I could mount the reflectance array.

Reference bot
Reference bot

I then mounted the array at the front, near the wheels, using some padded double-sided tape (the array must be within a quarter of an inch of the line, so a little padding was required). To avoid confusion, the array was oriented so that its left (pin 1, according to the documentation) was also the bot's left (assuming the wheels are the front of the bot).

Reflectance array mounted at the front of the bot. Pin 1 is on the right in this picture (the bot's left).

The Line-Following Software

With the bot constructed, I needed to tell it what to do. My aim was not to create the best line-following bot ever (that is a task that possibly awaits you at CodeMash), I merely wanted to make something that demonstrates the basic concepts.

The first thing that the bot needs to do is to "see". Although we had a little code to check the array worked, we had not actually calibrated the array. Calibration allows us to show the array the extremes that it is to understand, i.e. the materials that represent the existence and non-existence of a line. Thankfully, the Johnny Five driver for the reflectance array makes calibration easy with the calibrateUntil function.

var five = require("johnny-five");
var board = new five.Board();

var stdin = process.stdin;
stdin.setRawMode(true);
stdin.resume();

board.on("ready", function () {
    var eyes = new five.IR.Reflect.Array({
        emitter: 13,
        pins: ["A0", "A1", "A2", "A3", "A4", "A5"]
    });
    
    var calibrating = true;
    
    // Start calibration
    // All sensors need to see the extremes so they can understand what a line is,
    // so move the eyes over the materials that represent lines and not lines during calibration.
    eyes.calibrateUntil(function () { return !calibrating; });
    console.log("Press the spacebar to end calibration...");
    
    stdin.on("keypress", function(chunk, key) {
        if (!key || key.name !== 'space') return;
        
        calibrating = false;
    });

    eyes.on("line", function(err, line) {
        console.log(line);
    });
    
    eyes.enable();
});

In my updated code, I also added keyboard input capture so that the calibration mode could be exited via the space bar. Running this with my bot, I was able to drag a piece of paper with a thick black electrical tape line under the array and calibrate it. After calibration, I could see from the console output that my bot recognised the line and in which direction it had last seen it5.

Next, I needed to be able to move the bot based on the line position. For this, I added some simple wheel commands and thresholds. The code is shown below.

var five = require("johnny-five");
var board = new five.Board();

var stdin = process.stdin;
stdin.setRawMode(true);
stdin.resume();

board.on("ready", function () {
    var wheels = {
        left: new five.Servo({ pin: 9, type: 'continuous' }),
        right: new five.Servo({ pin: 10, type: 'continuous' }),
        stop: function () {
            wheels.left.center();
            wheels.right.center();
        },
        forward: function () {
            wheels.left.ccw();
            wheels.right.cw();
            console.log("goForward");
        },
        pivotLeft: function () {
            wheels.left.center();
            wheels.right.cw();
            console.log("turnLeft");
        },
        pivotRight: function () {
            wheels.left.ccw();
            wheels.right.center();
            console.log("turnRight");
        }
    };
    
    var eyes = new five.IR.Reflect.Array({
        emitter: 13,
        pins: ["A0", "A1", "A2", "A3", "A4", "A5"]
    });
    
    var calibrating = true;
    var running = false;

    wheels.stop();
    
    // Start calibration
    // All sensors need to see the extremes so they can understand what a line is,
    // so move the eyes over the materials that represent lines and not lines during calibration.
    eyes.calibrateUntil(function () { return !calibrating; });
    console.log("Press the spacebar to end calibration and start running...");
    
    stdin.on("keypress", function(chunk, key) {
        if (!key || key.name !== 'space') return;
        
        calibrating = false;
        running = !running;
        
        if (!running) {
            wheels.stop();
            console.log("Stopped running. Press the spacebar to start again...")
        }
    });

    eyes.on("line", function(err, line) {
        if(!running) return;
    
        if (line < 1000) {
            wheels.pivotLeft();
        } else if (line > 4000) {
            wheels.pivotRight();
        } else {
            wheels.forward();
        }
        console.log(line);
    });
    
    eyes.enable();
});

The first thing I added was a wheels object to encapsulate the motor controls. Movement is provided by two continuous servos attached to pins 9 and 10. After defining left and right servos, I created the following methods:

  • forward
    Both servos turning such that they rotate toward the front of the bot
  • pivotLeft
    The left servo rotates in reverse while the right servo rotates forward
  • pivotRight
    The right servo rotates in reverse while the left servo rotates forward
  • stop
    Both servos stop moving

Next, I made sure that stop()  was called on startup to ensure the bot was not wandering around aimlessly. I then updated the space bar handling to act as a toggle that on first use stopped calibration and started the bot on its line following quest, but on subsequent uses merely stopped or started the line following. Finally, I added some thresholds to the line  event handler to determine when the bot should drive forward and when it should pivot in either direction based on the value sent from the array.

And with that, my simple line-following robot was complete. It does a fair job at following a course, but it is in need of fine tuning if it is to win any races. Perhaps you will be up to the task when you take part in the CareEvolution-sponsored NodeBots precompilers at CodeMash 2.0.1.5. If you wish to take part in our hacking extravaganza, you will need to register, so be sure to reserve your spot.

  1. which earned Brian the privilege of becoming a core committer []
  2. of course, you don't have to compete in either; you can just hack []
  3. thanks to the efforts of John Chapman, no one will need to solder pins to the reflectance arrays []
  4. pins 7 and 8 are unused as the reflectance sensors for those pins have been separated from the component []
  5. the `line` event from the array uses 0 to mean the line was last seen to the left and 5001 to mean it was last seen to the right; any value between 1 and 5000 means the line is under the array with the value indicating its position []

Why software bugs exist and how you can help

Numbers in software development are represented by fixed size variables represented in binary. These are usually 8, 16, 32 or 64 bits (each bit represents a 1 or a 0). When we develop software, we choose which of these will provide enough space for the thing we are representing.

Recently, the Gangnam Style video on YouTube surpassed 2,147,483,647 views and it appeared as though the view counter broke. That number is significant because it is the upper limit of a 32-bit signed integer. It turns out that the video view count was being represented using a 32-bit signed integer — a signed value1 can represent whole numbers in the range -2,147,483,648 through 2,147,483,647; it cannot represent any number outside that range.

Though, according to YouTube, this turned out to be an Easter egg2, the bug was there before they updated the counter to 64-bit and it certainly is not the first time a number has pushed the limits. For example, the use of two digits to represent a year that contributed to the infamous fizzle that was Y2K.

But why? Why are there bugs at all?

Although it may seem like software bugs are there just to ruin your day, they were not intentionally put there or maliciously inserted to give you a reason to "Office Space" your device. As software engineers we have to consider a variety of constraints on the software we are developing. How much space does it need to run? How much space will there be on the device on which it is to run? How fast does it have to be?  How many years will the software be in use3? What other software will be running? And we have deadlines by which our work has to be completed. In fact, software engineers tend to consider a whole host of things such as the requirements of the software (functional, spatial, and temporal4), the specification of the system on which it is to execute, project deadlines and budgets, and the expectations of the end user.

Almost always, there has to be compromise. Even though a solution might be possible that accommodates all considerations, we have to deliver software in a time frame that people will pay for and some things just take too long or cost too much. That is not to say that all software bugs are because of time and money, some exist because of mistakes and as a consequence of poor design.

What does it all mean?

Software engineers like myself do not want you to encounter bugs. We work very hard and the QA teams work very hard to ensure that you do not get buggy software; if we see a problem, we do what we can to address it. To find these bugs, we try to consider all the ways our software might be used and test them. Unfortunately, most bugs do not advertise their existence quite so obviously or politely as YouTube's view counter bug. For example, when in comes to the infinite ways any one device might be configured with different peripherals and apps installed, we just cannot test them all; the system is too complex5.

 Good developers welcome user feedback. We need your help.

Next time you encounter a bug in the software you use, whether it is a mobile app, a website, an ATM, a desktop application, or some other device, spare a thought for the software engineers. Remember, good developers welcome user feedback. Take a moment to tell them or the publishers of the software about the problem.

  • What did you type, touch, or click?
  • What else was running on your device?
  • What part of the software were you in?
  • What Internet browser or operating system were you running?
  • What versions?

Be as detailed as you can. All these details and more can help a software engineer track down, reproduce and ultimately fix that bug.

There is no malice in a software bug. It was not put there specifically to ruin your day. However, without your help, it will not go away. So, reach out to the developers and tell them, they will thank you for it.

Today's featured image is based on Software Bugs by Martin Maciaszek.

  1. signed means it can be positive or negative []
  2. An Easter Egg is a hidden feature often added to software as an amusement for users who find it. Examples include the "barrel roll" in Google or the flight simulator in Excel []
  3. Underestimation of this was a big contributor to Y2K []
  4. i.e. how it works, what space it needs, and how long it takes to run and for how long it has to run []
  5. That's a discussion for another time []