Video Playback Rate Hackery

Photo by Noom Peerapong on Unsplash

Some video sites, like YouTube, provide a way to change the playback speed of the video. This allows you to watch content faster or slower than the standard speed. It is an incredibly useful feature for many people and until earlier this year, I thought it was ubiquitous. I am so used to using it that when I wanted to watch a video and it was not available, I got quite frustrated1.

Thankfully, a colleague showed me that all is not lost and I want to share the magic with you.

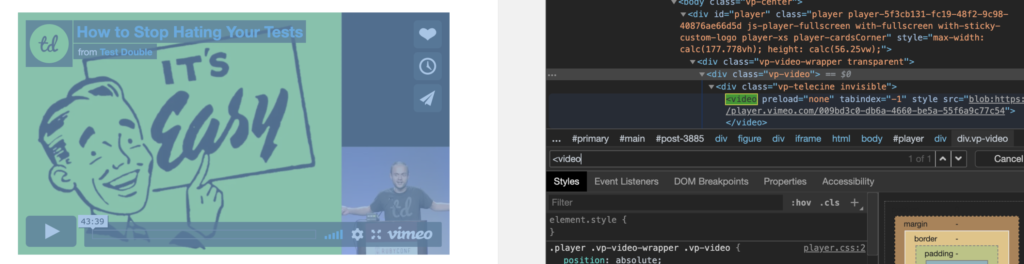
Above is the video I wanted to watch (source). It is an interesting video packed with useful information about testing, but it is quite long. I really wanted to watch it, but I did not have a lot of time available, so decided to watch it at a faster speed. However, I could not find a way to adapt the playback speed within the site's user experience. What to do?

In swoops my colleague, via Slack, to remind me that I have browser developer tools at my finger tips, primed to let me make it happen anyway. You can make this happen on the Vimeo site, the TestDouble site, or even here, on my blog.

In the world of HTML5, videos are embedded in pages using the video element. The video element implements the HTMLMediaElement interface (as does the audio element) and if you can get a reference to the video element in JavaScript, you can use this interface to manipulate the video playback.

The first step is getting the element. I did this in Google Chrome, but you should be able to do this in other browsers too, though the commands may be different. I right-clicked on the video and selected Inspect.

Screen grab of the right-click menu, showing the commands "View Page Source", "View Frame Source", "Reload Frame" and "Inspect"

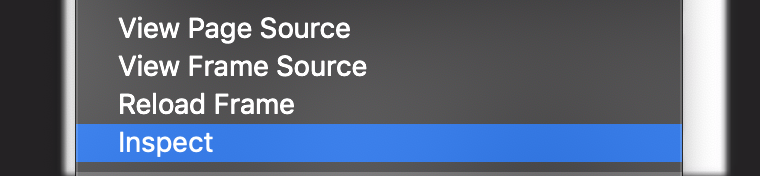
This should open the developer tools, with a node highlighted.

A snippet of HTML as shown in the Chrome Dev Tools. Some items are collapsed, hiding the child HTML. One node is highlighted.

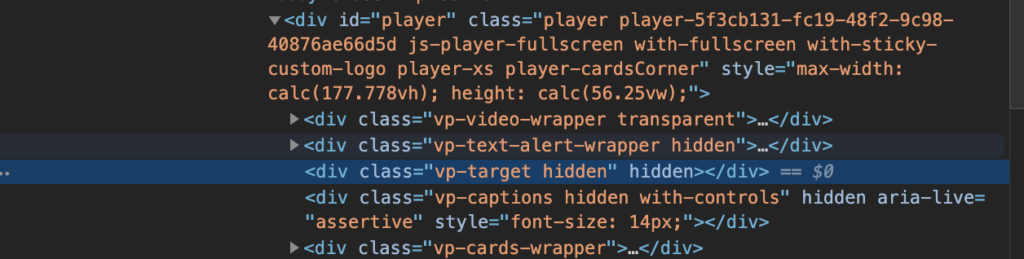
As seen in the screenshot above, the highlighted node was not the video element. Initially, I looked at the sibling elements and expanded likely candidates until I found the video tag I wanted, but there is an easier way. Use the Find command within the Elements tab of the Chrome developer tools by pressing āŒ˜+F (probably Ctrl+F on Windows).

A screengrab of the find bar in the Elements tab of the Google Chrome developer tools. The text "<video" has been entered and "1 match" is indicated as found.

Within the find bar, you can type <video and it will find the first video element in the page and, if there are more, allow you to cycle through any others until you get to the one you want. You can even tell if it is the one you want or not as both the node and the corresponding video are highlighted as seen in the screenshot below.

Screenshot showing the highlighted node found in the DOM via the Chrome developer tools on the right and the corresponding video highlighted in the page itself on the left.

With the video element found, we can right click the DOM node in the developer tools and select Store as global variable.

Screen grab showing the found "video" element and the right-click menu with the "Store as global variable" option highlighted.

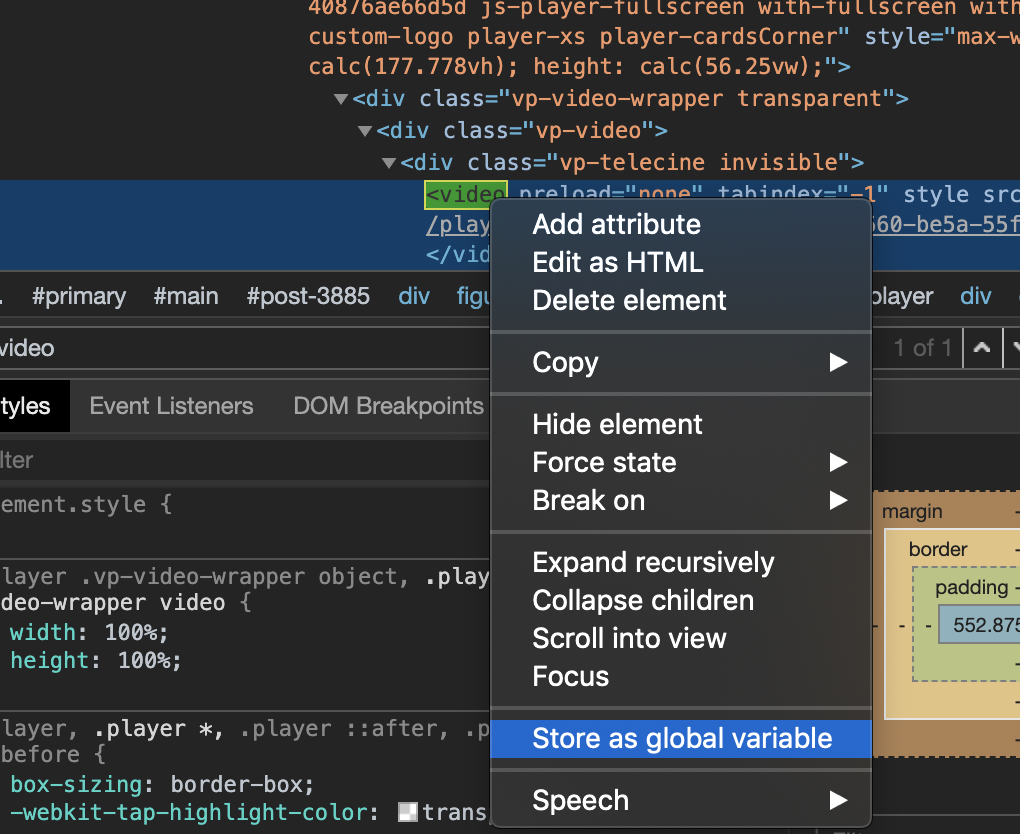
This creates a global variable that we can use to manipulate the element. The console section is opened to show us the created variable and the element to which it refers.

The console of the Chrome developer tools showing the name of the global variable we created "temp1", and the video element it refers to.

Now we can use the variable (temp1 in this case) to adjust the playback rate (or anything else we wanted to do). For example, if we want to run at double speed, just change playbackRate to 2 by entering temp1.playbackRate = 2.

Screenshot of the text "temp1.playbackRate = 2" having been entered in the developer tools console and the result "2" being returned to confirm that value is set.

And that's it. Hit play on that video and it will now be running at twice normal speed. Want it to run at half speed instead? Set playbackRate to 0.5 instead. Want it to run at normal speed again? Just set playbackRate to 1.

I hope y'all find this as helpful as I have and next time you stumble because a common feature appears to be lacking, don't be afraid to crack open those developer tools and see what magical hackery you can perform.

  1. "quite" is British for "inconsolably" []

OzCode: Reveal With Reveal

In my last post, I revealed that I am a magician; an OzCode magician1. I also revealed the new LINQ support currently in EAP. Since that was two reveals in one, I thought that I would look at another OzCodeĀ feature today coincidentally called Reveal.

I remember this specific feature as "favourites for properties" although I am reliably informed by the OzCode team, their website, and their documentation that it is in fact called "Reveal"2. Reveal was the feature that first lured me into regular use of OzCode and if it is the only feature you use, you will still wonder how you really survived without it.

When debugging, we can spend lots of time drilling down into objects to find the value of various properties and sub-properties. This can get especially tiresome when we're looking at a few similar objects since we repeat the same steps. Although pinning certain values is helpful, it does not really solve the initial issue of drilling down to find the thing to pin.

With Reveal, we can make life much simpler by elevating the details of an object to itsĀ summary; like an on-the-fly custom ToStringĀ implementation. Not only does this help with looking at one item, but it really helps with collections of similar items. For example3:

Animated GIF showing how to use Reveal in OzCode

Any properties that are "revealed" carry across to the rest of the debug sessionĀ and beyond;Ā once you have revealed some properties, they stay revealed until you decide you do not want them to be anymore, even across debug sessions.

Animated GIF showing how the revealed properties remain revealed

You can even see (and change) your revealed properties directly within the LINQ analysis window.

Animated GIF of using Reveal inside the new LINQ analysis feature of OzCode

Finally, revealed properties propagate up the object hierarchy allowing you to surface values from deeper in your object tree. This can really be a huge time saver, especially since the revealed properties are remembered across sessions.Ā No more hovering over multiple things to find what you're looking for and no more writingĀ custom ToStringĀ overrides, debug visualizers,Ā or other workarounds.

Hopefully, thisĀ overview of Reveal in OzCode has demonstrated not only why I love it so much, but also how valuable it can be. I genuinely believe OzCodeĀ to be an essential tool in any .NET developer's kit, but since you may mistake me for some corporate shill, you should not take my word for it; tryĀ OzCode out for yourself with a free trial (or take part in the EAP). Stop performing workarounds and start performing magic.

  1. Read as Sean Connery as James Bond []
  2. and apparently it doesn't matter how often I tell them they are wrong []
  3. To demonstrate, I am using the handy demo app from OzCode, which you can find onĀ GitHub []

C#6: Null-conditional operators

With the release of Visual Studio 2015 in July came C# 6. Each iteration of C# has tended to have a theme and if there were a theme for this one, it would be developer productivity; all the new features in C# 6 appear to beĀ either improvements to existing features, or syntactical shortcuts to simplify common operations. One of those syntactical shortcuts is the `?.` operator1, which is accompanied by the similar `?[]` operator2.

These new operators are collectively known as null-conditional operators.Ā Most, if not all C# developers have used the null-coalescing operator, `??` and found it to be brilliant…until the next step was to call a method or property on the result. Though `(something ?? somethingelse).Property` seems like it might be a good idea, there is rarely a suitable `somethingelse` that doesn't just feel like hack, so invariably, we resort to an `if` or the conditional operator, `?:`3.

var x = new MyClass();

ReturnTypeOfDoSomethingCool y = null;
if (x != null)
{
    y = x.DoSomethingCool();
}

// or, perhaps,

var y = x == null ?4;

In C# 6, the `?.` and `?[]` operators step up to help. These new null-conditionalĀ operators check the value on the left of the operator and, if it is null, return null, short-circuiting the remainder of the expression; if the value on the left of the operator is non-null, the expression continues according to precedence rules.

Using these operators,Ā we can express our earlier code much more succinctly and without resorting to convoluted, hacky `??` chains.

var x = new MyClass();
var y = x?.DoSomethingCool();

// and, with an indexer,

var a = new List<int>();
Console.WriteLine( a?[0] ?? "nothing" );

There isn't much else to write about these simple operators except to draw attention to how `?.` works with `Nullable<T>` types such as `int?`5.Ā Consider the `??` operator.Ā When the `??` operator is applied to a nullable type like `int?`, it either returns the value wrapped in that `int?` or the value evaluated from the right of the operator. That is to say that instead of needing to reference the `Value` property of the nullable directly, the operator does that for you.Ā The following assignment works because `x.Value` is returned from the `??` operator, not `x`.

int? x = 10;
int y = x ?? 0;

The `?.`Ā operator works the same way, which means the following does not make sense and won't compile; `Value` is not a property of `int`:

int? x = 10;
int y = x?.Value;

Whereas thisĀ will work just fine:

int? x = 10;
string y = x?.ToString();

In Conclusion…

The null-conditional operators, `?.` and `?[]` provide some shortcuts that will no doubt lead to clearer code, and I welcome their addition to the C# language. I hope that you do to.


  1. aka, the one-eyed Elvis operator []
  2. the robot Elvis, or Howard The Duck []
  3. The two-eyed Elvis []
  4. ReturnTypeOfDoSomethingCool)null) : x.DoSomethingCool();

    Or, if using an indexer:

    var x = new List<int>();
    if (x != null)
    {
       Console.WriteLine(x[0]);
    }
    
    Console.WriteLine(x == null ? "nothing" : x[0].ToString( []
  5. also expressible as `Nullable<int>` []

Use Inbox, Use Bundles, Change Your Life

I love Google Inbox. At work, it has enabled me to banish pseudo-spam1, prioritize work, and be more productive.Ā At home, it has enabled me to quickly find details about upcoming trips including up-to-date flight information, remind myself of tasks that I need to do around the house, and generally be more organized. While Inbox doesn't replace Gmail for all situations, it does replace it as a day-to-day email client. Gmail is awesome; Inbox is awesomer.

The main feature of Inbox that has enabled me to buildĀ a healthier relationship with my email (and achieve virtual Inbox Zero without having to make email management my day job) is Bundling. Bundles in Inbox are a lot like filters that label emails in Gmail; they allow you to group emails based on rules. Not only can you define filters to determine what emails go in the bundle, but you can also decide if the bundled messages go to your inbox (and how often you see the bundle) or if they are just archived away.

Inbox Sidebar
Inbox Sidebar

Inbox comes with some standard bundles: Purchases, Finance, Social, Updates, Forums, Promos, Low Priority, and Trips. Trips is a magic bundle that you cannot configure; it gathers information about things like hotel stays, flight reservations, and car rentals, and combines them into trips like "Weekend in St. Louis" or "Trip to United Kingdom". The other bundles, equivalent to the tabs that Gmail added a year or two ago, automatically define the filters (and as such, those filters are uneditable), but do allow you to control the behavior of the bundle.

When bundled emails appear in your Inbox, they appearĀ as a single item that can be expanded to view the emails inside. You can also mark the entire bundle as done2, if you desire. These features mean you can bundle emails in multiple bundles and have those bundles appear in your Inbox as messages arrive, once a day (at a time of your choice), once a week (at a time and day of your choice), or never3Ā (bundling some of the pseudo-spam and only having it appear once a day or once a week has drastically improved the signal-to-noise ratio of my email).

Trips
Trips

Trip to NYC
Trip to NYC

While theĀ default bundles are useful, the real power is in defining your own. You can start from fresh or you can use an existing label. Each label is shown in Inbox as unbundled and has a settings gear that allows you to setupĀ bundling rules. In myĀ example, I added a rule to labelĀ emails relating to Ann Arbor .NET Developers group.

Label settings without any bundle rules

Adding a filter rule

Label settings showing bundling rules

With the bundleĀ defined, every email that comes in matching the rule will be labelled and added to the bundle, which will appear in my inbox whenever a message arrives. Any messages I mark as done are archived4, removing them from the main inbox. However, they can be seen quickly by clicking the bundle name in the left-hand pane.Ā This is great, except for one thing. The bundle definition only works for new emails as they arrive. It does not include messages you have received before the bundle was setup.

This just felt untidy to me so I was determined to fix it. As it turns out, Gmail provides all the tools to complete this part of Inbox bundles. Since each bundle is a set of filter rules and a label, you can actually edit those filters in Gmail, and Gmail includes the additional ability of applying that rule to existing emails. Ā To do this, go to Gmail and click the Settings gear, then the Filters tab within settings.

Bundling filters in Gmail
Filters that define my bundle in Gmail

Find the filters that represent your new bundling rules, then edit each one in turn. On the first settings box for the filter, click continue in the lower right. On the following screen, check the "Apply to matching conversations" checkbox and click the "Update filter" button.

First filter edit screen

Last filter editing screen

Apply to existing messages

After performing this action for each of my bundles, I returned to Inbox and checked the corresponding bundles; all my emails were now organised as I wanted.

In summary, if you haven't tried Inbox (and you have an Android or iPhone; a strange limitation that I wish Google would lift), I highly recommend spending some time with it, getting the bundles set up how you want, and using it as your primary interface for your Google email. The combination of bundling with the ability to treatĀ emails as tasks (mark them as done, snooze them, pin them) and see them in a single timeline with your Google remindersĀ makes Inbox a powerful yet simple way to manage day-to-day email.Ā Before Inbox, I abandoned Inbox Zero long ago as a "fake work" task that held no value whatsoever, my Gmail inbox had hundreds of read and unread emails in it. Now that I have Inbox, I reached Inbox Zero in a day with minimalĀ effort that one might consider to be just "reading email". I'm not saying Inbox Zero is valuable, I'm just saying that it is realistically achievable with Inbox because Inbox gets daily email management right.

Use bundles, change your life.

  1. I use the term "pseudo-spam" to describe those emails that you don't want to necessarily totally banish as spam so that you can search them later, but that aren't important to you at all such as support emails for projects you don't work on, or wiki update notifications []
  2. One of the great features of Inbox is the ability to treat emails as tasks, adding reminders to deal with them later or mark them as done; this makes drop,delegate,defer,do a lot easier to manage []
  3. If a bundle is marked as never, it is considered "unbundled" and works just as a filter that applies a label []
  4. This can be changed to "Move to Trash" in the Inbox settings []

Some of my favourite tools

Update: This post has been updated to recognise that CodeLineage is now maintained by Hippo Camp Software and not Red Gate Software as was originally stated.

If you know me, you might well suspect this post is about some of the idiots I know, but it is not, this is entirely about some of the tools I use in day-to-day development. This is by no means an exhaustive list, nor is it presented in any particular order. However, assuming you are even a little bit like me as a developer, you will see a whole bunch of things you already use, but hopefully there is at least one item that is new to you. If you do find something new and useful here, or you have some suggestions of your own, please feel free to post a comment.

OzCode

OzCode is an add-in for Visual Studio that provides some debugging super powers like collection searching, adding computed properties to objects, pinning properties so that you don't have to go hunting in the object tree, simpler tracepoint creation, and a bunch more. I first tried this during beta and was quickly sold on its value. Give the 30-day trial a chance and see if it works for you.

Resharper

This seems to be a staple for most C# developers. I was a late-comer to using this tool and I am not sure I like it for the same reasons as everyone else. I actually love Resharper for its test runner, which is a more performant alternative to Visual Studio's built-in Test Explorer, and the ability to quickly change file names to match the type they contain. However, it has a lot of features, so while this is not free, give the trial a chance and see if it fits.

Web Essentials

Another staple for many Visual Studio developers, Web Essentials provides lots of support for web-related development including enhancedĀ support for JavaScript, CSS, CoffeeScript, LESS, SASS, MarkDown, and much more. If you do any kind of web development, this is essential1.

LinqPad

I was late to the LinqPad party, but gave it a shot during Ann Arbor Give Camp 2013 and within my first hour or two of using it, dropped some cash on the premium version (it is very inexpensive for what you get). Since then, whether it is hacking code or hacking databases, I have been usingĀ LinqPad as my standard tool for hacking.

For code, it does not have the overhead of creating projects and command line, WinForms or WPF wrapper tools that you would have to do in Visual Studio. For databases, LinqPadĀ gives you the freedom to use SQL, C#, F# or VB for querying and manipulating your database as well as support for many different data sources beyound just SQL Server, providing an excellent alternative to SQL Management Studio.

LinqPad is free, but you get some cool features if you go premium, and considering the sub-$100 price, it is totally worth it.

JustDecompile

When Red Gate stopped providing Reflector for free, JetBrains and Telerik stepped up with their own free decompilers for poking around inside .NET code. These are often invaluable when tracking down obscure bugs or wanting to learn more about the code that is running when you did not write it. While JetBrains' dotPeek is useful, I have found that JustDecompile from Telerik has a better feature set (including showing MSIL, which I could not find in dotPeek).

Chutzpah

Chutzpah is a test runner for JavaScript unit tests and is available as a Nuget package. It supportsĀ tests written forĀ Jasmine, Mocha, and QUnit, as well as a variety of languages including CoffeeScript and TypeScript. There are also two Visual Studio extensions to provide Test Explorer integration and a handy context menu. I find the context menu most useful out of these.

Chutzpah is a great option when you cannot leverage a NodeJS-based tool-chain likeĀ GruntĀ or Gulp, or some other non-Visual Studio buildĀ process.

CodeLineage

CodeLineage is a free Visual Studio extension from Hippo CampĀ Software2. Regardless of your source control provider, CodeLineage provides you with a simple interface for comparing different points in the history of a given file. The simple interface makes it easy to select which versions to compare. I do not use this tool often, but when I need it, it is fantastic.

FileNesting

This Visual Studio extension from the developer of Web Essentials makes nesting files under one another a breeze. You can set up automated nesting rules or perform nesting manually.

I like to keep types separated by file when developing in C#. Files are cheap and it helps discovery when navigating code. However, this sometimes means using partial classes to keep nested types separate, so to keep my solution explorer tidy, I edit the project files and nest source code files. I also find this useful for Angular directives, allowing me to apply the familiar pattern Ā of organizing code-behind under presentation by nesting JavaScript files under the template HTML.

Whether you have your own nesting guidelines or want to ensure generated code is nested under its corresponding definition (such as JavaScript generated from CoffeeScript), this extension is brilliant.

Switch Startup Project

Ever hit F5 to debug only to find out you tried to start a non-executable project and have to hunt for the right project in the Solution Explorer? This used to happen to me a lot, but not since this handy extension, which adds a drop down to the toolbar where I can select the project I want to be my startup project. A valuable time saver.

MultiEditing

Multi-line editing has been a valuable improvement in recent releases of Visual Studio, but it has a limitation in that you can only edit contiguous lines at the same column location. Sometimes, you want to edit multiple lines in a variety of locations and with this handy extension, you can. Just hold ALTĀ and click the locations you want to multi-edit, then type away.

Productivity Power Tools

Productivity Power Tools for Visual Studio have been a staple extension since at least Visual Studio 2008. Often the test bed of features that eventually appear as first class citizens in the Visual Studio suite, Productivity Power Tools enhances the overall Visual Studio experience.

The current version for Visual Studio 2013 provides support for colour printing, custom document tabs, copying as HTML, error visualization in the Solution Explorer, time stamps in the debug output margin, double-click to maximize and dock windows, and much more. This is a must-have for any Visual Studio user.

  1. yes, I went there []
  2. though it was maintained by Red Gate when I first started using it []