Video Playback Rate Hackery

Photo by Noom Peerapong on Unsplash

Some video sites, like YouTube, provide a way to change the playback speed of the video. This allows you to watch content faster or slower than the standard speed. It is an incredibly useful feature for many people and until earlier this year, I thought it was ubiquitous. I am so used to using it that when I wanted to watch a video and it was not available, I got quite frustrated1.

Thankfully, a colleague showed me that all is not lost and I want to share the magic with you.

Above is the video I wanted to watch (source). It is an interesting video packed with useful information about testing, but it is quite long. I really wanted to watch it, but I did not have a lot of time available, so decided to watch it at a faster speed. However, I could not find a way to adapt the playback speed within the site's user experience. What to do?

In swoops my colleague, via Slack, to remind me that I have browser developer tools at my finger tips, primed to let me make it happen anyway. You can make this happen on the Vimeo site, the TestDouble site, or even here, on my blog.

In the world of HTML5, videos are embedded in pages using the video element. The video element implements the HTMLMediaElement interface (as does the audio element) and if you can get a reference to the video element in JavaScript, you can use this interface to manipulate the video playback.

The first step is getting the element. I did this in Google Chrome, but you should be able to do this in other browsers too, though the commands may be different. I right-clicked on the video and selected Inspect.

Screen grab of the right-click menu, showing the commands "View Page Source", "View Frame Source", "Reload Frame" and "Inspect"

This should open the developer tools, with a node highlighted.

A snippet of HTML as shown in the Chrome Dev Tools. Some items are collapsed, hiding the child HTML. One node is highlighted.

As seen in the screenshot above, the highlighted node was not the video element. Initially, I looked at the sibling elements and expanded likely candidates until I found the video tag I wanted, but there is an easier way. Use the Find command within the Elements tab of the Chrome developer tools by pressing ⌘+F (probably Ctrl+F on Windows).

A screengrab of the find bar in the Elements tab of the Google Chrome developer tools. The text "<video" has been entered and "1 match" is indicated as found.

Within the find bar, you can type <video and it will find the first video element in the page and, if there are more, allow you to cycle through any others until you get to the one you want. You can even tell if it is the one you want or not as both the node and the corresponding video are highlighted as seen in the screenshot below.

Screenshot showing the highlighted node found in the DOM via the Chrome developer tools on the right and the corresponding video highlighted in the page itself on the left.

With the video element found, we can right click the DOM node in the developer tools and select Store as global variable.

Screen grab showing the found "video" element and the right-click menu with the "Store as global variable" option highlighted.

This creates a global variable that we can use to manipulate the element. The console section is opened to show us the created variable and the element to which it refers.

The console of the Chrome developer tools showing the name of the global variable we created "temp1", and the video element it refers to.

Now we can use the variable (temp1 in this case) to adjust the playback rate (or anything else we wanted to do). For example, if we want to run at double speed, just change playbackRate to 2 by entering temp1.playbackRate = 2.

Screenshot of the text "temp1.playbackRate = 2" having been entered in the developer tools console and the result "2" being returned to confirm that value is set.

And that's it. Hit play on that video and it will now be running at twice normal speed. Want it to run at half speed instead? Set playbackRate to 0.5 instead. Want it to run at normal speed again? Just set playbackRate to 1.

I hope y'all find this as helpful as I have and next time you stumble because a common feature appears to be lacking, don't be afraid to crack open those developer tools and see what magical hackery you can perform.

  1. "quite" is British for "inconsolably" []

C#7: Local Functions

We have been racing through the C#7 features in my latest series of posts; here is a list of what I have covered and what will be covered:

In today's post, we will look at local functions. Those who are familiar with JavaScript will be familiar with local functions; the ability to define a method inside of another method. We have had a similar ability in C# since anonymous methods were introduced albeit in a slightly less flexible form1. Up until C#7, methods defined within another method were assigned to variables and were limited in use and content. For example, one could not use yield inside anonymous methods.

Local functions allow us to declare a method within the scope of another method; not as an assignment to a run-time variable as with anonymous methods and lambda expressions, but as a compile-time symbol to be referenced locally by its parent function. With lambda expressions, the compiler does some heavy lifting for us, creating an anonymous type to hold our method and its closures; also, to call them, a delegate must be instantiated and then invoked, which incurs additional memory overhead to standard method calls: none of this is necessary for local functions as they are regular methods. Not only that, but because these are regular methods, the full range of method syntax is available to us, including yield.

The official documentation provides a good overview of the differences between anonymous methods/lambda expressions and local functions, which ends with this paragraph:

While local functions may seem redundant to lambda expressions, they actually serve different purposes and have different uses. Local functions are more efficient for the case when you want to write a function that is called only from the context of another method.

The last sentence of that infers one of the most useful things about local methods; streaming enumerable sequences with fail early support. The yield syntax introduced in C#3 has been incredibly useful, simplifying the work necessary for defining an enumerator from writing an entire class to just writing a method. However, due to the way enumeration works, we often have to split our enumerator methods into two so that things like argument validation occur immediately, rather than when the first item in the sequence is requested, like this:

public static IEnumerable<int> Numbers(int count)
{
    if (count <= 0) throw new ArgumentException();

    return NumbersImpl(count);
}

private static IEnumerable<int> NumbersImpl(int count)
{
    for (int i = 0; i < count; i++)
    {
        yield return i;
    }
}

The NumbersImpl method is only ever used by the public-facing Numbers method, but we cannot make that any clearer. However, with C#7 and local functions, we can now embed that method declaration into the Numbers method and make our code explicit.

public static IEnumerable<int> Numbers(int count)
{
    if (count <= 0) throw new ArgumentException();
    
    return NumbersImpl();

    IEnumerable<int> NumbersImpl()
    {
        for (int i = 0; i < count; i++)
        {
            yield return i;
        }
    }
}

There are a couple of things to note here. First, we can declare the local function after it has been called; unlike anonymous methods and lambda expressions, local functions are just like any other method; they are part of the program declaration rather than its execution. Second, and somewhat surprisingly2, we can use closures.

Closures in Local Functions

With lambda expressions and anonymous methods, closures are hoisted into member variables of an anonymous type, but this is not how local functions work; local functions do not necessarily get their own anonymous type3. So how do closures work in local functions? Well, the compiler performs a little code-rewriting for us to effectively hoist the closures into method arguments so that we don't have to repeat ourselves.

In Conclusion

Local functions provide a valuable alternative to anonymous methods and lambda expressions, and one-time use member functions. Not only do they make a clear distinction between run-time and compile-time, making the intent clear, but also by co-locating a single-use method with the code that calls it, we can make our code more readable. Of course, as with many other features of high-level languages like C#, this could be abused and make code horribly unreadable, so keep each other honest and be sure to call out incorrect or dubious usage when you see it.

You can read more about local functions in the official documentation.

What do you think? Will you use this new feature of C#? Does it make the language better? Please leave your views in the comments. Next week, we'll take a look at some of the changes C#7 makes to returning values from our methods.

  1. Lambda expressions are a terser syntax for anonymous methods []
  2. at least to me []
  3. Local functions that implement enumerators do get an anonymous type, but that's a special case []

The Need For Speed

Hopefully, those who are regular visitors to this blog1 have noticed a little speed boost of late. That is because I recently spent several days overhauling the appearance and performance with the intent of making the blog less frustrating and a little more professional. However, the outcome of my effort turned out to have other pleasant side effects.

I approached the performance issues as I would when developing software; I used data. In fact, it was data that drove me to look at it in the first place. Like many websites, this site uses Google Analytics, which allows me to poke around the usage of my site, see which of the many topics I have covered are of interest to people, what search terms bring people here (assuming people allow their search terms to be shared), and how the site is performing on various platforms and browsers. One day I happened to notice that my page load speeds, especially on mobile platforms, were pretty bad and that there appeared to be a direct correlation between the speed of pages loading and the likelihood that a visitor to the site would view more than one page before leaving2 . Thankfully, Google provides via their free PageSpeed Insights product, tips on how to improve the site. Armed with these tips, I set out to improve things.

Google PageSpeed Insights

Now, in hindsight, I wish I had been far more methodical and documented every step— it would have made for a great little series of blog entries or at least improved this one —but I did not, so instead, I want to summarise some of the tasks I undertook. Hopefully, this will be a useful overview for others who want to tackle performance on their own sites. The main changes I made can be organized into server configuration, site configuration, and content.

The simplest to resolve from a technical perspective was content, although it remains the last one to be completed mainly due to the time involved. It turns out that I got a little lazy when writing some of my original posts and did not compress images as much as I probably should have. The larger an image file is, the longer it takes to download, and this is only amplified by less powerful mobile devices. For new posts, I have been resolving this as I go by using a tool called PNGGauntlet to compress my images as either JPEG or PNG before uploading them to the site. Sadly, for images already uploaded to the site, I could only find plugins that ran on Apache (my installation of WordPress is on IIS for reasons that I might go into another time), would cost a small fortune to process all the images, or had reviews that implied the plugin might work great or might just corrupt my entire blog. I decided that for now, to leave things as they are and update images manually when I get the opportunity. This means, unfortunately, it will take a while. Thankfully, the server configuration options helped me out a little.

On the server side, there were two things that helped. The first, to ensure that the server compressed content before sending it to the web browser, did not help with the images, but it did greatly reduce the size of the various text files (HTML, CSS, and JavaScript) that get downloaded to render the site. However, the second change made a huge difference for repeat visitors. This was to make sure that the server told the browser how long it could cache content for before it needed to be downloaded again. Doing this ensured that repeat visitors to the site would not need to download all the CSS, JS, images, and other assets on every visit.

With the content and the server configuration modified to improve performance, the next and most important focus was the WordPress site itself. The biggest change was to introduce caching. WordPress generates HTML from PHP code. This takes time, so by caching the HTML it produces, the speed at which pages are available for visitors is greatly increased. A lot of caching solutions for WordPress are developed with Apache deployments in mind. Thankfully, I found that with some special IIS-specific tweaking, WP Super Cache works great3 .

At this point, the site was noticeably quicker and almost all the PageSpeed issues were eliminated. To finish off the rest, I added a few plugins and got rid of one as well. I used the Autoptimize plugin to concatenate, minify, compress, and perform other magic on the HTML, CSS, and JS files (this improved download times just a touch more by reducing the number of files the browser must request, and reducing the size of those files), I added JavaScript to Footer, a plugin that moves JavaScript to after the fold so that the content appears before the JavaScript is loaded, I updated the ad code (from Google) to use their latest asynchronous version, and I removed the social media plugin I was using, which was not only causing poor performance but was also doing some nasty things with cookies.

Along this journey of optimizing my site, I also took the opportunity to tidy up the layout, audit the cookies that are used, improve the way advertisers can target my ads, and add a sitemap generator to improve some of the ways Google (and other search engines) can crawl the site4. In all, it took about five days to get everything up and running in my spare time.

So, was it worth it?

Before and after
Before and after

From my perspective, it was definitely worth it (please let me know your perspective in the comments). The image above shows the average page load, server response, and page download times before the changes (from January through April – top row) and after the changes (June – bottom row). While the page download time has only decreased slightly, the other changes show a large improvement. Though I cannot tell for certain what changes were specifically responsible (nor what role, if any, the posts I have been writing have played5 ), I have not only seen the speed improve, but I have also seen roughly a 50-70% increase in visitors (especially from Russia, for some reason), a three-fold increase in ad revenue6, and a small decrease in Bounce Rate, among other changes.

I highly recommend taking the time to look at performance for your own blog. While there are still things that, if addressed, could improve mine (such as hosting on a dedicated server), and there are some things PageSpeed suggested to fix that are outside of my control, I am very pleased with where I am right now. As so many times in my life before, this has led me to the inevitable thought, "what if I had done this sooner?"

  1. hopefully, there are regular visitors []
  2. The percentage of visitors that leave after viewing only one page is known as the Bounce Rate []
  3. Provided you don't do things like enable compressing in WP Super Cache and IIS at the same time, for example. This took me a while to understand but the browser is only going to strip away one layer of that compression, so all it sees is garbled nonsense. []
  4. Some of these things I might blog about another time if there is interest (the cookie audit was an interesting journey of its own). []
  5. though I possibly could with some deeper use of Google Analytics []
  6. If that is sustained, I will be able to pay for the hosting of my blog from ad revenue for the first time []

Writing A Simple Slack Bot With Node slack-client

Last week, we held our first CareEvolution hackathon of 2015. The turn out was impressive and a wide variety of projects were undertaken, including 3D printed cups, Azure-based machine learning experiments, and Apple WatchKit prototypes. For my first hackathon project of the year, I decided to tinker with writing a bot for Slack. There are many ways to integrate custom functionality into Slack including an extensive API. I decided on writing a bot and working with the associated API because there was an existing NodeJS1 client wrapper, `slack-client`2. Using this client wrapper meant I could get straight to the functionality of my bot rather than getting intimate with the API and JSON payloads.

I ended up writing two bots. The first implemented the concept of `@here` that we had liked in HipChat and missed when we transitioned to Slack (they have `@channel`, but that includes offline people). The second implemented a way of querying our support server to get some basic details about our deployments without having to leave the current chat, something that I felt might be useful to our devops team. For this blog, I will concentrate on the simpler and less company-specific first bot, which I named `here-bot`.

The requirement for here-bot is simple:

When a message is sent to `@here` in a channel, notify only online members of the channel, excluding bots and the sender

In an ideal situation, this could be implemented like `@channel` and give users the ability to control how they get notified, but I could not identify an easy way to achieve that inside or outside of a bot (I raised a support request to get it added as a Slack feature). Instead, I felt there were two options:

  1. Tag users in a message back to the channel from `here-bot`
  2. Direct message the users from `here-bot` with links back to the channel

I decided on the first option as it was a little simpler.

To begin, I installed the client wrapper using `npm`:

npm install slack-client

The `slack-client` package provides a simple wrapper to the Slack API, making it easy to make a connection and get set up for handling messages. I used their sample code to guide me as I created the basic skeleton of `here-bot`.

var Slack = require('slack-client');

var token = 'MY SUPER SECRET BOT TOKEN';

var slack = new Slack(token, true, true);

slack.on('open', function () {
    var channels = Object.keys(slack.channels)
        .map(function (k) { return slack.channels[k]; })
        .filter(function (c) { return c.is_member; })
        .map(function (c) { return c.name; });

    var groups = Object.keys(slack.groups)
        .map(function (k) { return slack.groups[k]; })
        .filter(function (g) { return g.is_open && !g.is_archived; })
        .map(function (g) { return g.name; });

    console.log('Welcome to Slack. You are ' + slack.self.name + ' of ' + slack.team.name);

    if (channels.length > 0) {
        console.log('You are in: ' + channels.join(', '));
    }
    else {
        console.log('You are not in any channels.');
    }

    if (groups.length > 0) {
       console.log('As well as: ' + groups.join(', '));
    }
});

slack.login();

This code defines a connection to Slack using the token that is assigned to our bot by the bot integration setup on Slack's website. It then sets up a handler for the `open` event, where the groups and channels to which the bot belongs are output to the console. In Slack, I could see the bot reported as being online while the code executed and offline once I stopped execution. As bots go, it was not particularly impressive, but it was amazing how easy it was to get the bot online. The `slack-client` package made it easy to create a connection and iterate the bot's channels and groups, including querying whether the groups were open or archived.

For the next step, I needed to determine when my bot was messaged. It turns out that when a bot is the member of a channel (including direct message), it gets notified on each message entered in that channel. In our client code, we can get these messages using the `message` event.

slack.on('message', function(message) {
    var channel = slack.getChannelGroupOrDMByID(message.channel);
    var user = slack.getUserByID(message.user);

    if (message.type === 'message') {
        console.log(channel.name + ':' + user.name + ':' + message.text);
    }
});

Using the `slack-client`'s useful helper methods, I turned the message channel and user identifiers into channel and user objects. Then, if the message is a message (it turns out there are other types such as edits and deletions), I send the details of the message to the console.

With my bot now listening to messages, I wanted to determine if a message was written at the bot and should therefore alert the channel users. It turns out that when a message references a user, it actually embeds the user identifier in place of the displayed `@here` text. For example, a message that appears in the Slack message window as:

@here: Anyone know how to write a Slack bot?

Is sent to the `message` event as something like3:

<@U099999>: Anyone know how to write a Slack bot?

It turns out that this special code is how a link to a user or channel is embedded into a message. So, armed with this knowledge and knowing that I would want to mention users, I wrote a couple of helper methods: the first to generate a user mention embed code from a user identifier, the second to determine if a message was targeted at a specific user (i.e. that it began with a reference to that user).

var makeMention = function(userId) {
    return '<@' + userId + '>';
};

var isDirect = function(userId, messageText) {
    var userTag = makeMention(userId);
    return messageText &&
           messageText.length >= userTag.length &&
           messageText.substr(0, userTag.length) === userTag;
};

Using these helpers and the useful `slack.self` property, I could then update the `message` handler to only log messages that were sent directly to here-bot.

slack.on('message', function(message) {
    var channel = slack.getChannelGroupOrDMByID(message.channel);
    var user = slack.getUserByID(message.user);

    if (message.type === 'message' && isDirect(slack.self.id, message.text)) {
        console.log(channel.name + ':' + user.name + ':' + message.text);
    }
});

The final stage of the bot was to determine who was present in the channel and craft a message back to that channel mentioning those online users. This turned out to be a little trickier than I had anticipated. The `channel` object in `slack-client` provides an array of user identifiers for its members; `channel.members`. This array contains all users present in that channel, whether online or offline, bot or human. To determine details about each user, I would need the user object. However, the details for each Slack user are provided by the `slack.users` property. I needed to join the channel member identifiers with the Slack user details to get a collection of users for the channel. Through a little investigative debugging4, I learned that `slack.users` was not an array of user objects, but instead an object where each property name is a user identifier. At this point, I wrote a method to get the online human users for a channel.

var getOnlineHumansForChannel = function(channel) {
    if (!channel) return [];

    return (channel.members || [])
        .map(function(id) { return slack.users[id]; }
        .filter(function(u) { return !!u && !u.is_bot && u.presence === 'active'; });
};

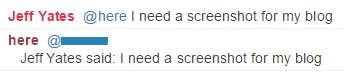
Finally, I crafted a message and wrote that message to the channel. In this update of my `message` event handler, I have trimmed the bot's mention from the start of the message before creating an array of user mentions, excluding the user that sent the message. The last step calls `channel.send` to output a message in the channel that mentions all the online users for that channel and repeats the original message text.

slack.on('message', function(message) {
    var channel = slack.getChannelGroupOrDMByID(message.channel);
    var user = slack.getUserByID(message.user);

    if (message.type === 'message' && isDirect(slack.self.id, message.text)) {
        var trimmedMessage = message.text.substr(makeMention(slack.self.id).length).trim();
        
        var onlineUsers = getOnlineHumansForChannel(channel)
            .filter(function(u) { return u.id != user.id; })
            .map(function(u) { return makeMention(u.id); });
        
        channel.send(onlineUsers.join(', ') + '\r\n' + user.real_name + 'said: ' + trimmedMessage);
    }
});

Conclusion

Example

My `@here` bot is shown below in its entirety for those that are interested. It was incredibly easy to write thanks to the `slack-client` package, which left me with hackathon time to spare for a more complex bot. I will definitely be using `slack-client` again.

var Slack = require('slack-client');

var token = 'MY SUPER SECRET BOT TOKEN';

var slack = new Slack(token, true, true);

var makeMention = function(userId) {
    return '<@' + userId + '>';
};

var isDirect = function(userId, messageText) {
    var userTag = makeMention(userId);
    return messageText &&
           messageText.length >= userTag.length &&
           messageText.substr(0, userTag.length) === userTag;
};

var getOnlineHumansForChannel = function(channel) {
    if (!channel) return [];

    return (channel.members || [])
        .map(function(id) { return slack.users[id]; }
        .filter(function(u) { return !!u && !u.is_bot && u.presence === 'active'; });
};

slack.on('open', function () {
    var channels = Object.keys(slack.channels)
        .map(function (k) { return slack.channels[k]; })
        .filter(function (c) { return c.is_member; })
        .map(function (c) { return c.name; });

    var groups = Object.keys(slack.groups)
        .map(function (k) { return slack.groups[k]; })
        .filter(function (g) { return g.is_open && !g.is_archived; })
        .map(function (g) { return g.name; });

    console.log('Welcome to Slack. You are ' + slack.self.name + ' of ' + slack.team.name);

    if (channels.length > 0) {
        console.log('You are in: ' + channels.join(', '));
    }
    else {
        console.log('You are not in any channels.');
    }

    if (groups.length > 0) {
       console.log('As well as: ' + groups.join(', '));
    }
});

slack.on('message', function(message) {
    var channel = slack.getChannelGroupOrDMByID(message.channel);
    var user = slack.getUserByID(message.user);

    if (message.type === 'message' && isDirect(slack.self.id, message.text)) {
        var trimmedMessage = message.text.substr(makeMention(slack.self.id).length).trim();
        
        var onlineUsers = getOnlineHumansForChannel(channel)
            .filter(function(u) { return u.id != user.id; })
            .map(function(u) { return makeMention(u.id); });
        
        channel.send(onlineUsers.join(', ') + '\r\n' + user.real_name + 'said: ' + trimmedMessage);
    }
});

slack.login();


  1. or ioJS, if you would prefer []
  2. I find hackathons to be a bit like making a giant pile of sticks in the middle of a desert; it's an opportunity to get creative and build something where there seems to be nothing…using sticks…or in my case, a Node package and Slack []
  3. I totally made up the user identifier for this example []
  4. I used WebStorm 9 from JetBrains to debug my Node code, a surprisingly easy and pleasant experience []

Controlling a bot using node.js and express

Last week was our work hackathon. During these events we get to spend a day hacking around with something fun, whether it is work related or not. Thanks to my friend and colleague, Brian Genisio, this time around we got to tinker with hardware and build some bots.

Using node.js, johnny-five, an Arduino Uno board and a bunch of additional components, teams created their own sumo bots. At the end of the day, we competed to see who had the best bot. Ours was the only bot that walked instead of using wheels and we were confident our design could have won. Unfortunately,  we faced some technical difficulties and a couple of design issues that prevented us from achieving our full potential. You can see our bot (it's the large gold one that lumbers in from the bottom) take on all the others in this video and slowly start pushing them all out of the way.

http://youtu.be/pW6t5qfsc4g

As I am sure you can tell from the audio, this was a thoroughly enjoyable and highly competitive hackathon. There were a variety of problems to address as we developed our bots. Some of them were unique to the bot being created, others were comment to all. One such problem was how to control the bot. Regardless of how the signal got to the Arduino board (Bluetooth, RF and USB were available), we had to command our bots to move forwards, backwards, left and right (and in some cases, to deploy an extensive range of weaponry and distractions).

After some trial and error, I settled on using a simple web server and web page front-end that made API calls to the server. The server would then map these API calls to bot controls. This provided a way for us to use mouse, keyboard and touch input to control our electronic sumo minion. You can see the very basic user interface1 in this Vine that I took during our build.

https://vine.co/v/Ounjjiu6Br5

Using AngularJS, the buttons in the web page were connected to API calls. By clicking buttons in the web page, using the numpad or AWSD keys, or touching the screen of my laptop, we could control the robot. The API itself was implemented using the Express package in node.

Express

I installed express into our node application, using npm:

npm install express

Then I added express to our bot code and defined a simple API to process web requests:

var express = require("express");

var app = express();

app.post('/move', doMove);
app.post('/rotate', doRotate);
app.post('/stop', doStop);

app.use(express.static(__dirname + '/public'));

app.listen(4242);

This snippet of code has been edited down to show the pertinent details; you can view the real code on GitHub. First, we require the express module, then we use it to create our server app. The three calls to post set up our three API methods and the handlers for those methods. Using the post method defined these as POST endpoints, we could have used put, get or delete, if it were appropriate. The use call sets up a redirect for static page requests so that those requests are satisfied from our public directory. Finally, we tell the app to listen on port 4242.

Each request that matches one of the three calls I have setup will be sent to the appropriate handling methods. These handlers each take a request object and a response object, which they can use to get additional information about the request and craft an appropriate response.

Here is an implementation of the doRotate method:

function doRotate(req, res) {
    var direction = req.param('direction');
    var rate = req.param('rate');
    drive.rotate(direction, rate);
    res.send();
}

In this handler, we get the direction and rate parameters from the request and pass them to the code that does the real work. At the end, we respond to the request. We could provide data in our response or even send an error if we wanted.

This allowed me to host a local website and API for controlling our bot. It was that simple.

Conclusion

Hacking a robot using node.js was a great way to delve into a new facet of JavaScript programming; hacking hardware. Not only that, but it allowed me to discover some of the cooler things that can be done quickly and easily using node.js, such as setting up a web server using express.

Have you hacked a robot with node? How did you implement control? Please leave a comment with your experience or any questions you may have. And if you are interested in hacking a bot of your own, watch this space.

  1. and an early prototype of our robot []