Rewiring awesome lamps

First, let me apologise. There's a good possibility that some of what I write in this post will come across as bad innuendo and euphemisms (there's a bit of poking and screwing). This is or is not intentional, depending on whether you find it funny or are incredibly offended (or both).

Anyway, my wife has a couple of black and green lamps that are, well, words fail me so here's a picture.

Samson and Delilah - the lamps

I don't know enough racial stereotypes to know if anyone should be offended by these lamps (Do you? Are you?) due to anything other than their general appearance. They appear to be painted plaster and given that standard lamp fixtures can easily be attached to them, I doubt they're particularly old (even though my wife keeps calling them antiques). However, the wiring in them was getting dangerously frayed so we decided it was time to give them an electrical overhaul (yes, we're keeping them). Especially since we're going to put them on our new desk in the office (seriously, we're keeping them – perhaps after a new coat of paint).

For Samson (my nickname of the dashing gent on the left with the impressive torch protruding from his midsection), we got a replacement cord (with plug attached) and a new lamp fixture to hold the bulb. It was pretty straightforward to remove the old electrical fittings and replace them with these new pieces. However, Delilah (my name for the delightful damsel on the right) was not so straightforward.

To begin, the cord (with plug attached) that we had purchased for Delilah and that was identical in every way to the one successfully used to rewire Samson just didn't fit. No matter how had I tried, there was no way I could persuade the cable to slide up to the top of Delilah's head. So, we headed off to the hardware store and bought some 18-gauge lamp wire and a little, easy to install plug.

Delilah and her bits

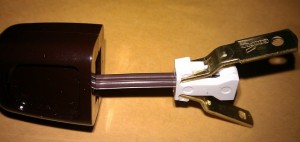
The first job was fitting the plug. This little thing really was simple to use. The centre pulled out and the prongs moved apart, making a gap for the wire. Making sure to thread it through the plug case first, I inserted the wire into the prongs. At this point, I learned something new; lamp wire has one side that is ribbed for differentiating live from neutral. Did you know that? I certainly didn't.

Plug ready to be assembled

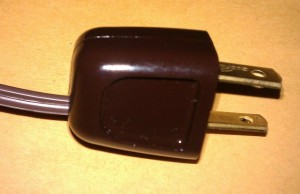
Anyway, following the instructions, I made sure the ribbed side was in the appropriate place and closed the prongs. This pierced the insulation on the wire and ensured the wire and prongs were connected appropriately. I then reassembled the plug pieces.

The plug all assembled and ready

Next, I threaded the wire up through Delilah until I had a couple of inches poking out of the top of her head (keep it clean). I then threaded the wire through the lamp crown and screwed that into place.

Crown screwed on and wire threaded through

Before I could attach the wire to the switch, the two strands needed to be separated, stripped, twisted and tied into an underwriter's knot.

Underwriter's knot
Underwriter's knot

I attached the wires to the switch and slid the fixture back together, then I pulled the slack back through Delilah before pressing the fixture firmly into the crown until it clicked into place.Β The last step was to borrow Samson's light, stick it in Delilah and fire up the power.

Delilah has the power

Job done. Just need some tasteful lamp shades now.

A little help with GetHashCode

Implementing the GetHashCode override has proven to be a confusing issue as there are a lot of intricacies to following the rules. There have been plenty of blog posts and other discussions regarding when and how to follow the rules; I don't intend to cover that ground again. Instead, please take a look at some of these posts and discussions:

However, I thought I'd share something that I've found the following useful when implementing GetHashCode for my different types. The following static class encapsulates the algorithm recommended by Jon Skeet in this StackOverflow answer (though it can be found in other places too – it is also the algorithm used by the C# compiler when implementing GetHashCode for anonymous types, for example). This algorithm uses two prime numbers; one for the initial hash and the other as a multiplier when combining a hash code. These prime numbers are used to reduce hash code collisions, something that a basic XOR hash does not do.

My HashCode class extension methods use generics to avoid boxing for value types and also support combining the hash codes of collection elements, if this is needed.

//*****************************************************************************
//
//  Copyright Β© 2012 Jeff Yates
//
//*****************************************************************************
using System;
using System.Collections.Generic;

namespace SomewhatAbstract
{
    /// <summary>
    /// Provides extensions for producing hash codes to support overrides
    /// of <see cref="System.Object.GetHashCode"/>.
    /// </summary>
    public static class HashCode
    {
        /// <summary>
        /// Provides the initial value for a hash code.
        /// </summary>
        public static readonly int InitialHash = 17;
        private const int Multiplier = 37;

        /// <summary>
        /// Combines the hash code for the given value to an existing hash code
        /// and returns the hash code.
        /// </summary>
        /// <param name="code">The previous hash value.</param>
        /// <param name="value">The value to hash.</param>
        /// <returns>The new hash code.</returns>
        private static int Hash<T>(int code, T value)
        {
            int hash = 0;
            if (value != null)
            {
                hash = value.GetHashCode();
            }

            unchecked
            {
                code = (code * HashCode.Multiplier) + hash;
            }
            return code;
        }

        /// <summary>
        /// Combines the hash codes for the elements in the given sequence with an
        /// existing hash code and returns the hash code.
        /// </summary>
        /// <param name="code">The code.</param>
        /// <param name="sequence">The sequence.</param>
        /// <returns>The new hash code.</returns>
        public static int HashWithContentsOf<T>(this int code, IEnumerable<T> sequence)
        {
            foreach (T element in sequence)
            {
                code = code.HashWith(element);
            }
            return code;
        }

        /// <summary>
        /// Combines the given value's hash code with an existing hash code value.
        /// </summary>
        /// <typeparam name="T">The type of the value being hashed.</typeparam>
        /// <param name="code">The previous hash code.</param>
        /// <param name="value">The value to hash.</param>
        /// <returns>The new hash code.</returns>
        public static int HashWith<T>(this int code, T value)
        {
            return Hash(code, value);
        }
    }
}

Here is an example of how you might use these extension methods to implement an override of GetHashCode. It doesn't necessarily save any typing over just hand-implementing the algorithm, but I find it helps avoid inconsistencies and forgetfulness while giving a little clarity to the code.

public struct MyCustomType
{
    private readonly ReadOnlyCollection myListOfThings;
    private readonly bool aFlagOfSomething;
    private readonly object aThing;

    public override int GetHashCode()
    {
        return HashCode.InitialHash
            .HashWith(this.aFlagOfSomething)
            .HashWith(this.aThing)
            .HashWithContentsOf(this.myListOfThings);
    }
}

Let me know if you find this useful. Perhaps you have a different approach when implementing GetHashCode. If you do, I'd love to hear about it.

Shattered

I go to sleep and dream of broken glass.
It sparkles in the sunslight like diamonds,
And dances across the floor like a million tiny bells.
Such beauty in something so painful.
Walking barefoot across it is like being close to you.
You're beauty is all devouring as you cut deeply,
With the words and actions you choose to employ.
Like a thousand tiny fragments of glass in my feet, you slice,
And I can't walk away.
Like the glass is stuck in my feet, you are stuck in my soul,
The pain following me no matter where I tread.
It's comforting to feel it, I should miss it if it were gone,
But oh, how it cuts, how I bleed.
I don't know how you came to be so broken, so shattered,
But like the glass, I don't think you can be repaired.
I wish I had the strength to turn and walk away,
But the pain would be too much, so like you, I stay;
Slaves to each others flaws and free only to do what we've always done,
Carry one another's scars as our own and dream.

October 2006

Versioning with T4 templates

In the last month or two I've started using T4 templates, a feature originally made available in Visual Studio 2005 though rarely used outside of code generation tools for database models and the like. Though I have known about T4 templates for quite some time, like many developers, I have struggled to conceive of a practical application in my every day software development activities. That is until recently, when two uses came along at once.

1 day, 7000 lines

The first use came when I started to implement a strongly typed unit conversion framework. I needed to generate types for different quantities (Area, Distance, Volume, etc.), units and operations that convert between them. As I was coding my framework, I noticed that much of the code was identical. Rather than cut and paste a lot (I had over 20 different quantities and hundreds of units) and deal with a horribly tedious task when bug fixing, I realised that a T4 template and an XML file would reduce my effort a lot. I embarked on learning all about T4 and within a day I was auto-generating over 7000 lines of useful code from far less than that.

I am still working on some nitty gritty details in that framework so I'd rather not blog about it in detail just yet. However, having become more familiar with T4 templates, it was much easier to spot other places they could add value. The next opportunity arose when working on another project. One of the first things I tend to do when setting up a development project is set up the versioning. I split common attributes shared by every assembly in my solution into a different file and then link to it in each project.

[assembly: System.Reflection.AssemblyCompany("SomewhatAbstract.com")]
[assembly: System.Reflection.AssemblyProduct("DoobreyFlap")]
[assembly: System.Reflection.AssemblyCopyright("Copyright Β© 2012 SomewhatAbstract.com")]

[assembly: System.Reflection.AssemblyConfiguration("alpha")]

// Version information for an assembly consists of the following four values:
//
// Major Version
// Minor Version
// Patch
// Revision
//
[assembly: System.Reflection.AssemblyVersion("1.0.0.101")]
[assembly: System.Reflection.AssemblyFileVersion("1.0.0.101")]

This single file is then updated by a script (MSBuild step or pre-build BAT or PS file) based on information from my source control provider of choice. You may wonder where T4 fits in here. Well, it doesn't, yet.

The next step in a development project is to consider deployment. I use Windows Installer XML (aka WIX) for my installers, an open source installation framework that uses XML files to describe the installer. Just as with my source code, I split the version information into its own file as this simplifies update of that information and allows me to share it across different installations. I also update some of this information using a script.

<?xml version="1.0" encoding="utf-8"?>

<!-- These values should be updated when a new release is made. This ensures that the new version can
 upgrade the old. -->

<!-- This is the product version.
 Note: only the first 3 tokens are used (i.e. 1.0.0.0 will be ignored). -->
<?define ProductVersion=1.0.0?>

<?define ProductVersionText="1.0.0.101"?>
<?define ProductState="alpha"?>

<Include />

So, now I have two version files. My scripts update these to include revision information from my source control provider (if you are familiar with semantic versioning, this goes in the build version, though I admit, in my examples I am not using SemVer). However, when doing a new major, minor or patch update, I have to manually edit each of these files to change the major, minor or patch version. On more than one occasion, I've updated one file and not the other. This only gets more complicated if there are additional files that need versioning (maybe there's also VB projects or some markdown for a release notice). This is where T4 templates comes in handy.

1 file, many files

Now, some of you may think that this is where my plan falls down. Can't T4 templates only output one file? How can one file be suitable for C#, VB and XML all at the same time? The answer is, it can't. At least not without a little help.

As you can execute any code in a T4 template, you could just write out a file using a FileStream or something similar. However, while researching T4 templates for my unit conversion framework and realising that 7000 lines of code and tens of different types in a single file might be a tad unmanageable in some circumstances, I discovered a rather handy T4 mix-in that permits me to output multiple files from a single template using a simple syntax.

Using Damien Guard's Manager.ttinclude file, I created a T4 template and outputted my C# and WIX files. Now, updating the version just means updating the template. This could easily be extended so that the information is read from some other file (such as an XML or JSON file) rather than hard-coded in the template. In addition, the revision information that I extract from source control via script could be extracted via the template itself, if I so choose.

<#@ template debug="true" hostSpecific="true"
#><#@ output extension=".cs"
#><#@ include file="Manager.ttinclude"
#><# // Create the file manager so we can output multiple files.
#><# var manager = Manager.Create(this.Host, this.GenerationEnvironment);
#><#
#><# // Setup the version information.
#><# var version = new Version(1, 0, 0, 101);
#><# var configuration = "alpha";
#><# var company = "SomwhatAbstract.com";
#><# var product = "DoobreyFlap";
#><# var copyright = "Copyright Β© 2012 SomewhatAbstract.com";
#><#
#><# // Output the C# versioning
#><# //
#><# // VersionInfo.g.cs
#><# //
#>
[assembly: System.Reflection.AssemblyCompany(<#= company #>)]
[assembly: System.Reflection.AssemblyProduct(<#= product #>)]
[assembly: System.Reflection.AssemblyCopyright(<#= copyright #>)]

[assembly: System.Reflection.AssemblyConfiguration(<#= configuration #>)]

// Version information for an assembly consists of the following four values:
//
// Major Version
// Minor Version
// Patch
// Revision
//
[assembly: System.Reflection.AssemblyVersion(<#= version.ToString() #>)]
[assembly: System.Reflection.AssemblyFileVersion(<#= version.ToString() #>)]
<#
#><#
#><#
#><# // Output the WIX versioning
#><# //
#><# // VersionInfo.g.wxi
#><# //
#><# manager.StartNewFile("VersionInfo.g.wxi");
#>
<?xml version="1.0" encoding="utf-8"?>

<!-- These values should be updated when a new release is made. This ensures that the new version can
 upgrade the old. -->

<!-- This is the product version.
 Note: only the first 3 tokens are used (i.e. 1.0.0.0 will be ignored). -->
<?define ProductVersion=<#= version.ToString(3) #>?>

<?define ProductVersionText="<#= version.ToString() #>"?>
<?define ProductState="<#= configuration #>"?>

<Include />
<# manager.EndBlock();
#><# manager.Process(true);
#><#+
#>

This template will output two files: VersionInfo.g.cs and VersionInfo.g.wxi. Note that the C# file is named after the template whereas the WIX file is named on line 41. I recommend adding the g suffix to make it easier to see that these are auto-generated files.Β I have this template in a special PreSolutionBuild project that sits at the start of the dependency chain for my solution. This keeps things nice and tidy in my solution.

Conclusion

As you can see, this is a very simple use for T4 templates, yet it solves a reasonably common issue. In the past I may have addressed this issue of making sure the version files are up-to-date by adding to the release processes or creating a bespoke tool. Personally, I prefer the elegance of the T4-based approach and I hope that others find it just as useful as I do.

For more information on T4 templates, I found the following resources exceedingly useful:

Making a Rain Barrel with Project Grow

Outside the workshop
Outside the workshop where we selected our barrel

A couple of weeks ago, my wife, Chrissy and I headed over to the Leslie Science and Nature Center in Ann Arbor, MI to take part in a workshop on building your own rain barrel. The workshop was organised by Project Grow – a private, non-profit organization supporting community gardening in the Ann Arbor area – in partnership with Maxi Container, Inc. – a local, family-owned and operated Detroit-based company.

The cost for participation in the workshop covered all the pieces in the rain barrel kit, including the barrel, brass fittings, and caulk as well as a donation towards the Leslie Science and Nature Center. The barrels used in the workshop were food-grade, having originated overseas filled with pickles, olives and other tasty morsels. Unlike their darker cousins, which are used to store solvents and other nasty chemicals, these food-safe, terracotta-colored containers are perfect for storing water that ultimately waters gardens. Their re-appropriation as rain barrels is one of several recycling kits provided by Maxi Container, which also include composters and drum stoves.

Josh Rubin tells us where the barrels came from

The workshop was introduced by Lucas DiGia, the Vice President of Project Grow who then handed over to Josh Rubin, the Creative Director of Maxi Container, Inc. and grandson of its founder, Max Rubin.

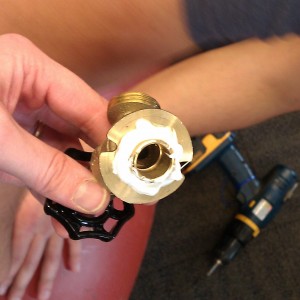
The back of the faucet with caulk applied

Josh started out with a demonstration of how to make the rain barrel, ably assisted by Lucas. Each rain barrel had been pre-drilled to provide a hole for the rain to get in at the top and another for it to get out again at the bottom. The first step was to fit a faucet in that lower hole. Caulk was applied around the back of the brass fixture where it would meet the barrel, then the faucet was inserted (with the application of a little brute force).

At this point, it was time for power tools. Even though the barrels had been pre-drilled with two holes,Β another hole was required for the overflow. This step had been left for us to do because its placement had to be chosen with an idea of where the rain barrel would ultimately be used. With Lucas steadying the barrel, Josh carefully drilled the third hole. The overflow fixture (suitable for attachment of any regular garden hose) was screwed into place using a wrench.

The mesh over the inlet

The final touch for the rain barrel was to affix a mesh over the inlet hole. This mesh not only prevents debris from entering the rain barrel but it also provides a base over which to scatter pebbles. The pebbles discourage mosquitoes from using the rain barrels for their offspring, avoiding the need for mosquito tablets to be added to the barrel.

And that was that. With Josh's demonstration over, the workshop participants were directed to complete their own rain barrels, with appropriate over sight and assistance from Josh, Lucas and the Project Grow volunteers. Chrissy and I managed to get our rain barrel completed quite quickly, barring a few arguments over who got to use the power tools. It's now sitting in the garage waiting for a sturdy base to be built for it to stand on – a full water barrel of this size will weigh over 300lbs!

Chrissy supervises while I fix the mesh in place

Overall, this was a thoroughly enjoyable experience. This is in no small part due to the efforts of Project Grow and Maxi Container, Inc. I would encourage others to attend the next workshop Project Grow is considering for later in the year. If you can't make a workshop, check out the kit on Maxi Container's website. Finally, you can check out more pictures from the workshop over at Project Grow's page on Facebook.

Chrissy grinning over our new rain barrel