Surface 2 RT review

First, full disclosure. Late last year, I entered a twitter contest being held by the official Microsoft Surface twitter account, @surface. I had to tweet what I would do if I won a Surface 2 with Surface Music Kit. My answer was somewhat throwaway; a spur of the moment thing:

A few weeks later, I received a DM informing me that I had won "something" and to provide my address within five days. I obliged, expecting to get a t-shirt or some other Surface-related swag; I was incredibly surprised when I received a shipping notification one Tuesday that showed a Surface 2 RT with Surface Music Kit would be arriving that afternoon. That said, there was no requirement on my part to provide a review nor that any such review should be unduly positive. With all that known, please read on.
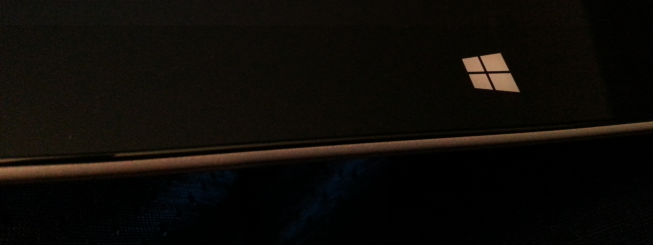
Surface Music Kit

Surface Music Kit Cover and App

Keyboard

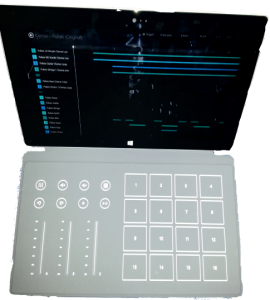
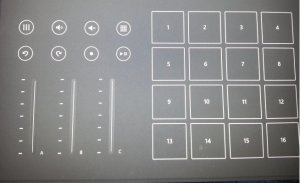
One of the cool things about the Microsoft Surface devices are their covers. The covers (available in touch and type variants) have an integrated input device and are the primary method of providing an external keyboard to a Surface1, though one could also use a Bluetooth or USB keyboard. Most of these covers have an embedded QWERTY keyboard and touchpad, much like a small laptop keyboard. However, the Surface Music Kit includes a special keyboard/cover designed for use with the Surface Music Kit application. This cover has three touch sliders (like electronic volume controls), some playback/record controls like one might find in a multimedia playback device, and a grid of 16 pads. Together, these can be used to mix and manipulate samples in the Surface Music Kit application2.

Surface Music Kit cover
Surface Music Kit cover; try typing your password on this
Back-lit Surface Type Cover 2

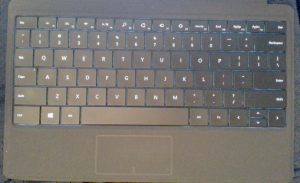
Since the device I won came with the music kit cover, my initial problems stemmed from having to use the onscreen keyboard. As cool as the Surface Music Kit is,  I can't type my email password with volume sliders and drum pads. Even though the onscreen keyboard is responsive and has a nice array of layout options (the thumb-friendly layout that splits the keyboard for easy thumb typing is great), I found it a little frustrating to use. Whichever layout I tried, the keyboard occupied too much of the screen, didn't provide the kind of tactile feedback I rely on when typing, and just wasn't fast enough when I wanted to unlock my device. These problems aren't unique to the Surface; I've yet to find any device where the onscreen keyboard doesn't suffer from these problems (though your mileage may vary). Of course, this problem is easily resolved: I received the Type Cover 2 as a Christmas gift from my wife.

Apps

By now, the number of apps in the Windows Store, especially when compared with equivalent Android or Apple stores, has been discussed to death. The Windows Store is getting more apps every day but the choices are limited by comparison with its competitors. That said, all the apps I really wanted such as Netflix, LastPass, and Mouse Without Borders were available and more often than not, other apps had an online equivalent (for example, I can watch Amazon Prime via the website, though it's not all roses when it comes to websites so read on).

The frustrating part of apps running on the Surface RT comes from the desktop. Surface RT devices run a version of Windows built for ARM processors instead of the usual x86/x64 processors that other Windows-based devices use. This means that unless a desktop application has been specifically written to run on this special ARM-based version of Windows (such as Office 2013, which Microsoft provides with the Surface 2 RT) it won't. The outcome of this is that even little apps that you find useful in every day stuff – especially as a developer such as git, node, Sublime, etc. – will not work. I didn't expect to find this as frustrating as I have and it has only been exacerbated with the unnecessary neglect of Internet Explorer by many websites.

Internet Explorer

Internet Explorer 11 is fantastic but also the only option on the Surface 2 RT given that other browsers are not available for the ARM-based platform. In the past, Internet Explorer has had a much-deserved stigma attached to it due to lack of standards compliance, quirky behavior, and poor performance. This has made it difficult for websites to support older versions of IE. However, the Internet Explorer of old is dead and in more recent releases, this stigma is just undeserved dead weight that needs to be cast aside. Unfortunately, this message has either not reached many developers or landed on deaf ears, leading to heavy-handed checks for IE on many sites that block IE users from getting a fully-featured site or interacting with a site at all, even though the site would work if that block were lifted.

As a developer, this has been doubly frustrating. I can't install useful tools like Git or Sublime, nor can I use many online development environments as they don't work or completely block their use from any version of Internet Explorer. This limited browsing experience isn't limited to development tools though; I have found that quite a few sites do not properly support IE. Perhaps one day, Microsoft will convince people that IE should be embraced once more and that its legacy should be left in the past, but until then, users of Surface 2 RT may face a substandard browsing experience.

That said, when sites do work with IE11, they work really well. A standout website for developers has to be Codio. I set this up against my GitHub account and have used it successfully to work on code samples for blog entries. Hopefully more sites begin to support IE like this.

Battery Life and Performance

This is where I should pull up some metrics of how the battery life is for various every day scenarios, but I'm not good at capturing metrics, so I'll tell you my experience. The battery life seems good when using the Surface for general stuff like editing documents, browsing the Internet, etc. The main complaint I have is that I'd like it to have an opt-in auto shutdown if left on sleep for more than a day. While sleep uses very little battery, there are times when my Surface has been sleeping for days on end, resulting in a drained battery. This has led to me shutting down the Surface 2 RT whenever I stop using it, which means I lose out on the "always on"-ness. Although the Surface 2 RT cold boots pretty quickly, the readiness after sleep is significantly faster. That said, I have no substantial complaints; my Surface 2 RT is definitely the most battery-efficient Windows-device I have had so far3.

Other bits and bobs

Front camera, start button and rear camera

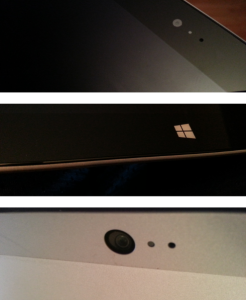
The two cameras on the Surface 2 RT: one front-facing and one rear-facing, stereo speakers and built-in microphone are all excellent and it was a pleasure using all these to give a Skype tour of our new bathroom to my parents back in England. The built-in kickstand with two viewing angle positions is also fantastic. In addition, the Surface 2 RT has a full-size USB port, 3.5mm headphone jack, mini-HDMI port, and microSD slot.

Surface inputs and outputs

Service

It is not often that one gets the opportunity to review the quality of device service and repair at the same time as reviewing the device. However, it has been some time since I first received my Surface 2 RT and in that time, I had the misfortune of dropping it on the concrete floor of our basement4. While the Surface 2 RT took the fall with grace, it fumbled the landing, which shattered the screen rendering touch operation impossible.

I followed the instructions on the Surface Online Service Center site to register my device and submit a service request. A broken screen is not covered by the standard warranty, so I paid a $200 fee and got myself a return to print out. I then detached my keyboard and removed the microSD card I had inserted5, and took my broken device to the local FedEx shipment center along with my return information. The packing and shipping of the device was included without any additional charge.

I do not recall just how long the service took, but within a week or two, a refurbished Surface 2 RT arrived on my doorstep. I eagerly unpacked it and turned it on. It sat in a reboot cycle.

I was not happy.

I plugged in the power and tried again. Still stuck in a reboot cycle.

Eventually, I found instructions to do a full factory reset, after which, the device booted but clearly had problems. It was not until after I had downloaded and installed just over one gigabyte of updates that it started to behave properly. It is because of this that I have mixed feelings about the service experience.

On the one hand, it was easy to register my device, submit a service request, and get it shipped. On the other hand, I had to use quite a bit of technical know-how to get the replacement device to work. I feel that if Microsoft wants to win over the non-tech market with these devices, they are going to need to do a lot better. I know for sure that many of my friends and relatives would not have known what to do next if faced with the reboot cycle, probably leading to endless tech support calls to Microsoft, or worse, me.

Conclusion

I have been using my Surface on and off over the last few months. Trying to see where it fits in my life between the eight core desktop PC at home, my core i7 ultrabook at work, and my phone, I was unsure that a tablet/laptop hybrid would work out and to begin with, it did not. However, once I got the QWERTY type cover and discovered which scenarios were useful to me, the Surface 2 RT has been a great addition to my regular arsenal of gadgets6.

The service experience was disappointing. While initially wonderfully easy, it became terribly frustrating once a replacement device was received, especially since I had paid $200 for the privilege. Microsoft needs to pay more attention to detail in this process if it is to become a first class experience.

Overall, I like the Surface 2 RT and will continue to use it (in fact, I have been writing most of this blog using it). However, I have to ask myself if I would have bought one and if I'm honest, I would not. Not because it isn't a great device but because the price tag, like most slates/tablets7, seems high for what you get8.  Of course, that also means I wouldn't buy a competitor's device either so read into that what you will.

  1. both have a track pad, but the type cover has more traditional, plastic backlit keys []
  2. Unfortunately, there is no SDK for using the Surface Music Kit cover in your own apps, which seems like an oversight to me []
  3. I currently use a Windows-based Core i7 ultrabook, but have had a Nokia Windows Phone and a variety of Dell laptops []
  4. It was during a jam session and I was trying to balance it so I could see the lyrics while I played guitar – the Surface was eager to prove that I was stretching myself beyond operating parameters []
  5. Specific instructions stated that these were  not guaranteed to be returned if I left them with the Surface []
  6. desktop, laptop, Android phone, xbox 360, xbox one []
  7. delete as applicable []
  8. clearly, I would've paid $200 for it, considering I was happy to pay that for the repairs []

Testing AngularJS: Asynchrony

So far, we have looked at some techniques for testing simple AngularJS factories and directives. However, things are rarely simple when it comes to web development and one area that complicates things is that of asynchronous operations such as web requests, timeouts and promises.

Eventually, when writing AngularJS, you will rely on the $timeout, $interval, or $q services to defer an action by some interval or indefinitely using promises. I will not go very deep into their use here, you can read much of that on the AngularJS documentation, but since it is likely that you will use them, how do you test them? How do you test asynchronous code without horribly complex and unreliable tests?

$timeout

Consider this simple example where we have a controller that defers some action using $timeout.

somewhatAbstract.controller('DeferredController', ['$scope', '$timeout', function ($scope, $timeout) {
    $scope.started = false;

    $timeout(function() {
        $scope.started = true;
    } );
}

Here we have a variable, started that is initialised to false and a deferred method that changes that value to true. A first stab at testing this might look a little like this:

describe 'deferred execution tests', ->
  describe 'started should be set to true', ->
    Given => module 'somewhatAbstract'
    Given => inject ($rootScope) =>
      @scope = $rootScope.$new()
    When => inject ($timeout, $controller) =>
      $controller 'deferredController', { $scope: @scope, $timeout: $timeout }
    Then => expect(@scope.started).toBeTruthy()

Unfortunately, such a test will not pass because the deferred code would not execute until after the expectation was tested. We can mitigate this by using some AngularJS magic provided by the ngMock module.

The ngMock module adds the $timeout.flush() method so that code deferred using $timeout can be executed deterministically1. The test can therefore be modified such that it passes by adding the highlighted line below.

describe 'deferred execution tests', ->
  describe 'started should be set to true', ->
    Given => module 'somewhatAbstract'
    Given => inject ($rootScope) =>
      @scope = $rootScope.$new()
    When => inject ($timeout, $controller) =>
      $controller 'deferredController', { $scope: @scope, $timeout: $timeout }
      $timeout.flush()
    Then => expect(@scope.started).toBeTruthy()

$q

For promises that were deferred using $q (including the promise returned from using $interval), we can use $scope.$apply() to complete a resolved or rejected promise and execute any code depending on that promise.

In the following contrived example, we have a controller with a start() method that returns a promise and a started() method that resolves that promise.

somewhatAbstract.controller('deferredController', ['$scope', '$timeout', '$q', function ($scope, $timeout, $q) {
    var deferred = $q.defer();

    $scope.start = function () {
        return deferred.promise;
    };

    $scope.started = function() {
        deferred.resolve({started:true}); };
    };
}]);
describe 'deferred execution tests', ->
  describe 'started should be set to true when promise resolves', ->
    Given => module 'somewhatAbstract'
    Given => inject ($rootScope, $q, $controller) =>
      @scope = $rootScope.$new()
      $controller 'deferredController', { $scope: @scope, $q: $q }
    When =>
      @scope.start().then (result) => @actual = result
      @scope.started()
      @scope.$apply()
    Then => expect(@result).toBe { started: true }

The preceding test validates our controller and its promise. If you delete the highlighted line, you would see that the test fails because the resolved promise is never completed.

Finally…

In this post, we have taken a brief look at how AngularJS supports the testing of asynchronous code execution deferred using $timeout, $interval, or $q. The ability to synchronously control otherwise asynchronous actions not only allows us to test that deferred code, but also to prevent it executing at all. This can be incredibly useful when isolating different parts of our code by reducing how much of it has to run to validate a specific method.

Of course, quite often, a promise is only resolved after an HTTP request responds or fails, such as when using $resource. When writing unit tests, you may not have nor want the luxury of a back-end server that responds appropriately to test requests. Instead, you either want to fake out $resource, or fake out and validate the HTTP requests and responses2. In upcoming posts, we'll look at a simple $resource fake for the former and the special $httpBackend service that AngularJS provides for the latter. Until then, please leave your comments.

  1. The `flush()` method even takes a delay parameter to control which timeouts will execute and a similar method exists for `$interval` []
  2. The requests that you expect your code to make and the responses that your code expects to receive – or doesn't, as the case may be []

Testing AngularJS: Directives

So far in this series of AngularJS-related posts, we have looked at some utility factories for tracking web requests and preventing navigation requests, whether in-app or not, and how to write tests for those factories using Jasmine. In this post, we will look at how I generally test directives and how that impacts their structure.

Directives

Directives are the things we write in AngularJS that allow us to extend and modify the HTML language. We provide a template, some code-behind, and data binding, and AngularJS performs its magic to create a new behavior or control that is inserted via tag, attribute or CSS class. However, directives can at first seem difficult to test.

Let's look at a convoluted example.

sa.directive('saEditableField', function () {
    return {
        restrict: 'E',
		require: 'ngModel',
        template: '<label>{{fieldName}}</label><input type="text" ng-model="fieldValue" /><button ng-click="showField()">Alert!</button>',
        scope: {
            fieldName: '@saFieldName',
            fieldValue: '=ngModel'
        },
        controller: function($scope) {
            $scope.showField = function() {
                window.alert("Your " + $scope.fieldName + " is " + $scope.fieldValue);
            };
        }
    };
});

In this example we have a very simple directive. It specifies a template, some scope, and a controller where the business logic lives. It is used like this:

<sa-editable-field sa-field-name="First Name" ng-model="fieldValue"></sa-editable-field>

As it stands, there are a one or two things that either make this difficult to test or (I feel) could be clearer1. Let's refactor this directive with testing in mind.

Tests

When I have a working directive that I want to test, I tend to start writing tests. I realise this seems obvious, but it is worth noting as I do not tend to do much refactoring before writing tests and I don't tend to write tests before I have something to test. I find it much more useful to get a concept working and then think about what tests should be there and how I can implement those tests. When I find friction in authoring those tests, I identify my refactoring priorities.

Considering the directive presented above, what tests do we need? Here is the list of things that I think should be tested:

  • That the directive exists
  • That the directive compiles
  • That the alert shows when the button is clicked
  • That the alert mentions the field name
  • That the alert mentions the field value

Testing that the directive exists is easy (note that we have to add Directive to the end for the directive to be injected).

describe 'exists', ->
  When => inject (saEditableFieldDirective) =>
    @saEditableField = saEditableFieldDirective
  Then => expect(@saEditableField).toBeDefined()

Checking it compiles is a little more convoluted, but not difficult.

describe 'compiles', ->
  Given => inject ($rootScope) =>
    @scope = $rootScope.$new()
    @scope.field = 'test'
    @htmlFixture = angular.element('<sa-editable-field sa-field-name="Test" ng-model="field"></sa-editable-field>');
  When => inject ($compile) =>
    $compile(@htmlFixture)(@scope)
    @scope.$apply()
  Then => @htmlFixture.find('label').length == 1
  And => @htmlFixture.find('label').text() == 'Test'
  And => @htmlFixture.find('input').length == 1
  And => @htmlFixture.find('button').length == 1

The linking function that $compile returns is called because  $compile can succeed even if our fixture has a typo.

Using knowledge of our directive template, we can verify that the linking worked without going so far as to validate every aspect of the magic Angular does for us. In fact, since this is really intended to test the code that gets called inside the directive when it is linked to a scope, the template for the directive could be as simple as <div></div> (we will take a closer look in a future post at how we can make the directive template replaceable).

Testing the Alert

Testing that the directive exists, compiles and links is relatively straightforward when compared with testing that the alert is shown and shows the right thing. In order to test the alert, we need to be able to invoke showField, the method that shows it. We also need to check that showField actually shows the alert as we would like.

To invoke showField, we might try using the scope that is passed to the link method returned from $compile. Since the method is added to the scope in the controller, this should work, right? Of course not; this directive has an isolate scope and as such the method has been added to its own copy of the passed scope. We can get to that isolate scope from the compiled element using the isolateScope() method;

describe '#showField', ->
  Given => inject ($rootScope) =>
    @scope = $rootScope.$new()
    @scope.field = 'test'
    @htmlFixture = angular.element('<sa-editable-field sa-field-name="Test" ng-model="field"></sa-editable-field>');
  When => inject ($compile) =>
    $compile(@htmlFixture)(@scope)
    @scope.$apply()
  Then => expect(@htmlFixture.isolateScope().showFi

…but I feel like such a test involves too much setup ceremony just to get to the test2 and it relies on too many things outside of just the bit we want to validate. Instead, what if we could get at the controller independently of the directive?

sa.directive('saEditableField', function () {
    return {
        restrict: 'E',
		require: 'ngModel',
        template: '<label>{{fieldName}}</label><input type="text" ng-model="fieldValue" /><button ng-click="showField()">Alert!</button>',
        scope: {
            fieldName: '@saFieldName',
            fieldValue: '=ngModel'
        },
        controller: 'saFieldController'
    };
});

sa.controller('saFieldController', ['$scope', function($scope) {
    $scope.showField = function() {
        window.alert("Your " + $scope.fieldName + " is " + $scope.fieldValue);
    };
}]);

Now our controller is completely separate from the directive, which refers to the controller by name. This means we can write what I feel are clearer directive tests. Using a fake for the controller, we isolate the directive from the real thing and any side-effects it may have;

describe 'saEditableField', ->
  Given -> module ($provide) ->
    fakeFieldController = jasmine.createSpyObj 'saFieldController', ['showField']
    $provide.value 'saFieldController', fakeFieldController;return
  
  describe 'exists', ->
    When => inject (saEditableFieldDirective) =>
      @saEditableField = saEditableFieldDirective
    Then => expect(@saEditableField).toBeDefined()
      
  describe 'compiles', ->
    Given => inject ($rootScope) =>
      @scope = $rootScope.$new()
      @scope.field = 'test'
      @htmlFixture = angular.element('<sa-editable-field sa-field-name="Test" ng-model="field"></sa-editable-field>');
    When => inject ($compile) =>
      $compile(@htmlFixture)(@scope)
      @scope.$apply()
    Then => @htmlFixture.find('label').length == 1
    And => @htmlFixture.find('label').text() == 'Test'
    And => @htmlFixture.find('input').length == 1
    And => @htmlFixture.find('button').length == 1

…and now the controller can have its own tests too;

describe 'saFieldController', ->
  describe 'exists', ->
    Given => inject ($rootScope) =>
      @scope = $rootScope.$new()
    When => inject ($controller) =>
      @saFieldController = $controller 'saFieldController', { $scope: @scope }
    Then => expect(@saFieldController).toBeDefined()
      
  describe '#showField', ->
    describe 'exists', ->
      Given => inject ($rootScope) =>
        @scope = $rootScope.$new()
      When => inject ($controller) =>
        @saFieldController = $controller 'saFieldController', { $scope: @scope }
      Then => expect(@scope.showField).toEqual jasmine.any(Function)

$window

However, we are not quite finished. How do we know that the alert is shown when our showField method is called? We could spy on the global window object, but that's not really very Angular-y and our alert will get shown during testing (goodness knows what other side-effects we might face by using the global window object). What we need is an injectable version of window that we can replace with a fake during our tests. Not unsurprisingly, AngularJS has us covered with the $window service.

sa.controller('saFieldController', ['$scope', '$window', function($scope, $window) {
    $scope.showField = function() {
        $window.alert("Your " + $scope.fieldName + " is " + $scope.fieldValue);
    };
}]);

Now with our controller rewritten to use $window, we can tidy up and complete its test cases.

describe 'saFieldController', ->
  Given -> module ($provide) ->
    $provide.value '$window', jasmine.createSpyObj('$window', ['alert']);return
      
  describe 'exists', ->
    Given => inject ($rootScope) =>
      @scope = $rootScope.$new()
    When => inject ($controller) =>
      @saFieldController = $controller 'saFieldController', { $scope: @scope }
    Then => expect(@saFieldController).toBeDefined()
      
  describe '#showField', ->
    describe 'exists', ->
      Given => inject ($rootScope) =>
        @scope = $rootScope.$new()
      When => inject ($controller) =>
        @saFieldController = $controller 'saFieldController', { $scope: @scope }
      Then => expect(@scope.showField).toEqual jasmine.any(Function)
        
    describe 'calls $window.alert', ->
      Given => inject ($rootScope, $controller, $window) =>
        @scope = $rootScope.$new()
        @windowService = $window
        @saFieldController = $controller 'saFieldController', { $scope: @scope }
      When => @scope.showField()
      Then => expect(@windowService.alert).toHaveBeenCalled()
      
    describe 'alert includes $scope.fieldName', ->
      Given => inject ($rootScope, $controller, $window) =>
        @scope = $rootScope.$new()
        @scope.fieldName = "Test Name"
        @windowService = $window
        @saFieldController = $controller 'saFieldController', { $scope: @scope }
      When => @scope.showField()
      Then => expect(@windowService.alert.calls.mostRecent().args[0]).toMatch /.*Test Name.*/
        
    describe 'alert includes $scope.fieldValue', ->
      Given => inject ($rootScope, $controller, $window) =>
        @scope = $rootScope.$new()
        @scope.fieldValue = "Test Value"
        @windowService = $window
        @saFieldController = $controller 'saFieldController', { $scope: @scope }
      When => @scope.showField()
      Then => expect(@windowService.alert.calls.mostRecent().args[0]).toMatch /.*Test Value.*/

And there you have it. Some simple steps that make unit testing directives a little easier.

Finally…

In this post, we have taken a very brief look at how to structure a directive to simplify unit testing by separating the directive declaration from its controller and taking advantage of Angular services such as $window.

Although we have not covered some of the more complex directive concepts such as the link function and DOM manipulation3, these simple steps should take you a long way towards providing better test coverage of your AngularJS widgets.

Until next time, take care and don't forget to leave a comment.

  1. Not unexpected since I wrote it to discuss these things []
  2. we have to compile a fixture with a scope and then get the isolate scope from the element []
  3. I may cover that in a future post if there is interest or the whim takes me []

Testing AngularJS: inject, spies and $provide

Testing is an important part of software development. To a software developer, automating that testing is an important part of software development, that is because to a software developer (at least one like me) testing is boring…unless we can make it seem like software development.

In my last few posts on AngularJS we looked at a way to monitor HTTP activity and guard against page navigation when requests were pending. However, we didn't validate that the code actually worked. Fortunately, the great ways to encapsulate client-side business logic and isolate it from the user experience that AngularJS provides, coupled with excellent support from angular-mocks, make testing AngularJS easy. In this post, we will take a glimpse at how.

Jasmine, CoffeeScript and Chutzpah

There are a few approaches to JavaScript testing, but they usually involve the same general components; a test framework, a test runner, and a test language. Thankfully (for me and you), this post is not an exhaustive discussion of testing options or their pros and cons. Instead, I will be stating what I use and assuming that they are the best choice1. A great place to start is the JavaScript Testing Tactics presentation from Justin Searls, which can be found here along with other talks he has given.

Based on Justin's testing tactics, which I saw at SEMjs, I write all my tests using Jasmine, CoffeeScript and jasmine-given.  The outcome is a terse testing DSL2 that is low on ceremony and high on readability3.

Chutzpah

While it is common on greenfield projects to use a test runner such as Karma launched by Gulp or Grunt, I started my work on a legacy project where the build process was maintained using Visual Studio and MSBuild. Chutzpah is a suite of tools that fits this development process nicely, including a test runner as a NuGet package and some simple Visual Studio integration via extensions.

In addition, Chutzpah supports multiple testing frameworks4, multiple languages5 and code coverage metrics using Blanket.js. Basically, Chutzpah is awesome; fact.

Testing an Angular Factory

With our test framework, test runner and test language selected, we can look at our first test.  We are going to test saHttpActivityInterceptor and the very first thing we should test is that saHttpActivityInterceptor  actually exists. The following test does exactly that.

###
## <reference path="../angular-sa.js"/>
###

describe 'saHttpActivityInterceptor', ->
  Given -> module 'somewhatabstract'
  describe 'exists', ->
    When => inject (saHttpActivityInterceptor) =>
      @saHttpActivityInterceptor = saHttpActivityInterceptor
    Then => expect(@saHttpActivityInterceptor).toBeDefined()

Just as with AngularJS implementations, AngularJS tests start with some setup: a reference path to the file under test (other files such as the Jasmine framework, AngularJS and angular-mocks are included via the Chutzpah configuration file), a  describe call under which to group all tests for  saHttpActivityInterceptor, and a Given call that ensures the somewhatabstract module is loaded at the start of each child test (the module method is provided by Angular Mocks).

The actual unit test is declared starting at line 7 with describe 'exists', ->. This test is very simple; it states that when we try to inject our factory, we should get something other than undefined. The => syntax in CoffeeScript (also known as "fat arrow" syntax6) ensures that the When and Then calls share the same this context so that the @saHttpActivityInterceptor variable is shared between them (the @ symbol preceeding a variable in CoffeeScript indicates a context-level variable). The value stored in the @saHttpActivityInterceptor variable is obtained by asking AngularJS to inject it using the inject function, a helpful utility from angular-mocks.

This test works, you can verify it easily by commenting out the interceptor declaration in the JavaScript file we referenced7, but it is not a great test. If saNavigationGuard  does not exist, this test will fail, yet our interceptor still exists. What we have done is create a simple integration test instead of a unit test; we need to isolate the thing under test, saHttpActivityInterceptor, from its dependency, saNavigationGuard.

inject and $provide

To isolate our item under test, we need to provide our own version of saNavigationGuard . We can do this using a fake; an object that pretends to be the real thing. We will use a Jasmine spy as a fake to represent saNavigationGuard and then provide it to AngularJS using the $provide  service8. Because AngularJS uses the most recent definition when injecting dependencies and because our newly created spy is the most recent definition of saNavigationGuard, it is that spy which ultimately gets injected into saHttpActivityInterceptor when the test runs.

###
## <reference path="../angular-sa.js"/>
###

describe 'saHttpActivityInterceptor', ->
  Given -> module 'somewhatabstract'
  Given -> module ($provide) ->
    fakeNavigationGuard = jasmine.createSpyObj 'saNavigationGuard', ['registerGuardian']
    $provide.value 'saNavigationGuard', fakeNavigationGuard;return
      
  describe 'exists', ->
    When => inject (saHttpActivityInterceptor) =>
      @saHttpActivityInterceptor = saHttpActivityInterceptor
    Then => expect(@saHttpActivityInterceptor).toBeDefined()

Not only are we now isolating saHttpActivityInterceptor , but because our fake is being used in place of the real saNavigationGuard, we can check that any guardian registered with our fake works properly9.

###
## <reference path="../angular-sa.js"/>
###

describe 'saHttpActivityInterceptor', ->
  Given -> module 'somewhatabstract'
  Given -> module ($provide) ->
    fakeNavigationGuard = jasmine.createSpyObj 'saNavigationGuard', ['registerGuardian']
    $provide.value 'saNavigationGuard', fakeNavigationGuard;return
      
  describe 'exists', ->
    When => inject (saHttpActivityInterceptor) =>
      @saHttpActivityInterceptor = saHttpActivityInterceptor
    Then => expect(@saHttpActivityInterceptor).toBeDefined()
      
  describe '#guardian', ->
    describe 'is registered', ->
      Given => inject (saNavigationGuard) =>
        @saNavigationGuard = saNavigationGuard
      When => inject (saHttpActivityInterceptor) =>
      Then => expect(@saNavigationGuard.registerGuardian).toHaveBeenCalledWith jasmine.any(Function)
      
    describe 'returns undefined when there are no pending requests', ->
      Given => inject (saNavigationGuard) =>
        saNavigationGuard.registerGuardian.and.callFake (guardian) => @guardian = guardian
        inject (saHttpActivityInterceptor) =>
      When => @actual = @guardian()
      Then => expect(@actual).toBeUndefined()
    
    describe 'returns message when there are pending requests', ->
      Given => inject (saNavigationGuard) =>
        saNavigationGuard.registerGuardian.and.callFake (guardian) => @guardian = guardian
        inject (saHttpActivityInterceptor) => saHttpActivityInterceptor.request { method: "POST" }
      When => @actual = @guardian()
      Then => expect(@actual).toBeDefined()

And there we have it, a little test suite that validates the saHttpActivityInterceptor, almost. You may note that to test the guardian, we had to actually use one of the factory functions, request, but how do we know that the request function works if we haven't tested it? We should add some tests, but since we can only check the functionality of requestresponse, and responseError via the guardian call and we can only check the guardian call via the functionality of those other methods, we don't have a good way to gain high confidence in the functionality of any of these methods. Therefore, if we really wanted to test this effectively, we need to refactor the count functionality into its own factory. That way we can inject and validate the count state independently of the thing under test. For now, that's an exercise for another time.

Finally…

In this post, I have shown how we can test a simple AngularJS factory using Jasmine, Jasmine-Given and the built-in testing support of the AngularJS framework via Angular Mocks; specifically, module,  inject and $provide.

While not exhaustive, I hope this look at testing Angular-based code encourages you to begin testing your own applications. Code discussed in this and earlier related posts can be found in a repository on GitHub.  The repository includes a Visual Studio solution and project to run the tests, including NuGet and Bower restore to get the appropriate packages for running the tests. I intend to expand the code in GitHub as I write more blogs on AngularJS and AngularJS testing.

In the next post, we will take a look at how I structure directives to simplify testing and what that testing looks like. We might even see some of the cooler testing tricks for AngularJS that enable us to synchronously test asynchronous operations and validate web requests. Until then, feel free to ask questions in the comments and carry on coding.

  1. I recommend that you investigate for yourself before choosing what works best for you and your development processes []
  2. Domain-specific Language []
  3. IMHO YMMV []
  4. Jasmine, QUnit and Mocha []
  5. CoffeeScript, TypeScript or plain old JavaScript []
  6. Be careful when using this "fat arrow" syntax – sharing context across unit tests can cause side-effects including false pass and fail results []
  7. Go on, try it. The code is on GitHub []
  8. Make sure to use $provide before any calls to inject []
  9. Though we could also have done this by spying on the real saNavigationGuard.registerGuardian function using Jasmine's spyOn function, such an approach assumes the remainder of saNavigationGuard has no unwanted side-effects, which is not necessarily true []

Track pending web requests with AngularJS

Navigation Guard

In the previous two posts (here and here), I covered the AngularJS factory, saNavigationGuard that I had created. This factory provides a simple way to guard against inconvenient page navigation in our Angular applications. However, up until now, I have not demonstrated one of the coolest uses for this. Before we look at this awesome use of saNavigationGuard, let us take a short trip into late last year.

I was getting started on my first big project with AngularJS and I had added a busy indicator to my user experience. To control when the indicator was active, I used a counter. This counter was incremented and decremented before and after using Angular resources. It was a nest of promises and error handlers, just to make sure the counter worked properly. I was not entirely happy with it but it was the best I could work out from my knowledge of Angular and JavaScript, so I submitted a pull request. My colleague reviewed the work and, looking at the busy indicator and the code to control the counter, stated, "there must be a better way."

I did not know at the time, but he was right, there is a better way and it uses an Angular feature called "interceptors".

Interceptors

Interceptors provide hooks into web requests, responses and their errors allowing us to modify or handle them in different ways. They are provided via an AngularJS provider such as a factory or service and injected into the $httpProvider using config as follows.

angular.module('somewhatabstract').config(['$httpProvider', function($httpProvider) {
	$httpProvider.interceptors.push('saHttpActivityInterceptor');
}]);

In this snippet, the name of the interceptor, saHttpActivityInterceptor, is added to the array of interceptors on $httpProvider.

The interceptor itself is a little more complex.

angular.module('somewhatabstract').factory('saHttpActivityInterceptor', ['$q', 'saNavigationGuard', function($q, saNavigationGuard) {
	var pendingRequestsCounter = 0;

	var updateCounter = function(method, delta) {
		if (method != 'POST' && method != 'PUT' && method != 'DELETE') {
		    return false;
		}
		pendingRequestsCounter += delta;
		return true;
	};

	saNavigationGuard.registerGuardian(function() {
		return pendingRequestsCounter > 0 ? 'There are changes pending.' : undefined;
	});

	return {
		request: function(request) {
			request.saTracked = updateCounter(request.method, 1);
			return request;
		},

		response: function(response) {
			if (response.config && response.config.saTracked) {
				updateCounter(response.config.method, -1);
			}
			return response;
		},

		responseError: function(rejection) {
			if (rejection.config && rejection.config.saTracked) {
				updateCounter(response.config.method, -1);
			}
			return $q.reject(rejection);
		}
	};
}]);

The interceptor factory returns an object that, in this case, has three methods: request, response and responseError. A fourth method, requestError, can also be included in interceptors if needed. Before returning our interceptor, the interceptor factory registers a guardian with saNavigationGuard that will guard against navigation if the pendingRequestsCounter is greater than zero.

The interceptor monitors requests and responses. On each request, the request method is checked, if it is POST, PUT or DELETE, the pendingRequestsCounter variable is incremented by one and the request is tagged to indicate it is being tracked. We flag it so that we know to pay attention when the corresponding response or response error occurs. In the response and response error handlers, we decrement our counter based on the tracking flag and the method.

Finally…

The outcome of using this interceptor is that if the user tries to navigate away from the page after a request has been made but before its response has been received, they will see a message asking them to consider postponing the navigation.

In the next post, we will look at testing both this interceptor and the saNavigationGuard functionality using my preferred combination of jasmine, CoffeeScript and jasmine-given.

As always, please consider leaving a comment if you have found this post useful or have any alternatives.